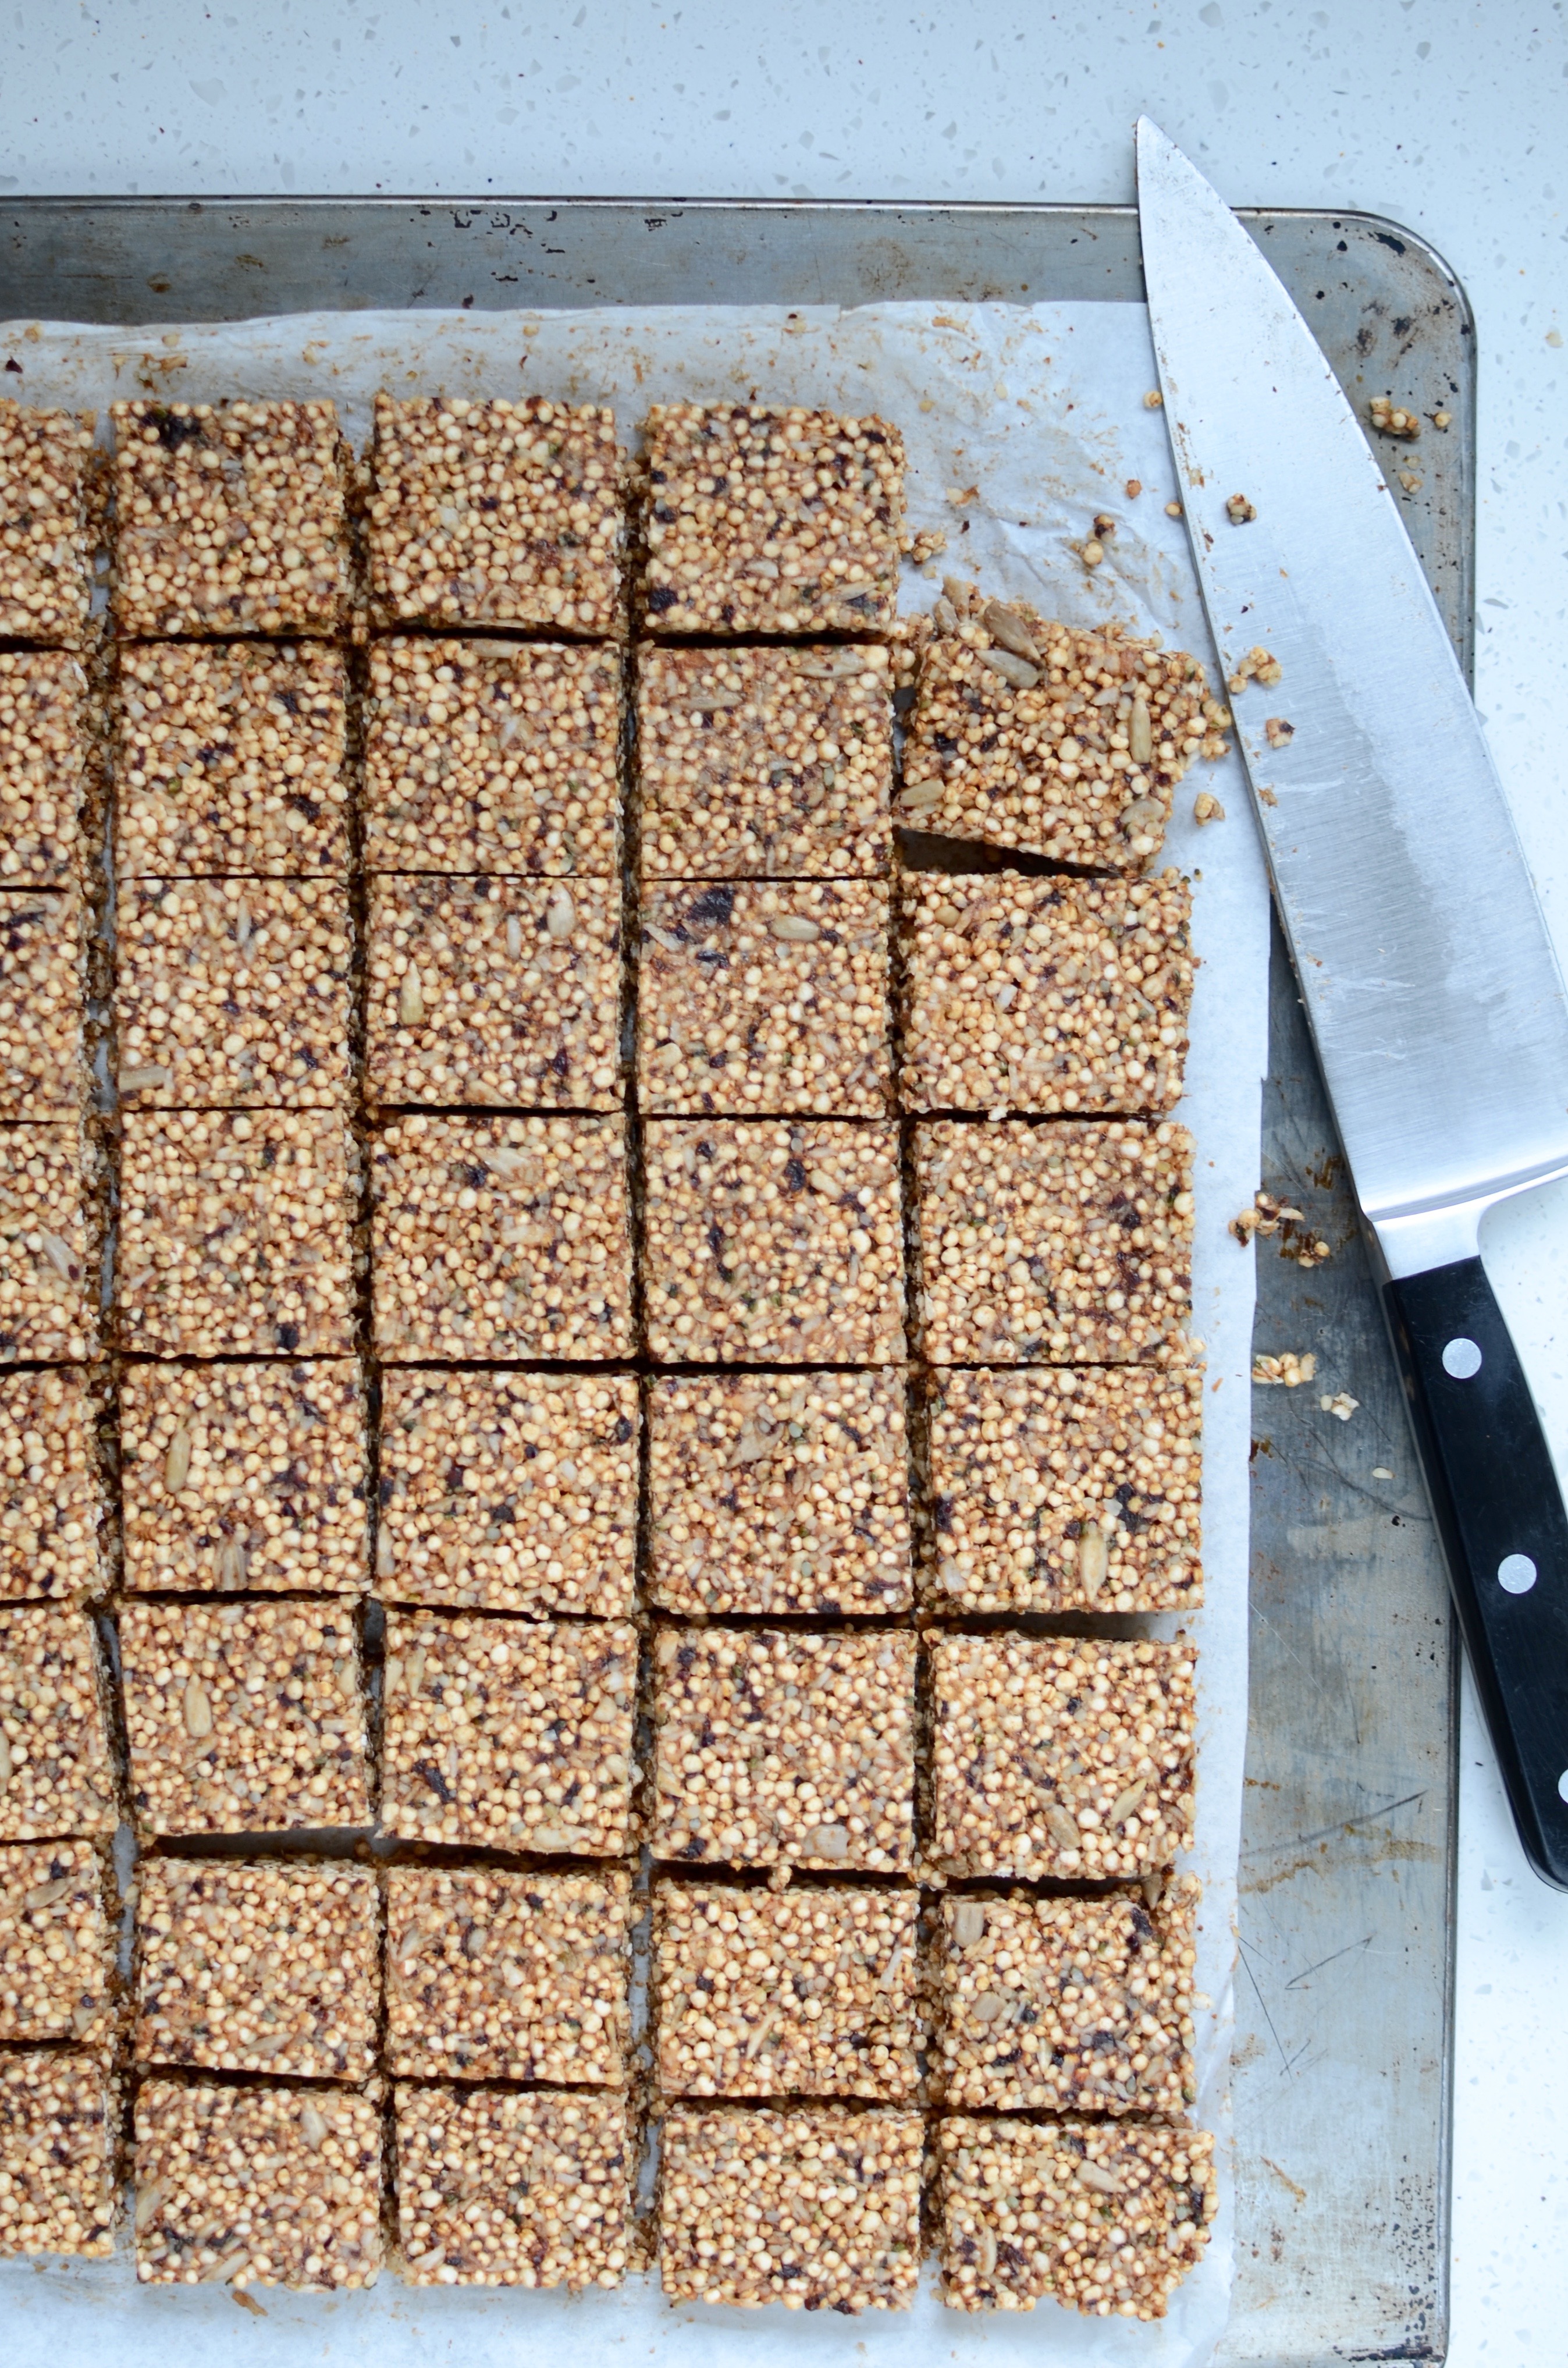
Puffed quinoa squares
A relative unknown a few years ago, South American-born Quinoa has since crept into our hearts and is unlikely to disappear anytime soon. This little pseudo-grain is very nutritious, rich in protein and gluten-free to boot, making it an ideal addition to any meal. It is most often cooked and prepared in the same way as rice, but I love grinding and making a delicious breakfast porridge with it. You can also make puffed quinoa as if you were making popcorn. Heat a large heavy bottomed pot (cast iron ones work best) and add about half a cup of quinoa. Keep shaking the pot until most of the seeds have popped. If your pot is deep enough, you won’t need a lid to keep the little nippers at bay. Tip them out onto a baking sheet to cool and use in muesli, as a topping on yoghurt or in recipes such as these squares below.

Puffed quinoa squares
The squares make an excellent after-school snack, as they are a mini version of a complete meal.
Makes about 40
Ingredients
200g (1 1/2 loosely packed cups) soft, dried prunes
125ml coconut water, at room temperature and preferably raw (i.e. unpasteurised)
150ml (125g or 1/2 cup plus 2 tablespoons) liquid coconut oil
125ml (1/2 cup) raw honey
Pinch of sea salt
5 cups puffed quinoa (home-made or store-bought)
90g (1 cup) toasted desiccated coconut
70g (1/2 cup) shelled hemp seeds
70g (1/2 cup) shelled sunflower seeds
Method
- Soak the prunes in the coconut water whilst you get your other ingredients together.
- In a powerful blender, blend the prunes, coconut water and enough of the coconut oil to give you a smooth paste. Scrape into a bowl.
- Add the rest of the oil, honey, salt, quinoa, desiccated coconut and seeds, and stir until well combined. Your mixture needs to be sticky and hold together when pressed.
- Line a 34cm x 26cm (9” x 13”) tin or oven dish with greaseproof paper, then press the mixture into the tin and refrigerate until set (at least a couple of hours).
- Turn out onto a chopping board and cut into squares. They will keep a week or so in the fridge, and freeze really well.
Red Velvet Ice Cream Sandwiches
If you have never tasted a slice of red velvet cake with cream cheese frosting, you may not understand what all the fuss is about. Its intriguing name refers partly to its smooth and velvety texture, and partly to the sensual red colour, which is achieved in most modern recipes by adding (lots of) red food colouring to a chocolate cake batter.
Both these features were, however, originally due to the reaction of an acid (like vinegar or buttermilk) with the cocoa powder in the batter, which not only created bubbles and aeration, but also enhanced the red anthocyanin in the cocoa, a compound (also found in foods like red cabbage) that gets more red in the presence of strong acids. However, these days most cocoa powder undergoes Dutch processing, where an alkalizing agent is added to neutralise its acidity. Hence the need for (lots of) red colouring was created amongst bakers, and expertly fulfilled in the US by Adams Extract, a Texan company with good marketing sense.
But now for the really interesting bit. For our purposes today, at least. During the Second World War, bakers used reduced beet juice to enhance the colour (and texture) of their cakes, including the infamous Red Velvet cake, and give otherwise cheap bakes a dramatic appearance. Ah ha! As you know, adding vegetables to any kind of dish is my forte, so I present to you: the very beet-y red velvet ice cream sandwich.
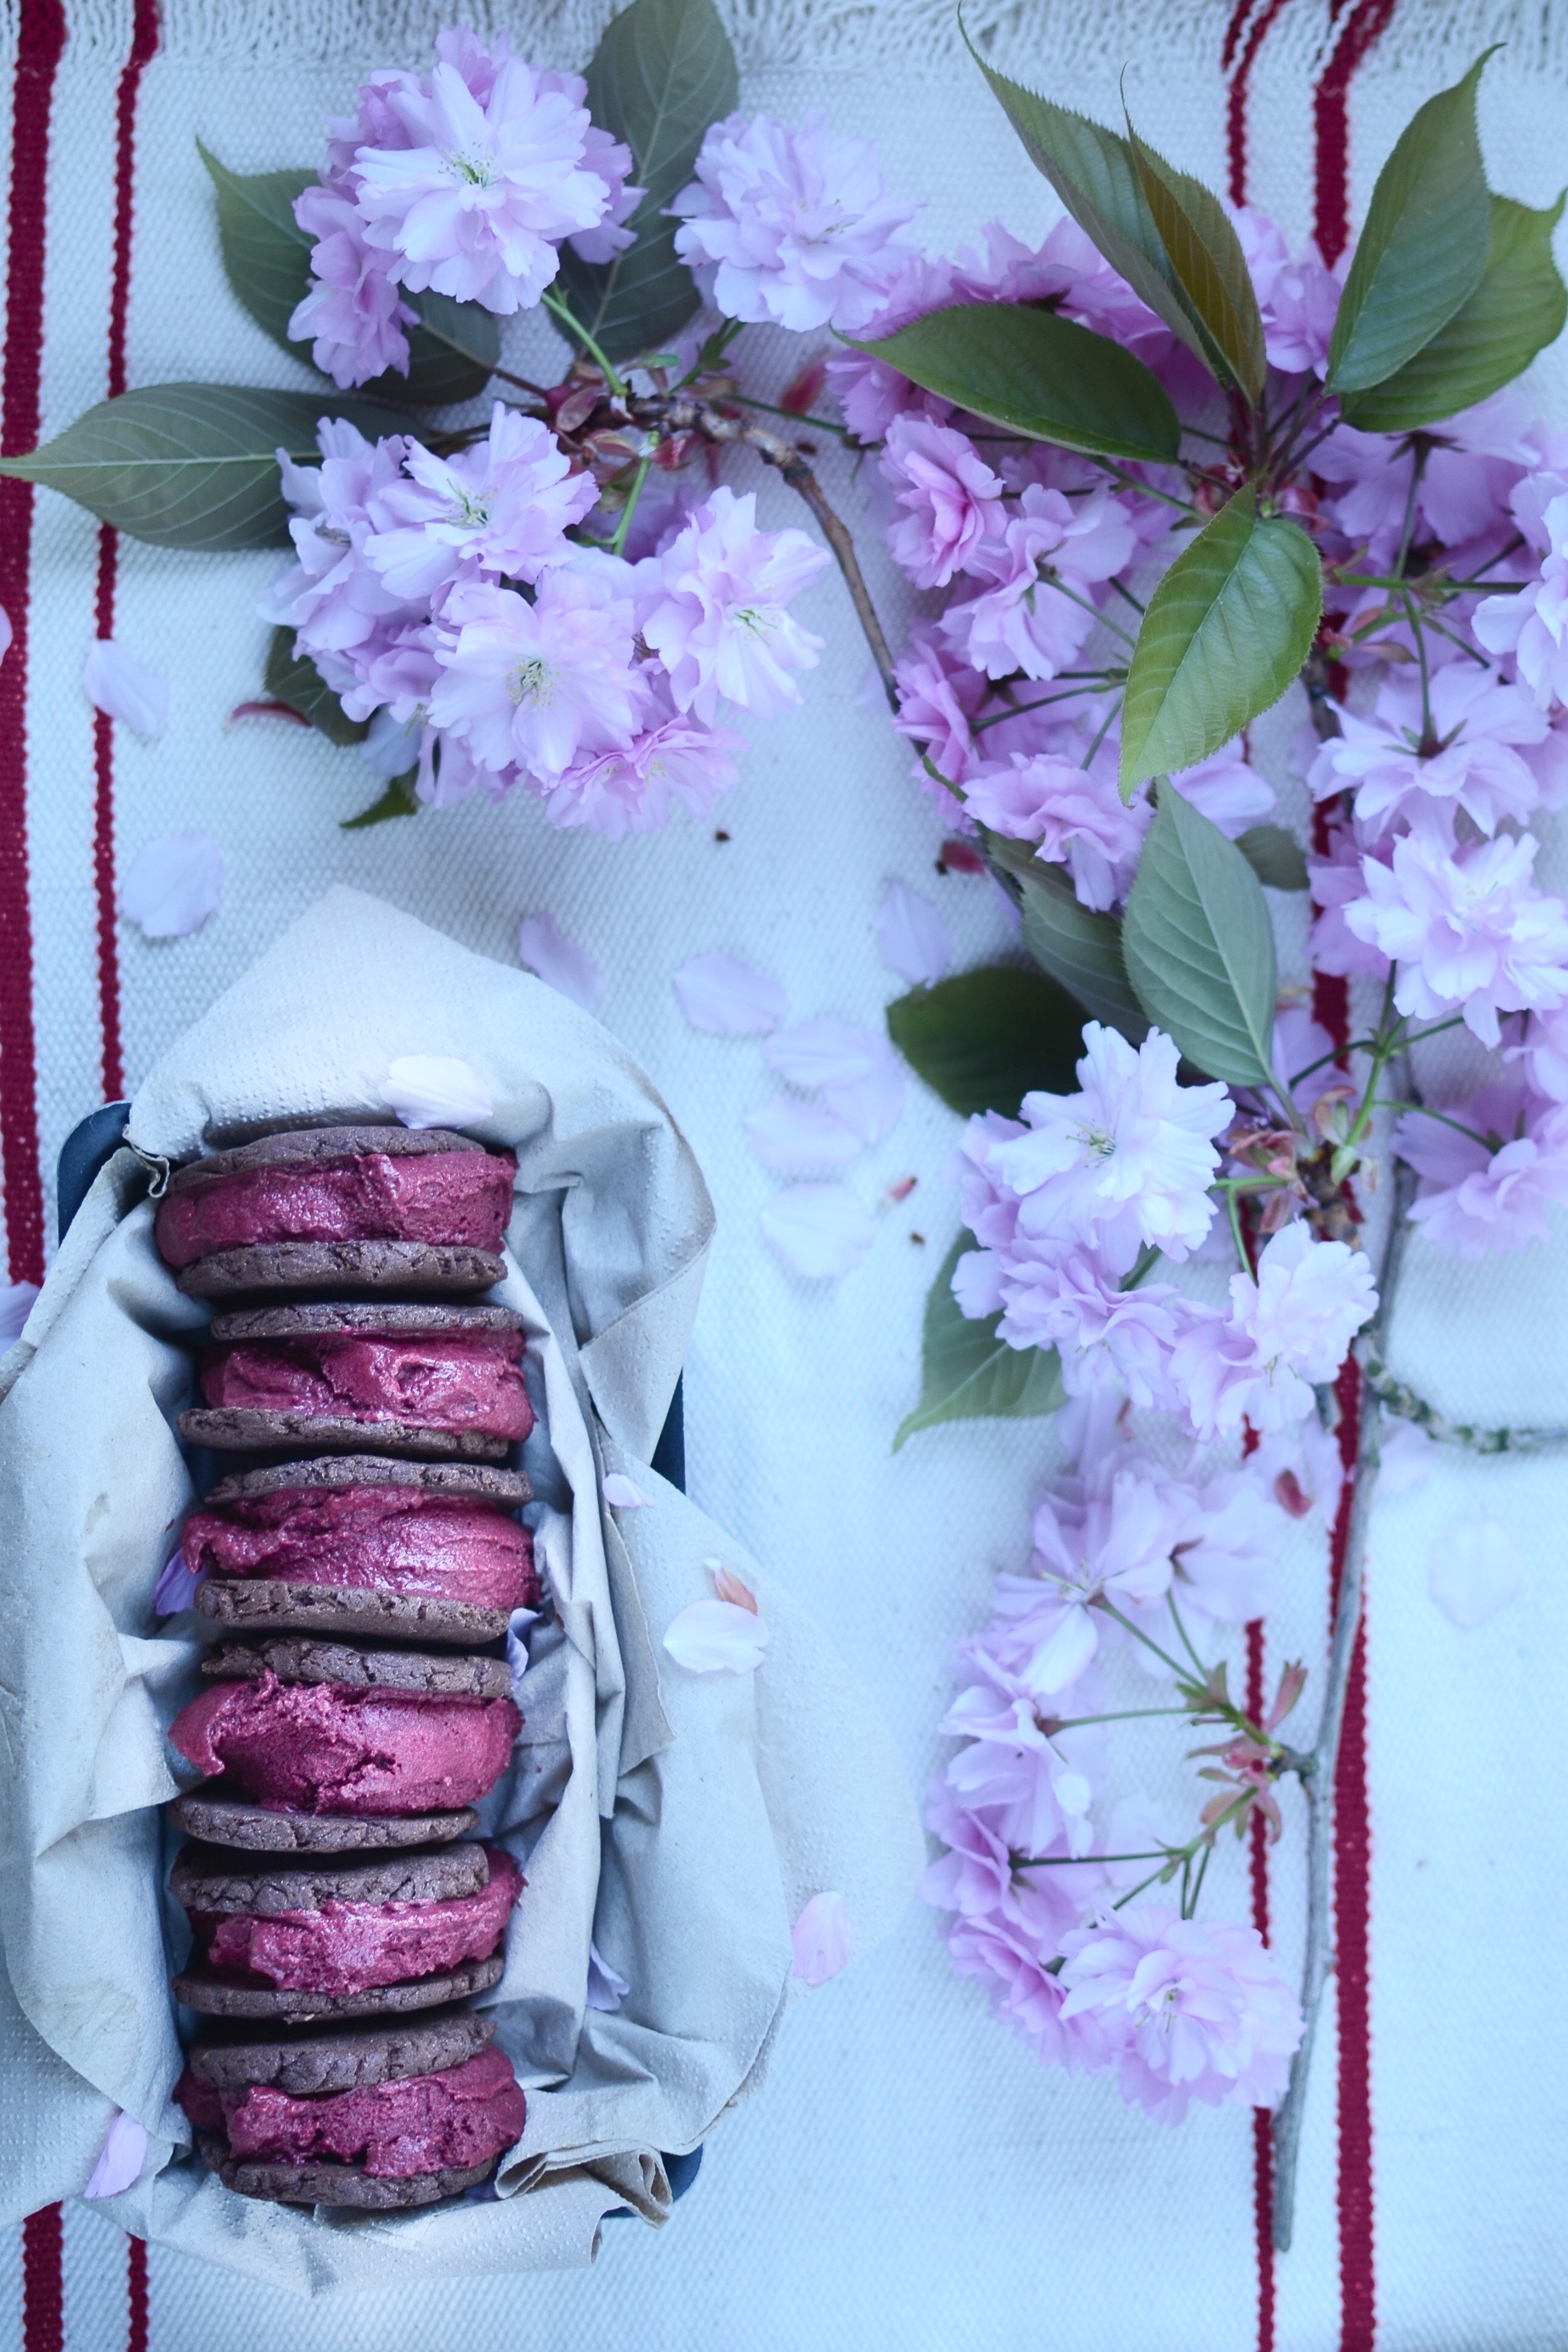
Red velvet ice cream sandwiches
These sandwiches are a beguiling mix of earthy, sweet, cool and chewy. I used buckwheat flour to keep it gluten-free, but if you are not a fan of the taste, use stoneground spelt flour instead. Be sure to freeze the sandwiches until firm, or else you will end up with more ice cream on your shirt than between your biscuits!
Makes 8 sandwiches
Ingredients for the ice cream
200g roasted beetroot (about 500g peeled, raw beetroot)
1 whole vanilla pod
1 can coconut milk, gently warmed to melt the fat
60ml (1/4 cup) raw honey, plus a little extra to taste
flesh of 1/2 ripe avocado (about 50g)
15g (2 tablespoons) organic unsweetened cocoa powder
7g (1 tablespoon) arrowroot powder, dissolved in 15ml (1 tablespoon) water
Ingredients for the cookies
1 tablespoon ground golden linseeds (flax seeds)
60ml (1/4 cup) milk of your choice
60ml (1/4 cup) melted coconut oil
60g (1/2 cup) coconut blossom sugar
1 teaspoon good quality vanilla extract
30g (1/4 cup) organic unsweetened cocoa powder
1/2 teaspoon baking powder
pinch of sea salt
160g (1 cup) buckwheat flour
Method
- For the ice cream: put all the ingredients, except 2/3 of the coconut milk and the arrowroot powder slurry, in a blender and blend until smooth. Set aside. (If you do not have a high speed blender, scrape out the seeds of the vanilla pod and only use these – pop the pod in your coffee or sugar pot.)
- Whisk the arrowroot slurry into the rest of the gently warmed coconut milk. As soon as it thickens, remove from the heat, and once cooled, add the beetroot mix and whisk. Refrigerate until cold.
- For the cookies: whisk the ground linseeds and milk together. Set aside for a few minutes to allow it to swell.
- Whisk the oil and sugar together until light and frothy. Add the vanilla & linseed mix, then sift the dry ingredients into the wet. Mix together briefly until you have a ball of dough.
- Using a small ice cream scoop or a tablespoon, scoop 16 dough balls onto a baking sheet (no need to grease) and flatten each ball (I use a small palette knife to do this).
- Bake for 10 minutes at 180°C/360°F. Allow to cool slightly before transferring to a cooling rack.
- For the sandwiches: churn the refrigerated ice cream mixture in your ice cream maker.
- Transfer the soft ice cream to a shallow container that will yield a slab of ice cream 3 – 4 cm thick. Pop it in the freezer until almost solidly frozen, then use a cookie cutter the same size as your cookies to cut out ice cream rounds and place between two cooled cookies. You could also remove the ice cream slightly earlier and use an ice cream scoop to place one scoop between two cookies and press down lightly.
- If you would like to make these ahead of time, put the sandwiches in a container in the freezer and remember to take them out at least 5 – 10 minutes before eating.
Note:
To roast the beetroot, scrub clean, peel and cut into medium dice. Toss lightly in melted coconut oil and roast at 180°C/360°F until tender (about 1 hour), turning every so often. Be careful not to let them burn.
If you do not own an ice cream maker, you can make the ice cream by freezing the mixture and whisking it every 30 minutes or so, to prevent the formation of ice crystals.

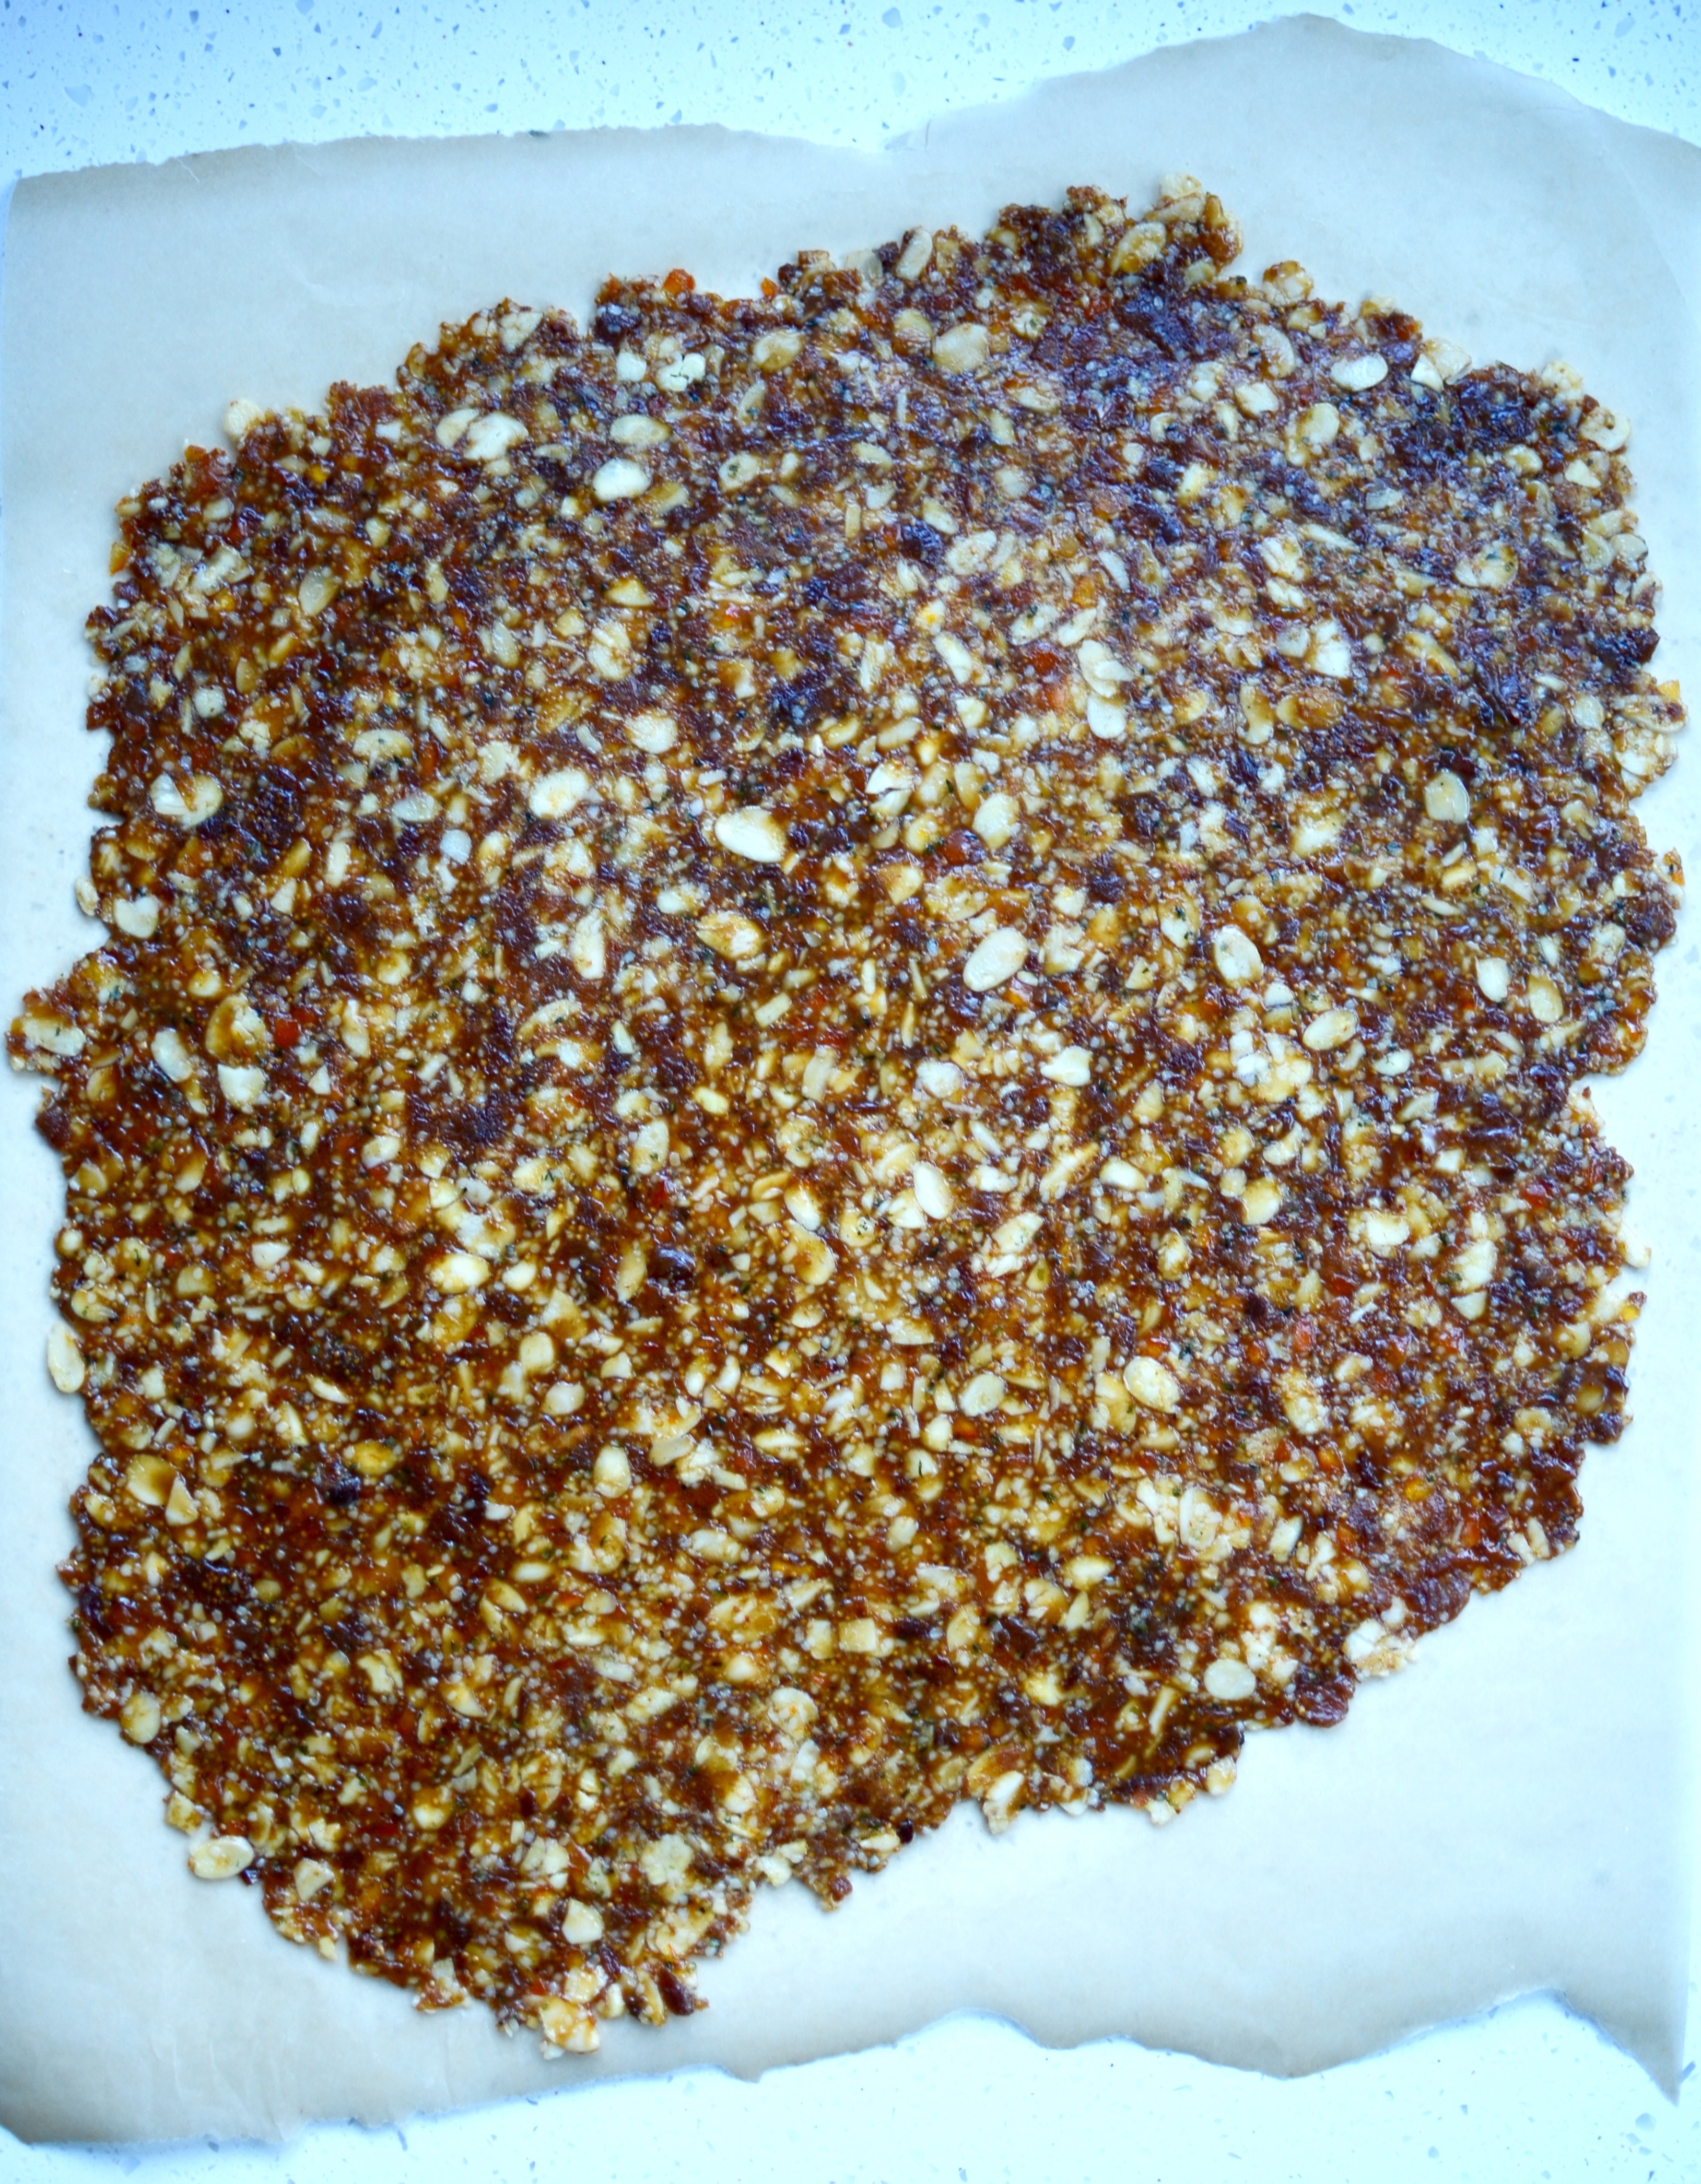
Chewy almond and fig thins
It doesn’t really matter when you make these, but you should! They are rather easy to throw together and definitely hit the spot when you need a little something to cheer up your darling (or yourself!). If you can’t find matcha powder, use a few drops of beetroot juice instead, to colour the chocolate pink.
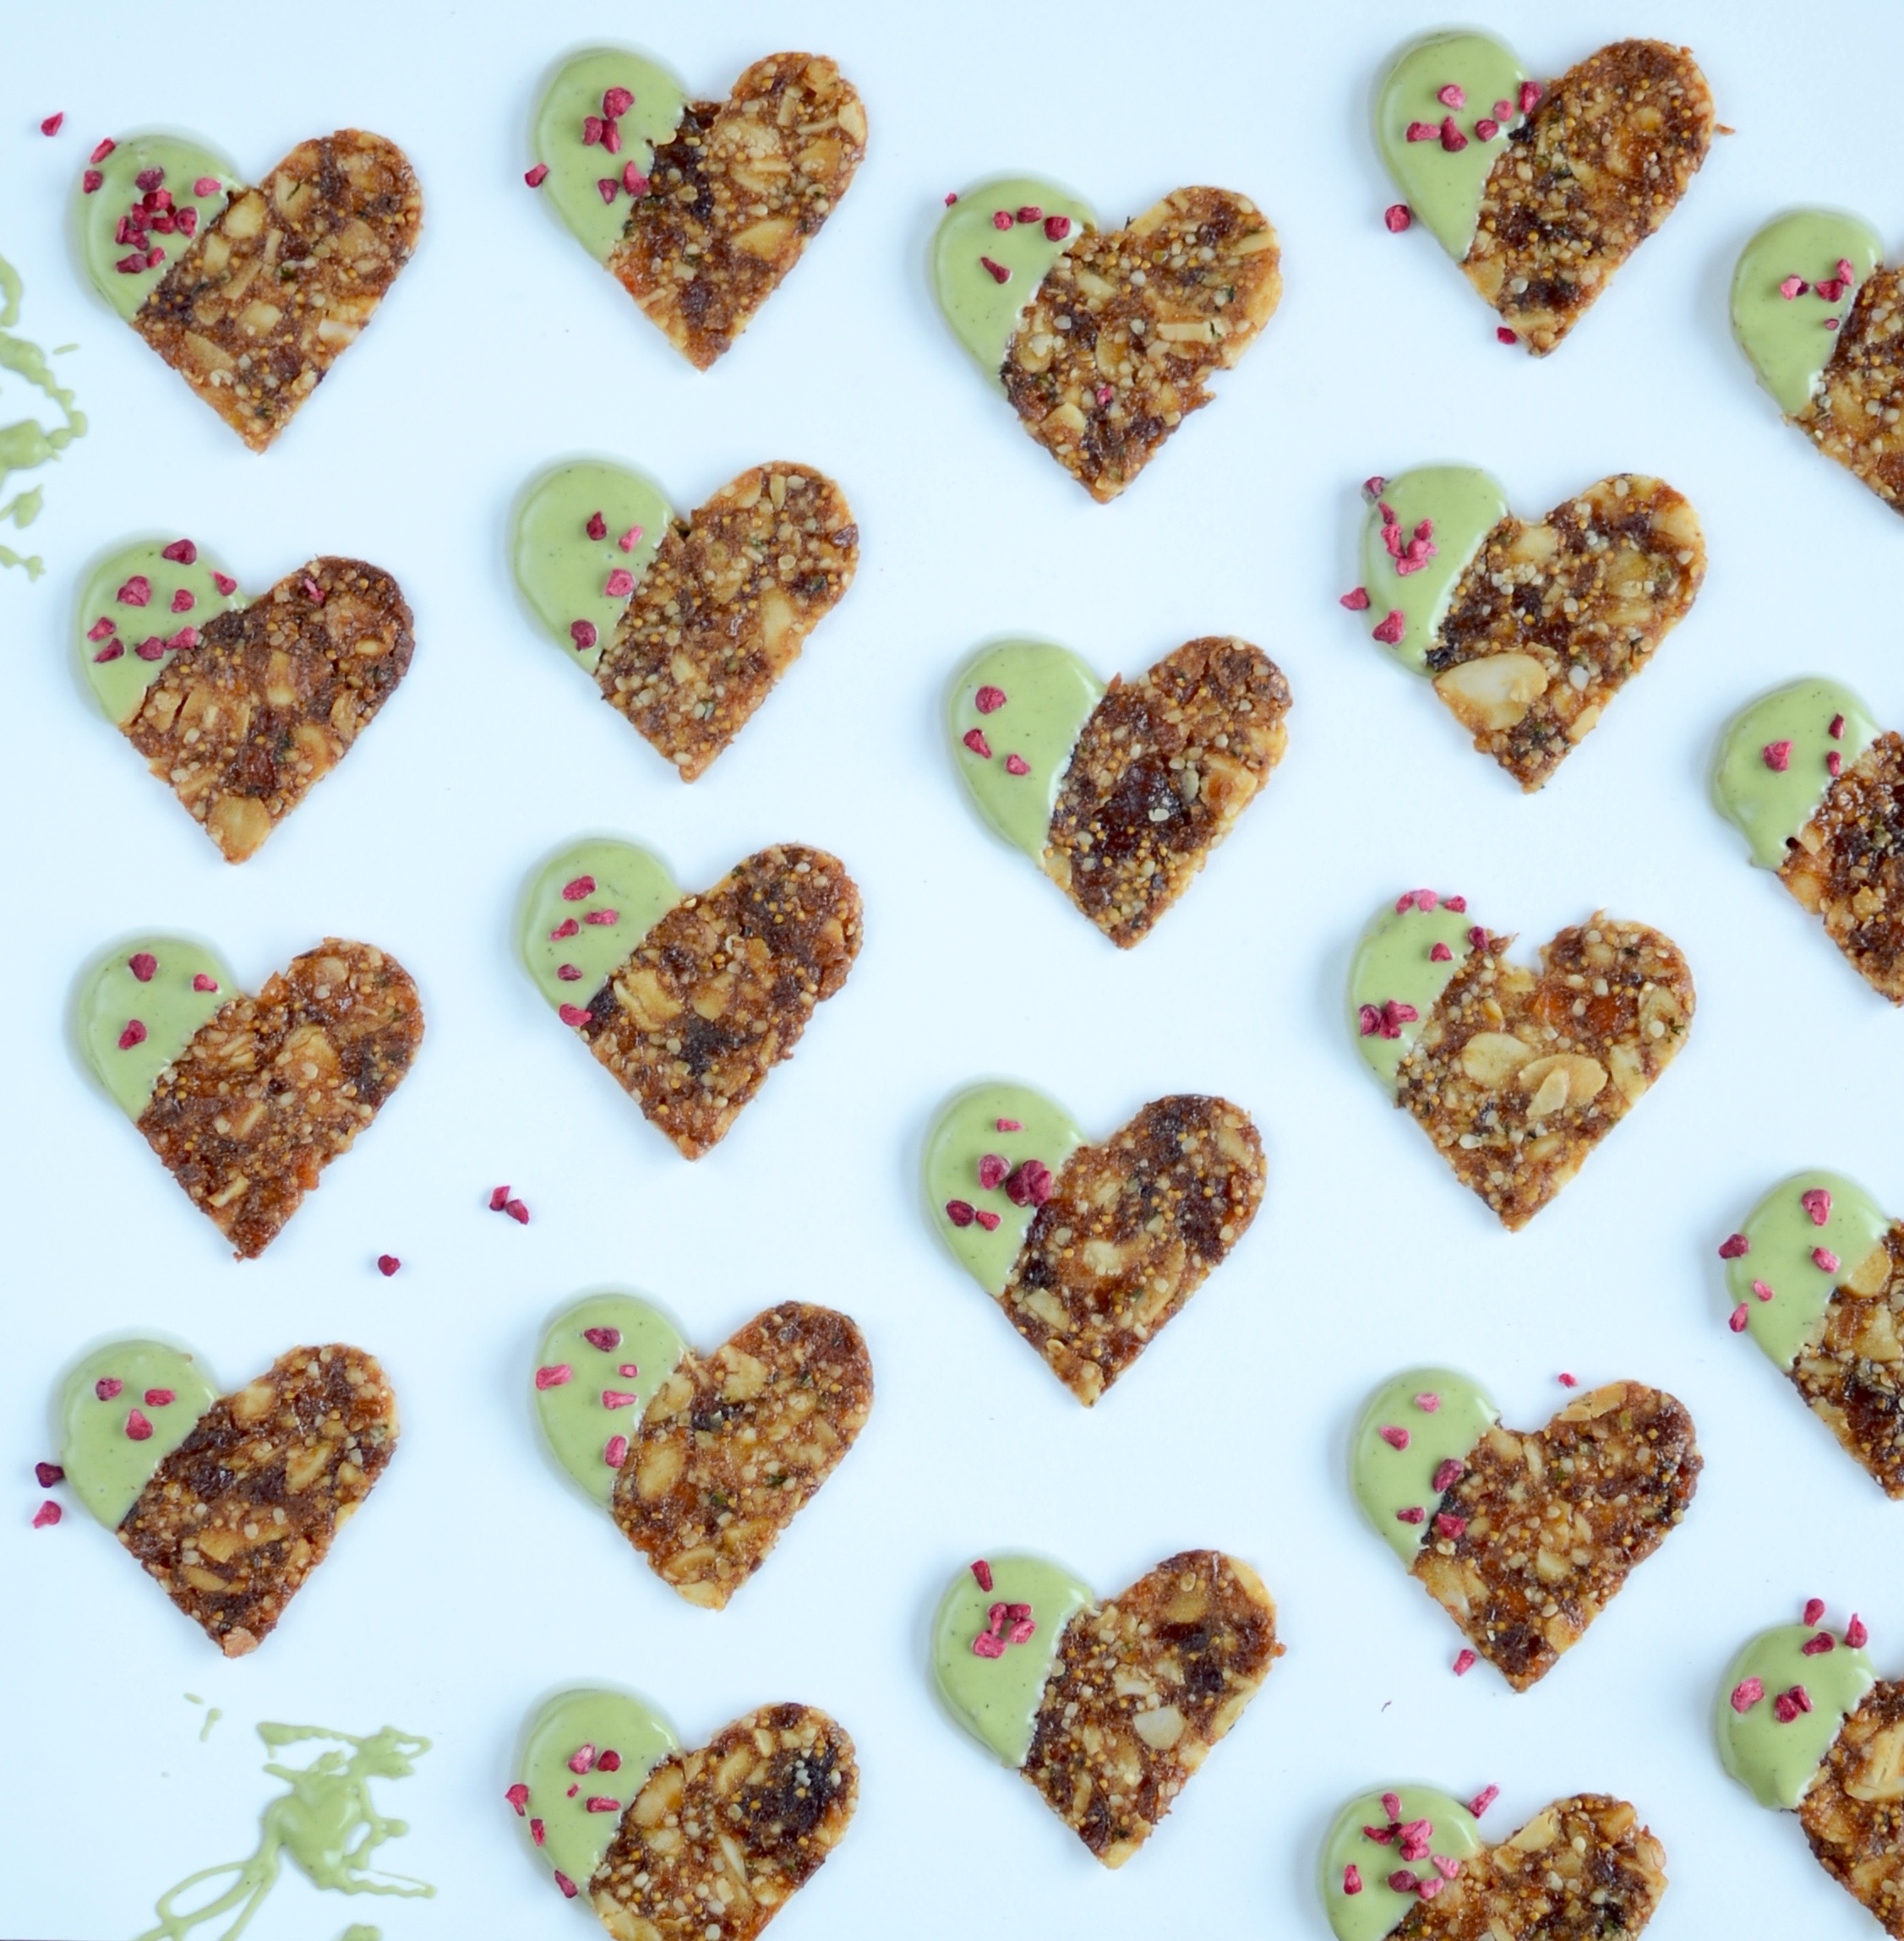
Chewy almond and fig thins
Ingredients
50g unsalted organic butter (or coconut oil)
50g coconut palm sugar (or you could use demarara sugar)
Pinch of sea salt
65g orange marmalade, very finely chopped
100g soft dried figs, finely chopped
80g flaked blanched almonds
30g shelled hemp seeds (also called hemp hearts)
25g brown rice flour
For the chocolate drizzle
100g organic white chocolate, broken into pieces
matcha powder (roughly 1 teaspoon)
freeze-dried raspberries or additional hemp hearts
Method
- Pre-heat the oven to 180°C/350°F and line two baking trays with parchment paper.
- Melt the butter and palm sugar in a small pan over a medium heat until the sugar is dissolved. Add the salt, give it a stir and set aside.
- Put the rest of the ingredients in a bowl and using a tablespoon, press everything against the sides to mix thoroughly and evenly distribute the flour. Add the butter and sugar mix and repeat the process until you have a lovely dark golden ball of deliciousness.
- Place this ball between two large pieces of parchment paper and roll it out until it is quite thin (how thin will depend on your preference, but I have found that 4mm is just about perfect). Slide onto a baking sheet and bake for about 10 minutes before removing from the oven.
- Now cut out shapes with a cookie cutter (press any offcuts together and roll them out again) or for a lot less effort, use a large knife to cut the cookie dough into rectangles. Place on the lined baking trays and return to the oven for another 8 – 10 minutes, rotating the trays half-way. Remove from the oven and transfer to a cooling rack to cool completely.
- When cool, melt the white chocolate in a double boiler or in a heatproof bowl set over a pan of simmering water (don’t let the bowl touch the water!) and stir every now and then. As soon as the chocolate has melted, add enough matcha powder for a lovely green hue.
- Dip each cookie in the melted chocolate half-way and sprinkle with freeze-dried raspberries or additional hemp hearts. return to the cooling racks and store in an air-tight container when set. You could also spread chocolate on the underside of each cookie and let it cool upside down. You will need more than 100g of chocolate, but it is more traditional. And reeeeeally good.
Note: If you are not a fan of white chocolate, feel free to use dark chocolate instead.

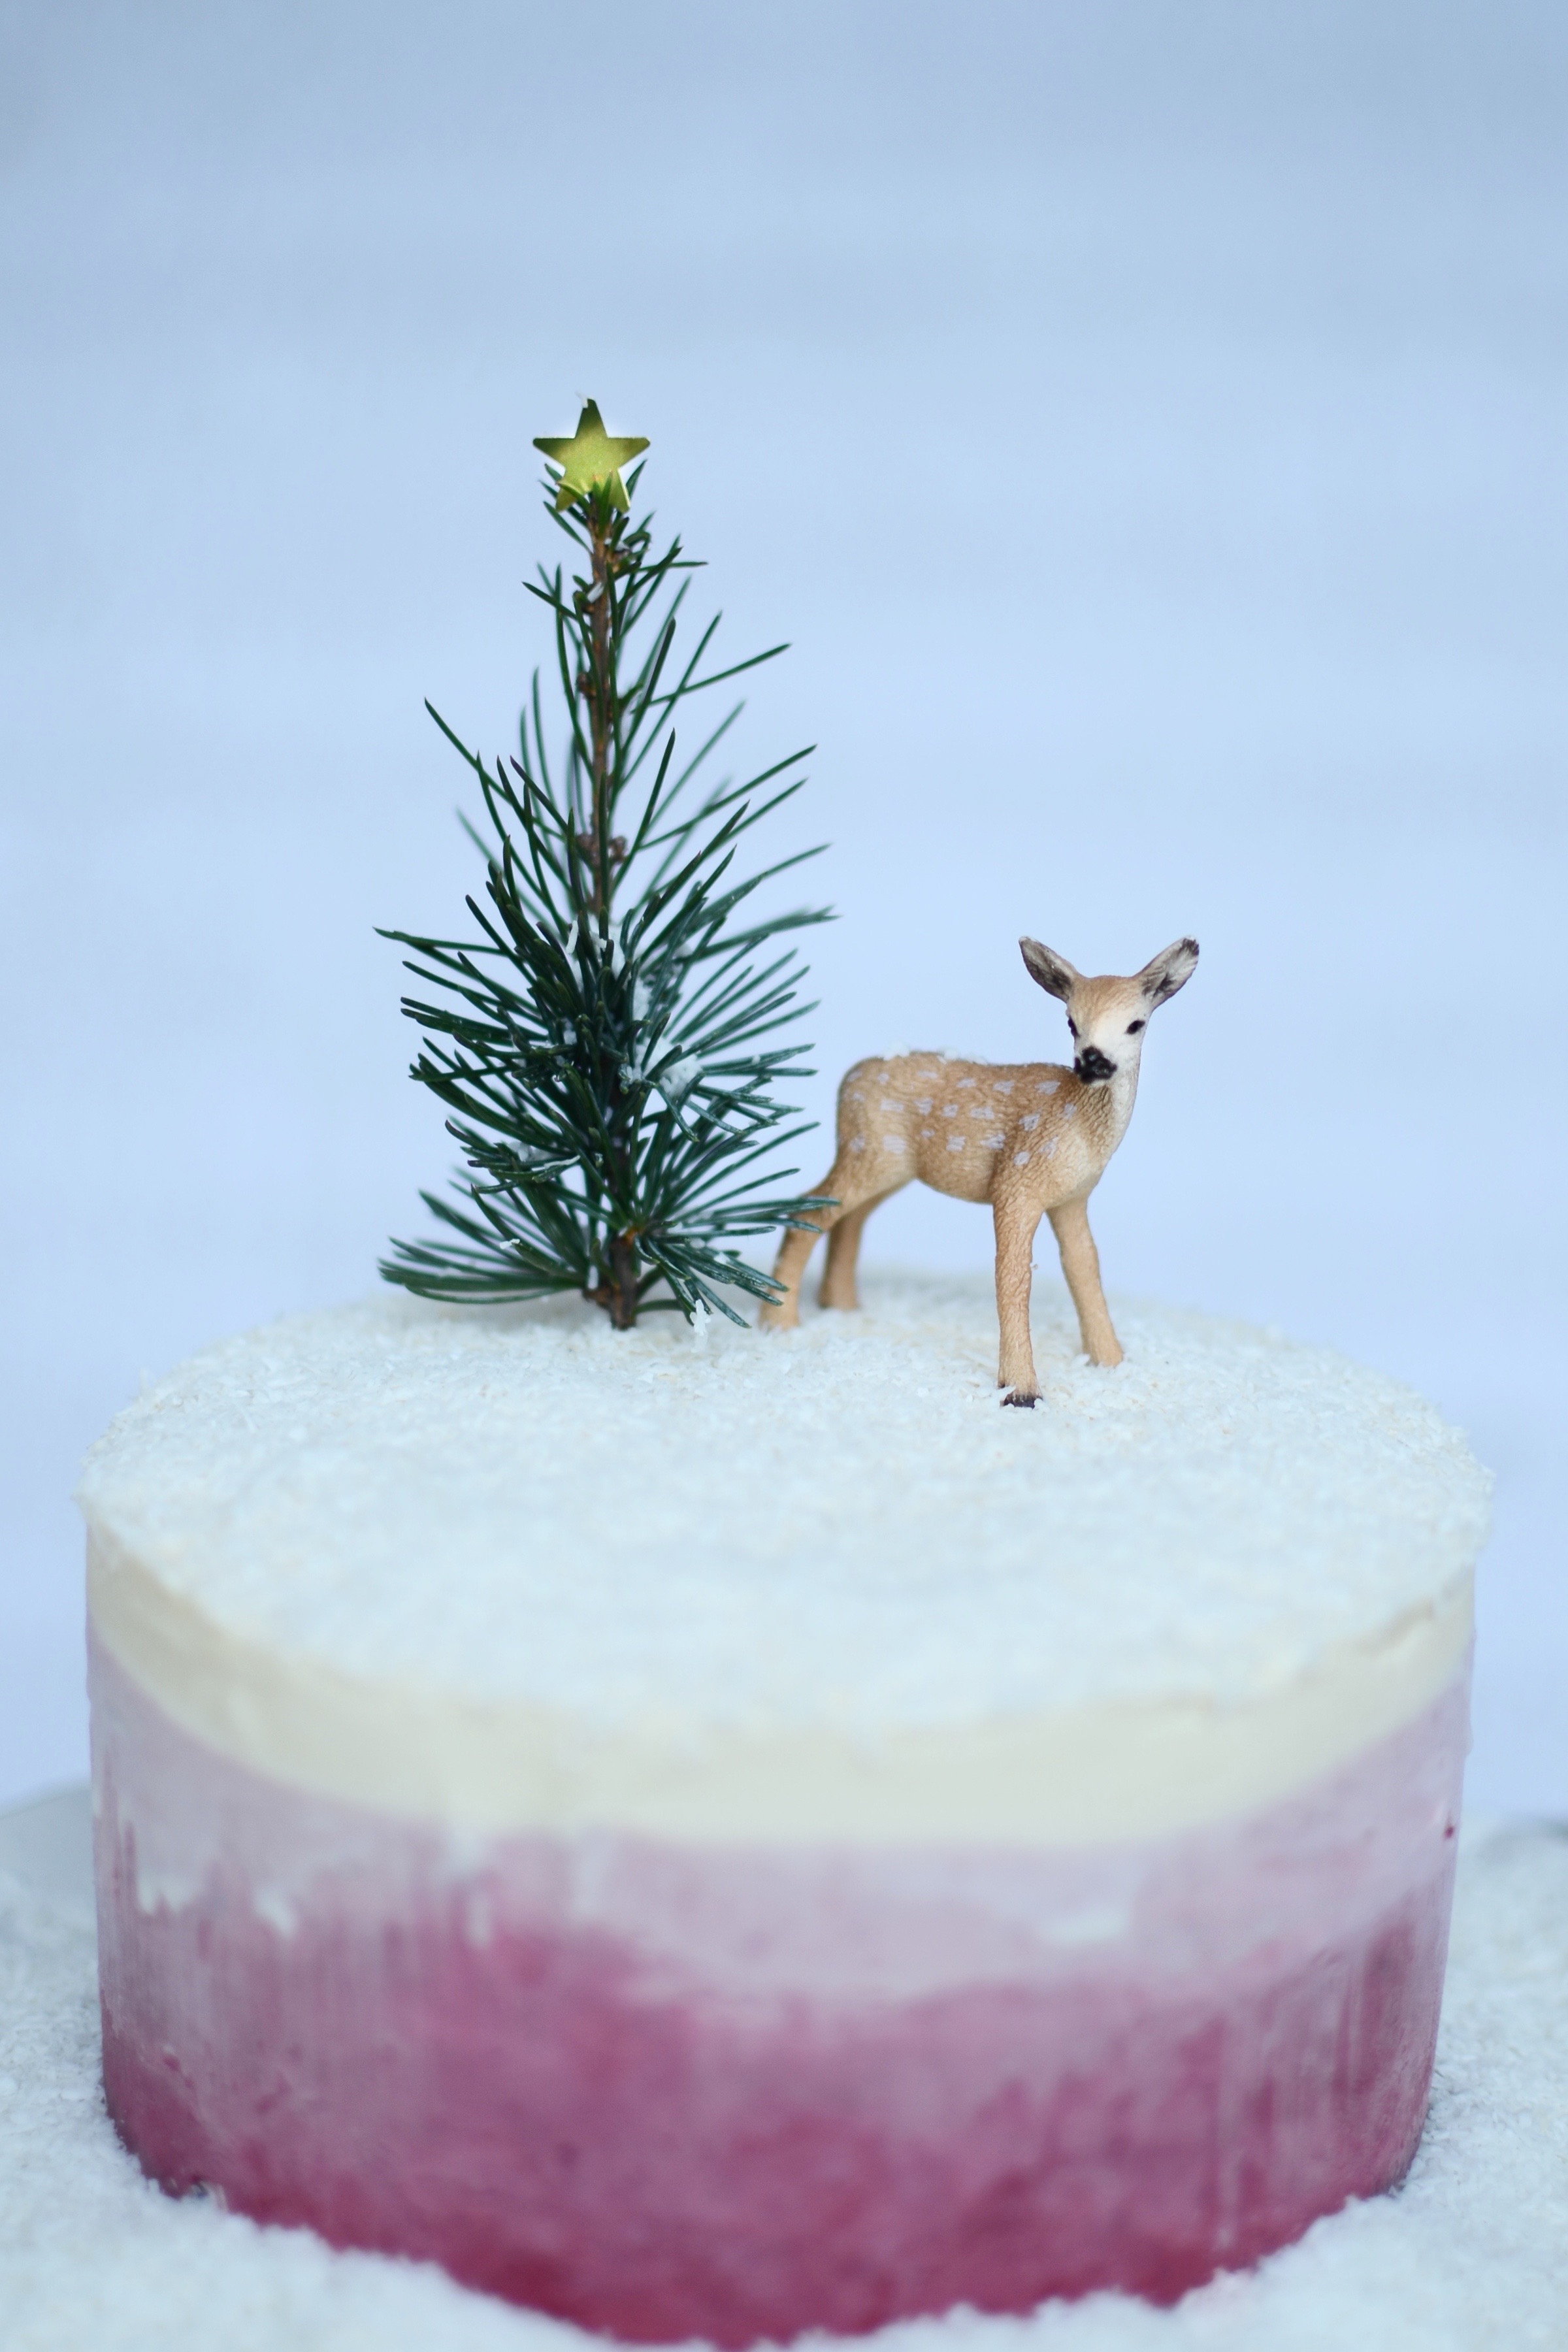
Cranberry and pomegranate ice cream cake
Hands up if you like the sound of “hassle-free entertaining”? Yeah, me too. Especially when you know there will be a lot of other things to worry about like last-minute gift wrapping, keeping an eye on the goose stuffed into your tiny oven or going into labour with your third child… This ice cream cake is the ideal make-ahead dessert and with its tart, refreshing coolness, will round off a heavy Christmas meal perfectly.

Cranberry and pomegranate ice cream cake
Makes one deep 6” or 15cm cake (3” or about 8cm high) and serves 8 – 10
Ingredients for the cranberry compote
400g cranberries
165ml (2/3 cups) fresh pomegranate juice
65g (less than 1/2 cup loosely packed cup) unrefined dark brown moist sugar or coconut palm sugar
1 vanilla pod, split in half lengthwise
To assemble
1.25 litres vanilla ice cream of your choice (vegan or coconut is fine too)
desiccated coconut
To serve
fresh pomegranate seeds
Method
- Place the ingredients for the compote in a heavy-based saucepan over a low heat and stir to dissolve the sugar, before turning up the heat and simmering gently for about 5 minutes, or until the cranberries are tender. Allow to cool slightly before blending everything until smooth. If you don’t have a high-speed blender, remove the vanilla pod, scrape out the seeds and return these to the cranberry mix. Discard the pod.
- Set aside to cool completely, preferably in the fridge.
- To start assembling the cake, allow 500ml of the ice cream to soften at room temperature.
- Mix 250ml (1 cup) of the cranberry puree with 450ml of the ice cream until well blended, spoon into a 15cm cake tin, smooth the top and place in the freezer for at least 10 – 15 minutes or until frozen. In the meantime, replace the left-over ice cream in the freezer and leave the next 500ml of ice cream at room temperature to soften.
- For the second layer, mix 125ml (1/2 cup) of the cranberry puree with 500ml ice cream until well blended. Spoon on top of the first layer, smooth the top and place in the freezer for 10 – 15 minutes.
- Finally, use as much of the remaining softened plain vanilla ice cream as is necessary to fill the tin to the top and return to the freezer. Leave for several hours or until solidly frozen.
- About 15 minutes before serving, remove from the freezer and allow to soften.
- Carefully remove the tin (you may want to run some hot water around the tin or use a blow torch if it is still solidly frozen) and place the cake on your serving plate with the vanilla layer on top. Sprinkle the coconut around the base and on top to create a snowy landscape. Bring the cake to the table and wait until it is soft enough to cut into slices, before serving with fresh pomegranate seeds.

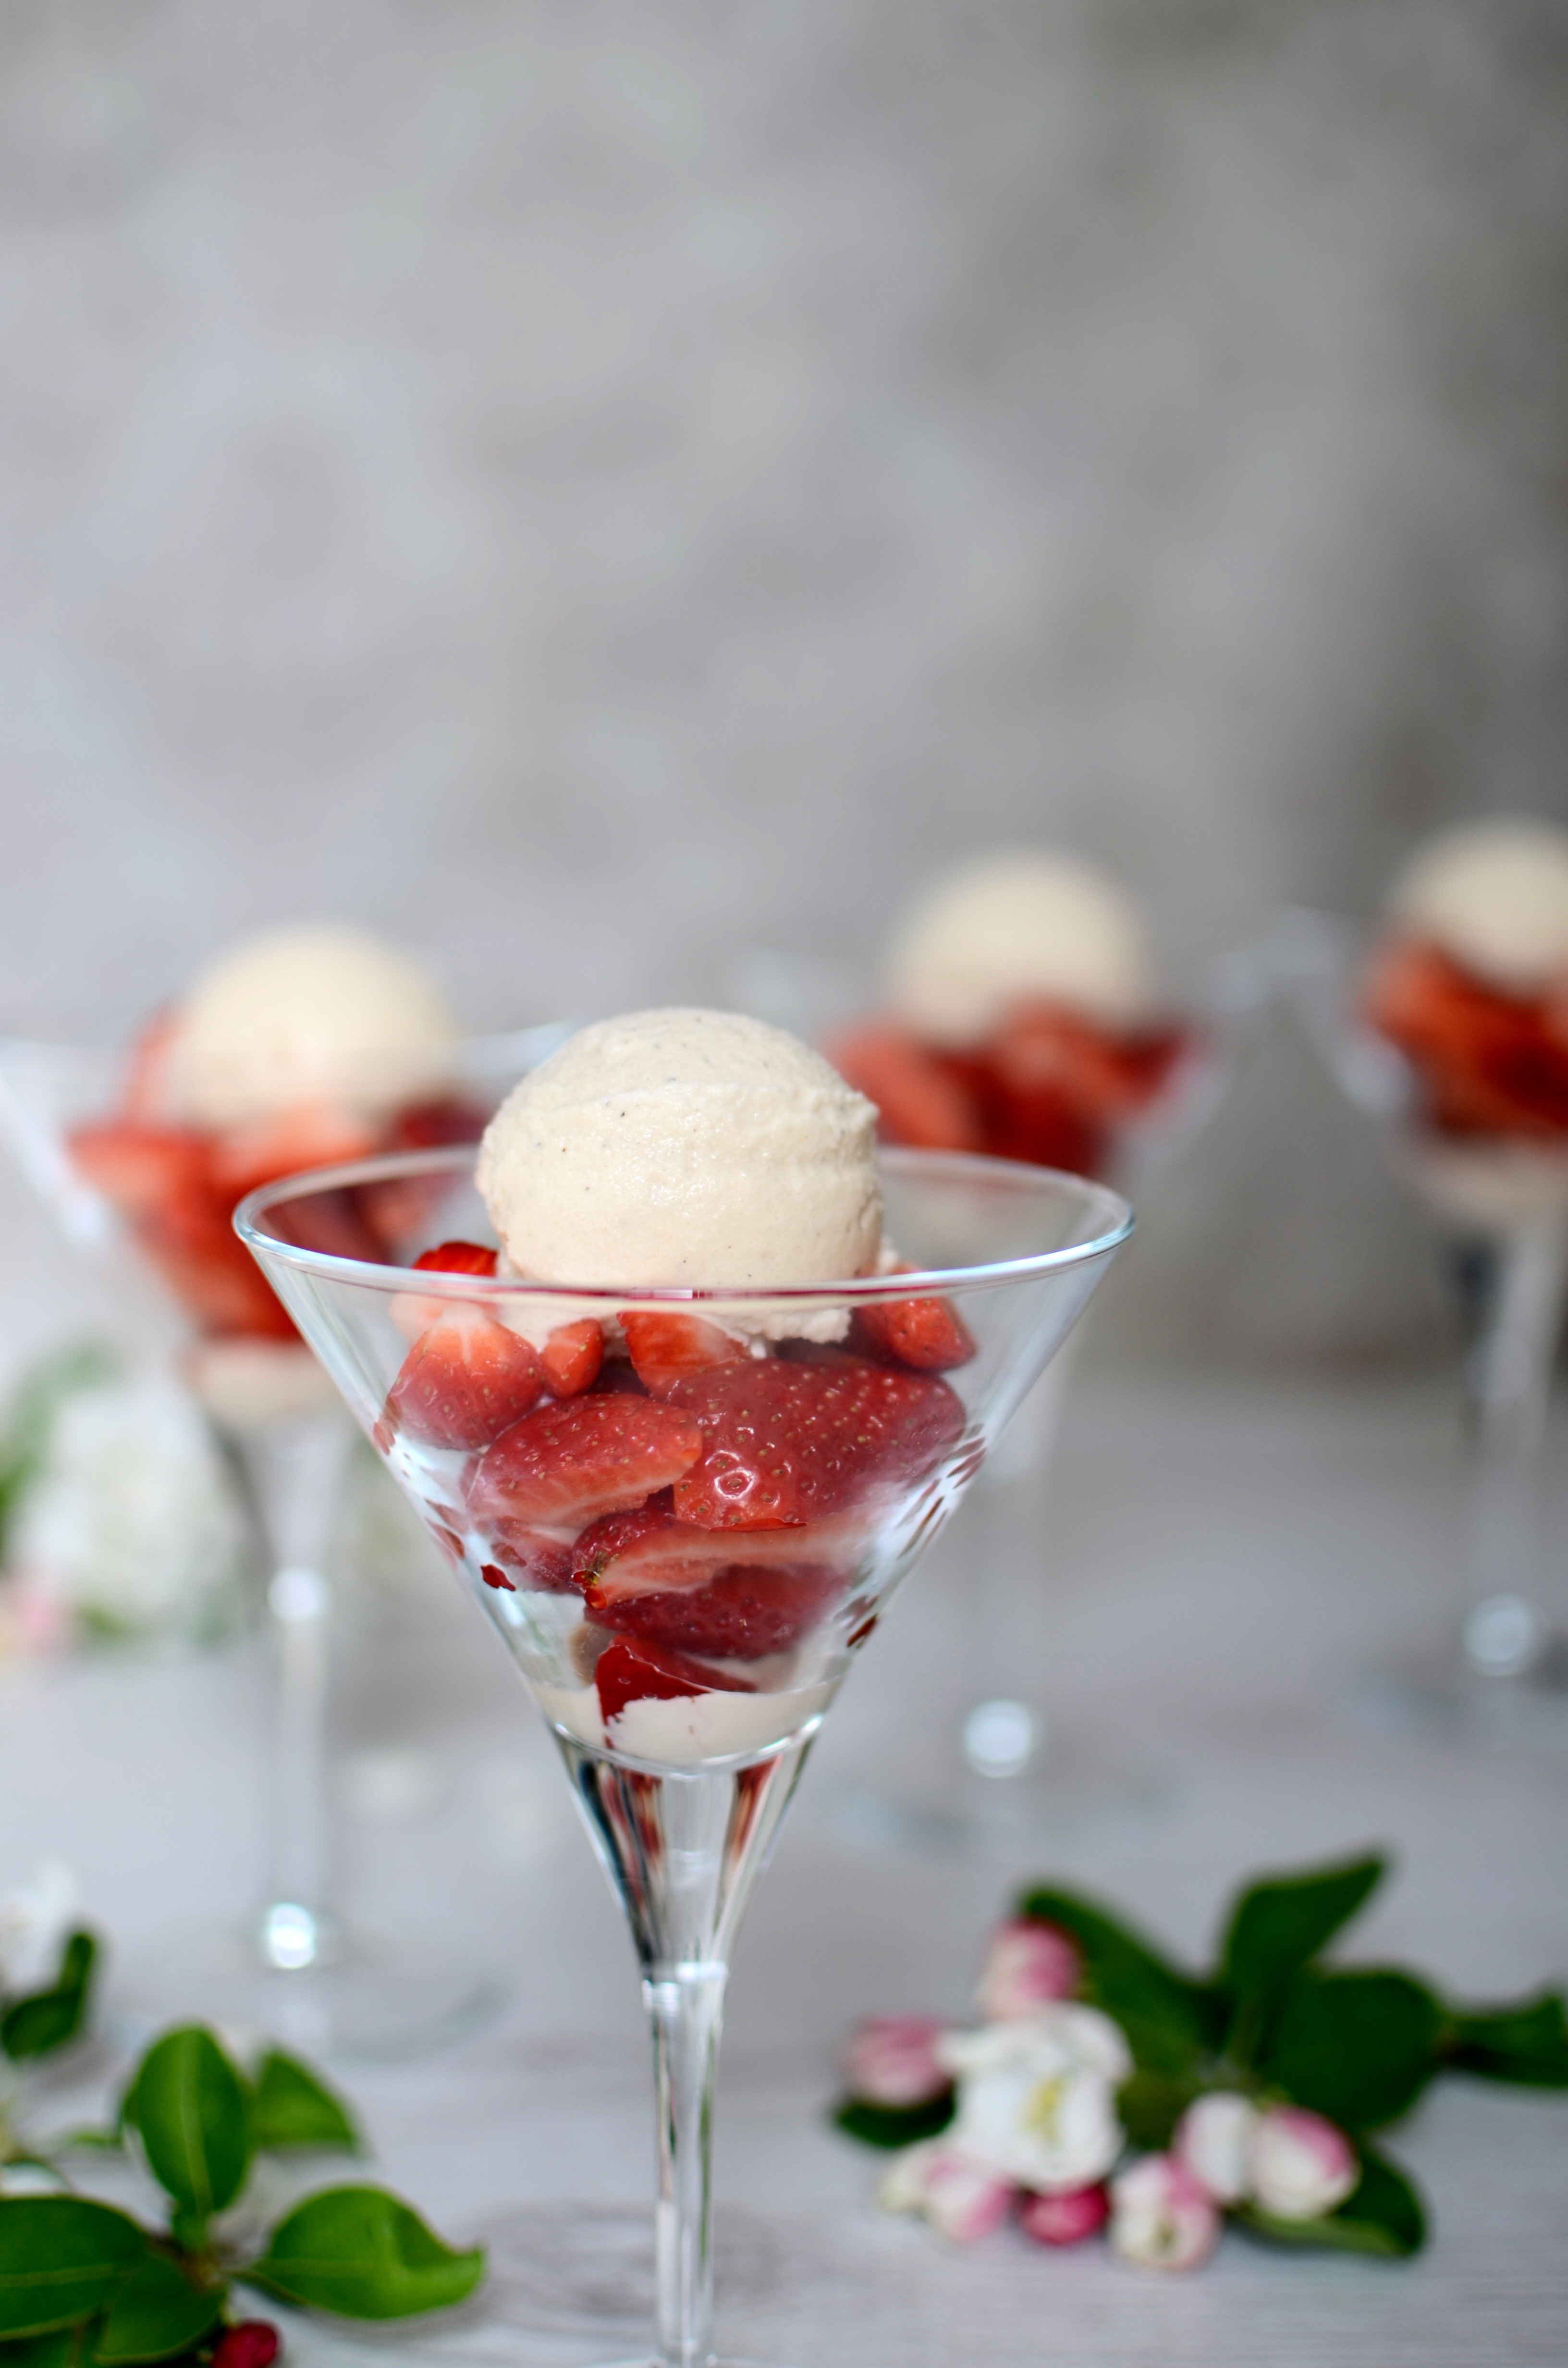
Balsamic frozen yoghurt with strawberries
Traditionally fermented and aged balsamic vinegar from Modena or Reggio Emilia in Italy is a very special condiment indeed. Whole pressed late-harvested grapes complete with juice, skin, seeds and stems (also called grape must) are cooked over a direct flame until reduced by half, then left to ferment naturally for up to three weeks. The concentrate is then matured and further concentrated for a minimum of 12 years in a “batteria,” or a minimum of five successively smaller ageing barrels. The delicious complex and tangy sweet flavour might be ruined if the vinegar is heated and it is most likely also too special (and expensive!) to use in salad dressings. Try drizzling it on gorgeous fresh strawberries or in this refreshingly different ice cream.
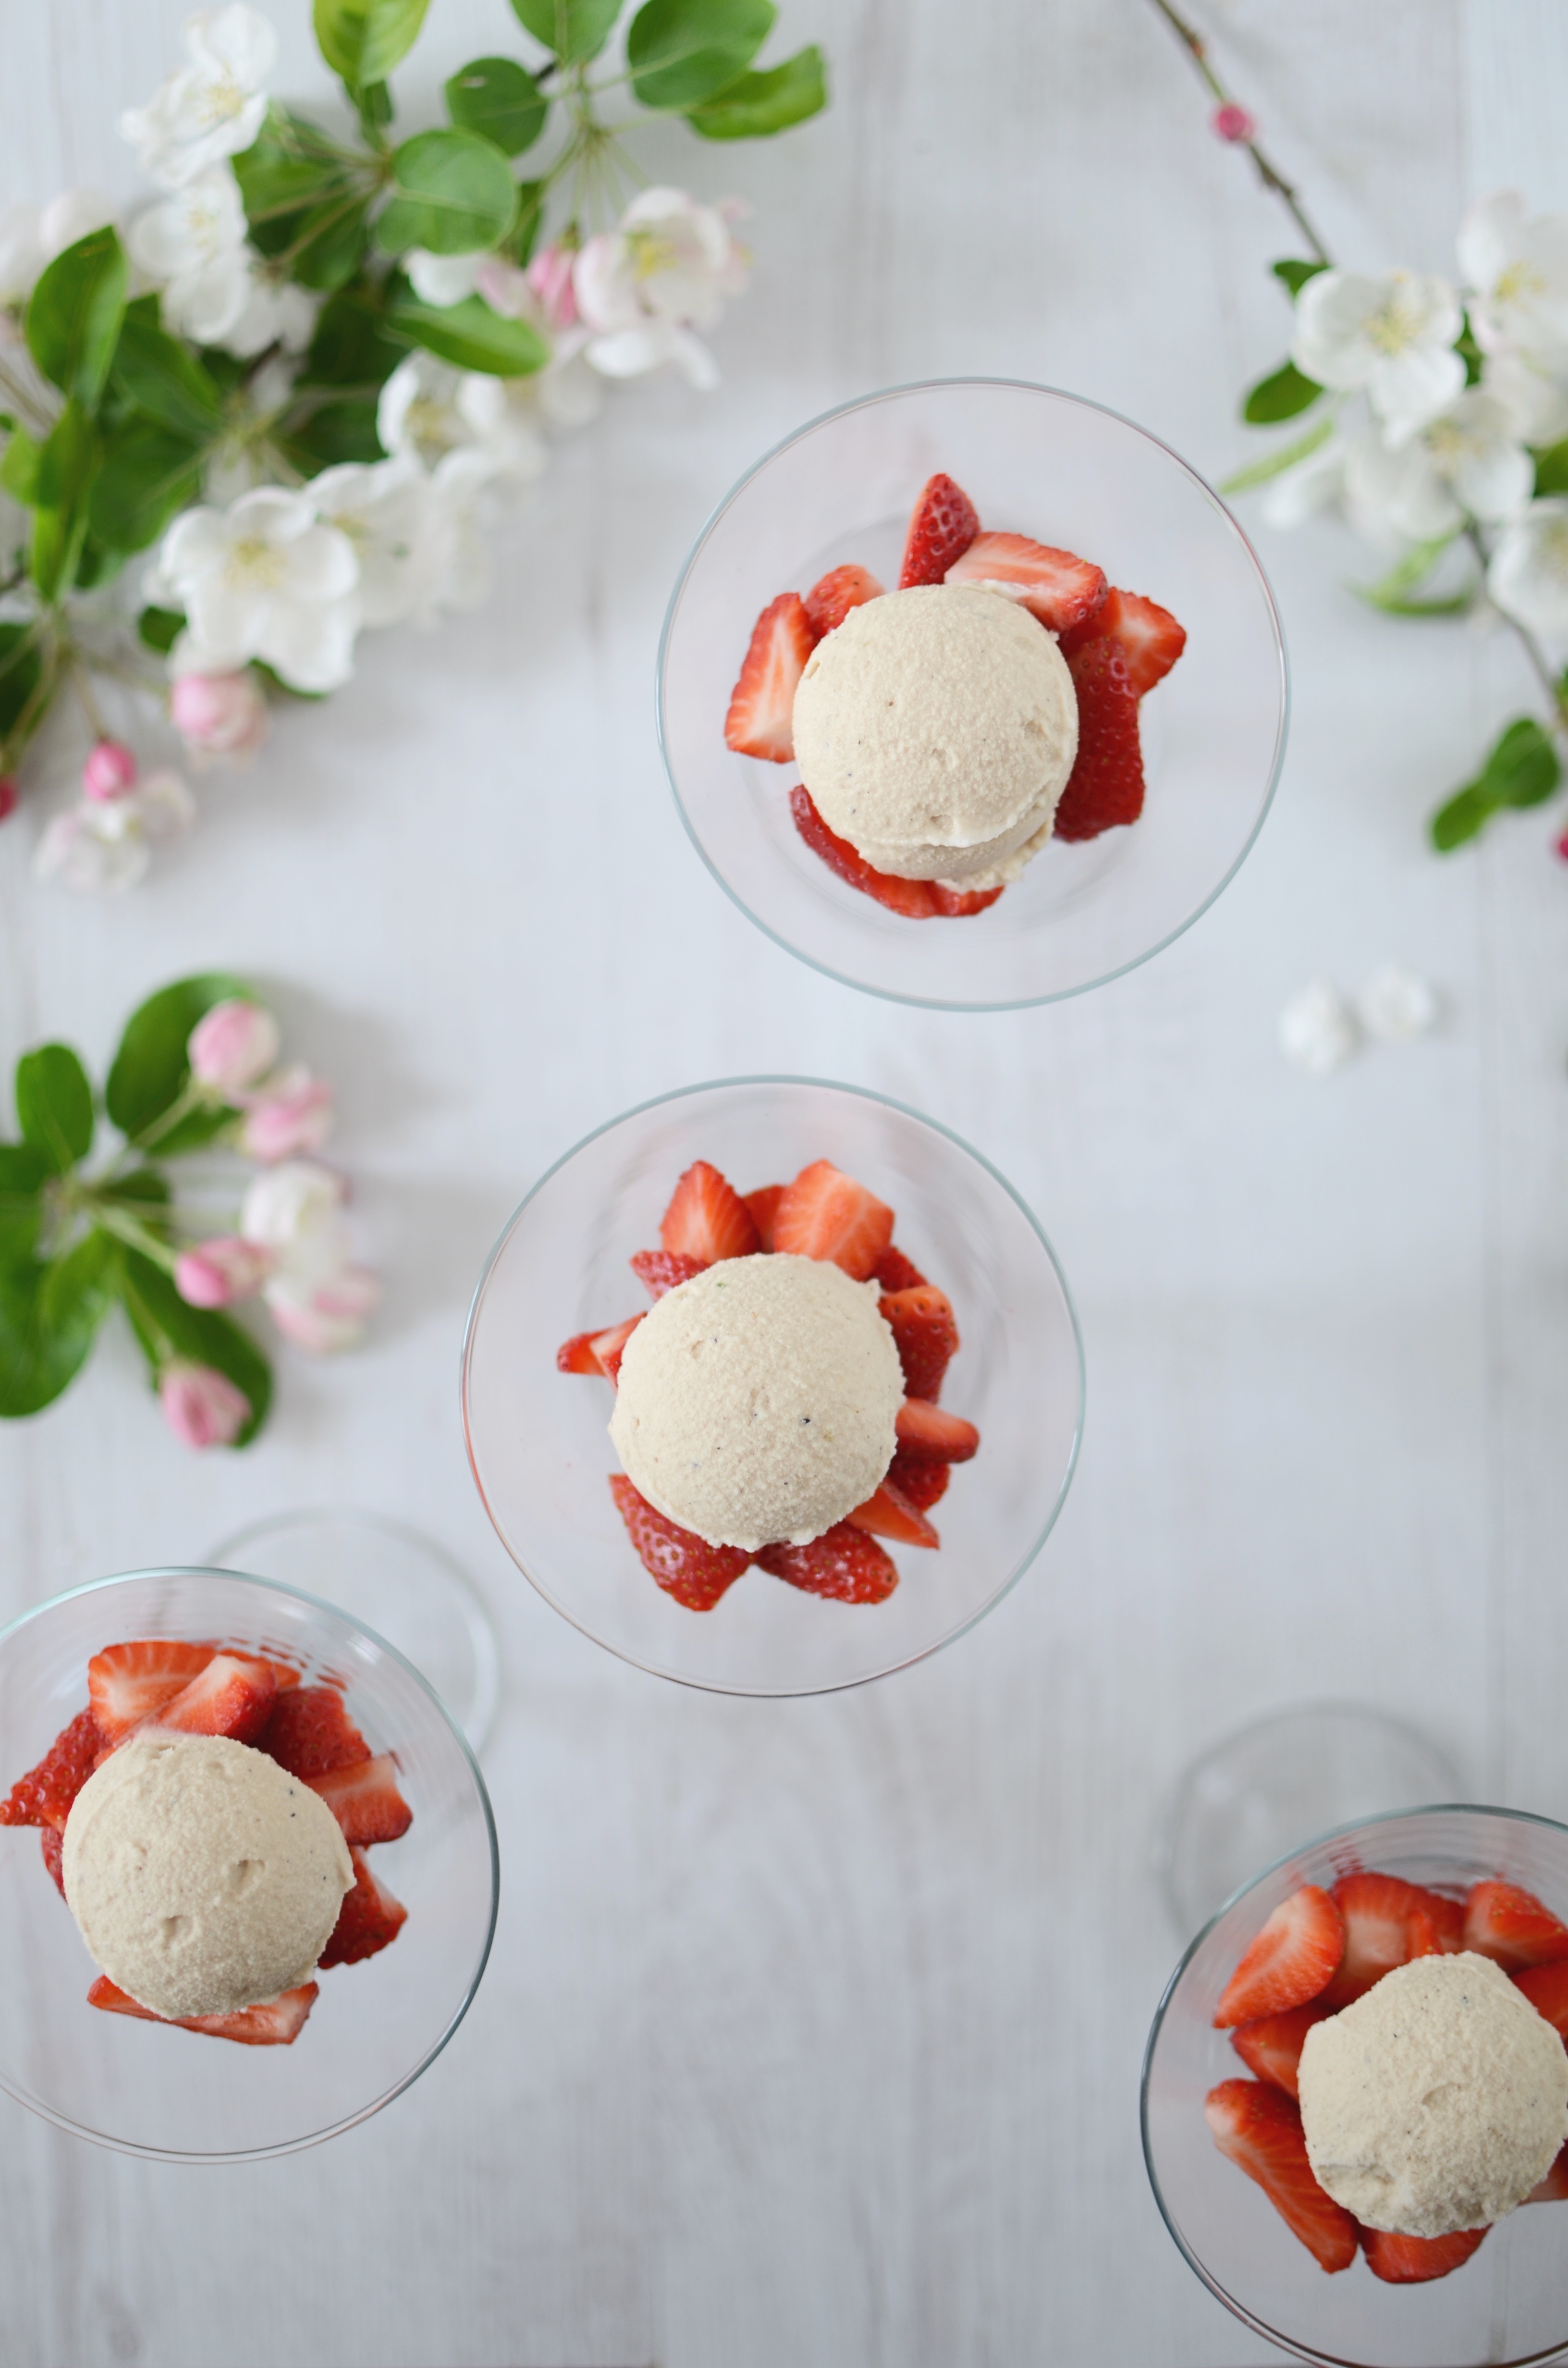

Serves 4 – 6
Ingredients
500ml (2 cups) organic goat or sheep yoghurt
2 1/2 tablespoons good quality aged balsamic vinegar plus extra to serve
pinch of coarsely ground black pepper
45 – 60ml (3 – 4 tablespoons) raw honey, or to taste
a large handful of fragrant strawberries per person
Method
- Mix together the first four ingredients. Freeze in an ice cream maker according to the manufacturer’s instructions, or place in the freezer and whisk (preferably with an electric whisk) ever half hour until firmly frozen.
- When the ice cream has reached the perfect consistency, serve with sweet strawberries and a drizzle of balsamic vinegar.
Stone fruit slices
The memories of my primary school years are punctuated by gloriously colourful events, much-loved traditions, lessons learnt the hard way, meaningful moments… And Maike’s mum’s weekly apricot tray bake. It will forever crop up in my mind as the most delicious treat anyone could wish for. It perfectly captured the balance between soft and chewy, tart and sweet. And it looked and tasted like the summer sun.
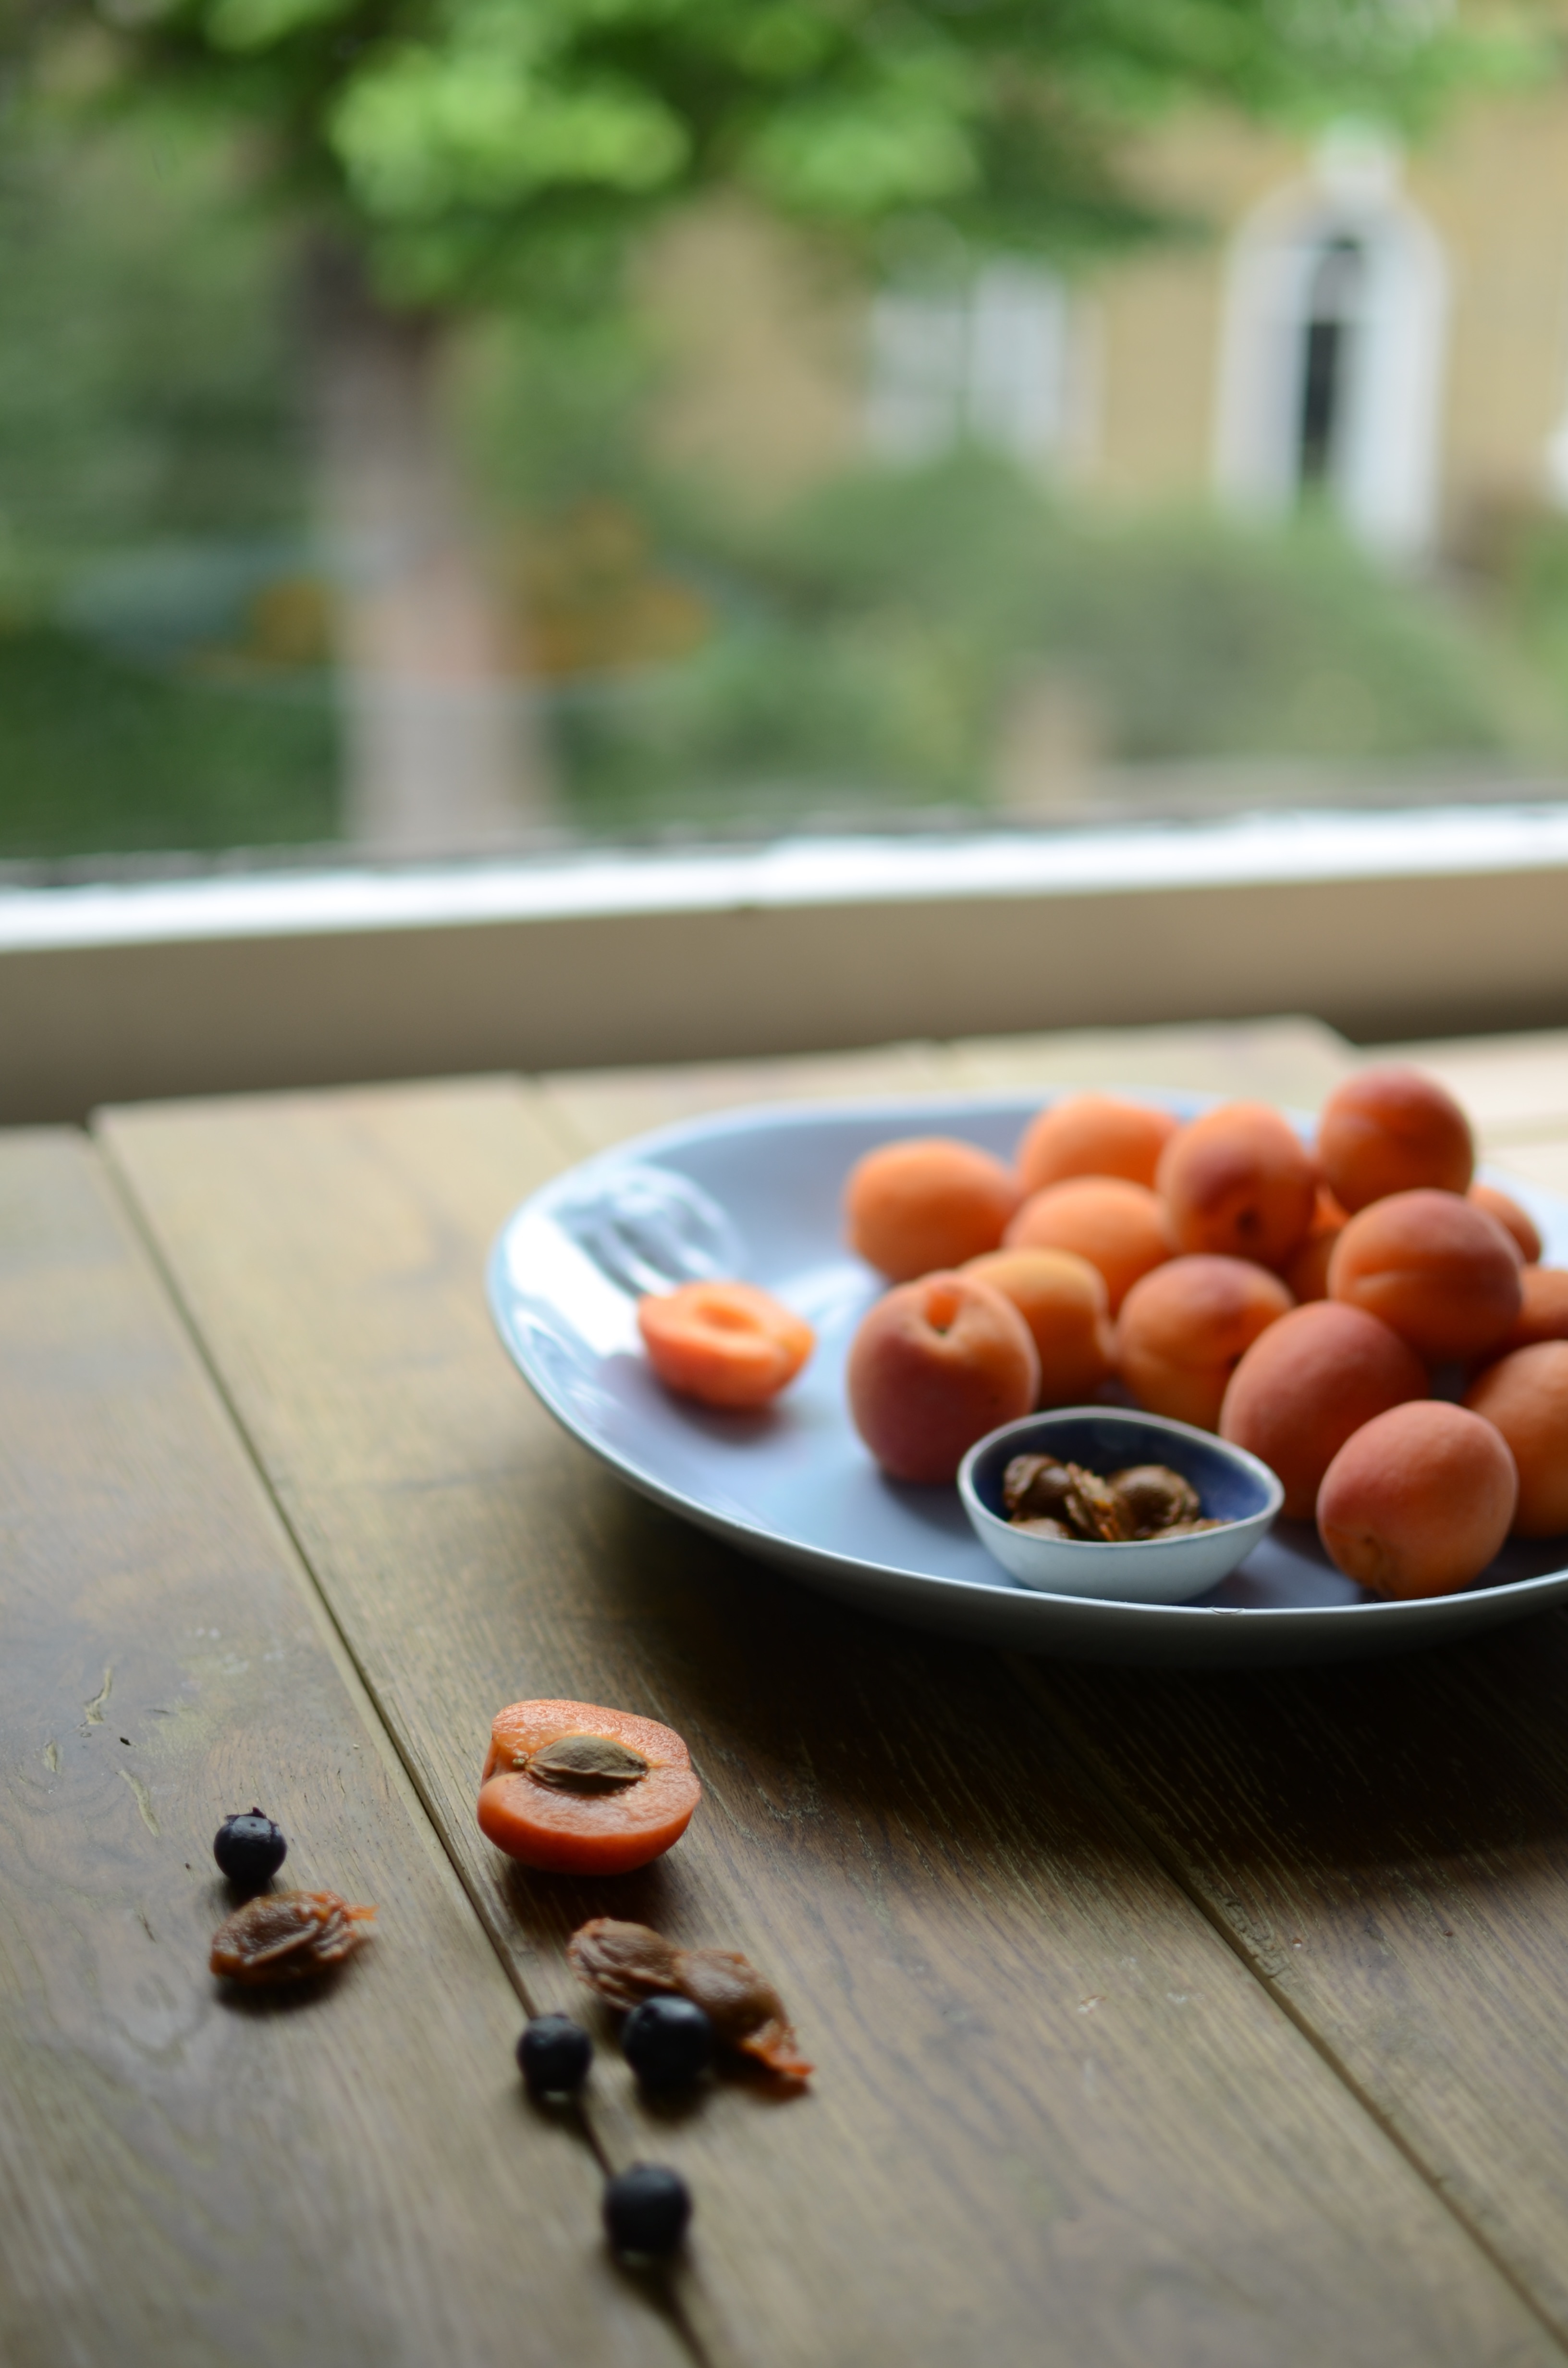
Rather than being a cake, this recipe really is more of a nutritious snack that I happily give my children after school and help myself to during busy mornings catching up on admin and work. The end result relies to a large extent on the taste and quality of your fruit, but even so, it is a good way to use up over-ripe, squooshy apricots and plums.

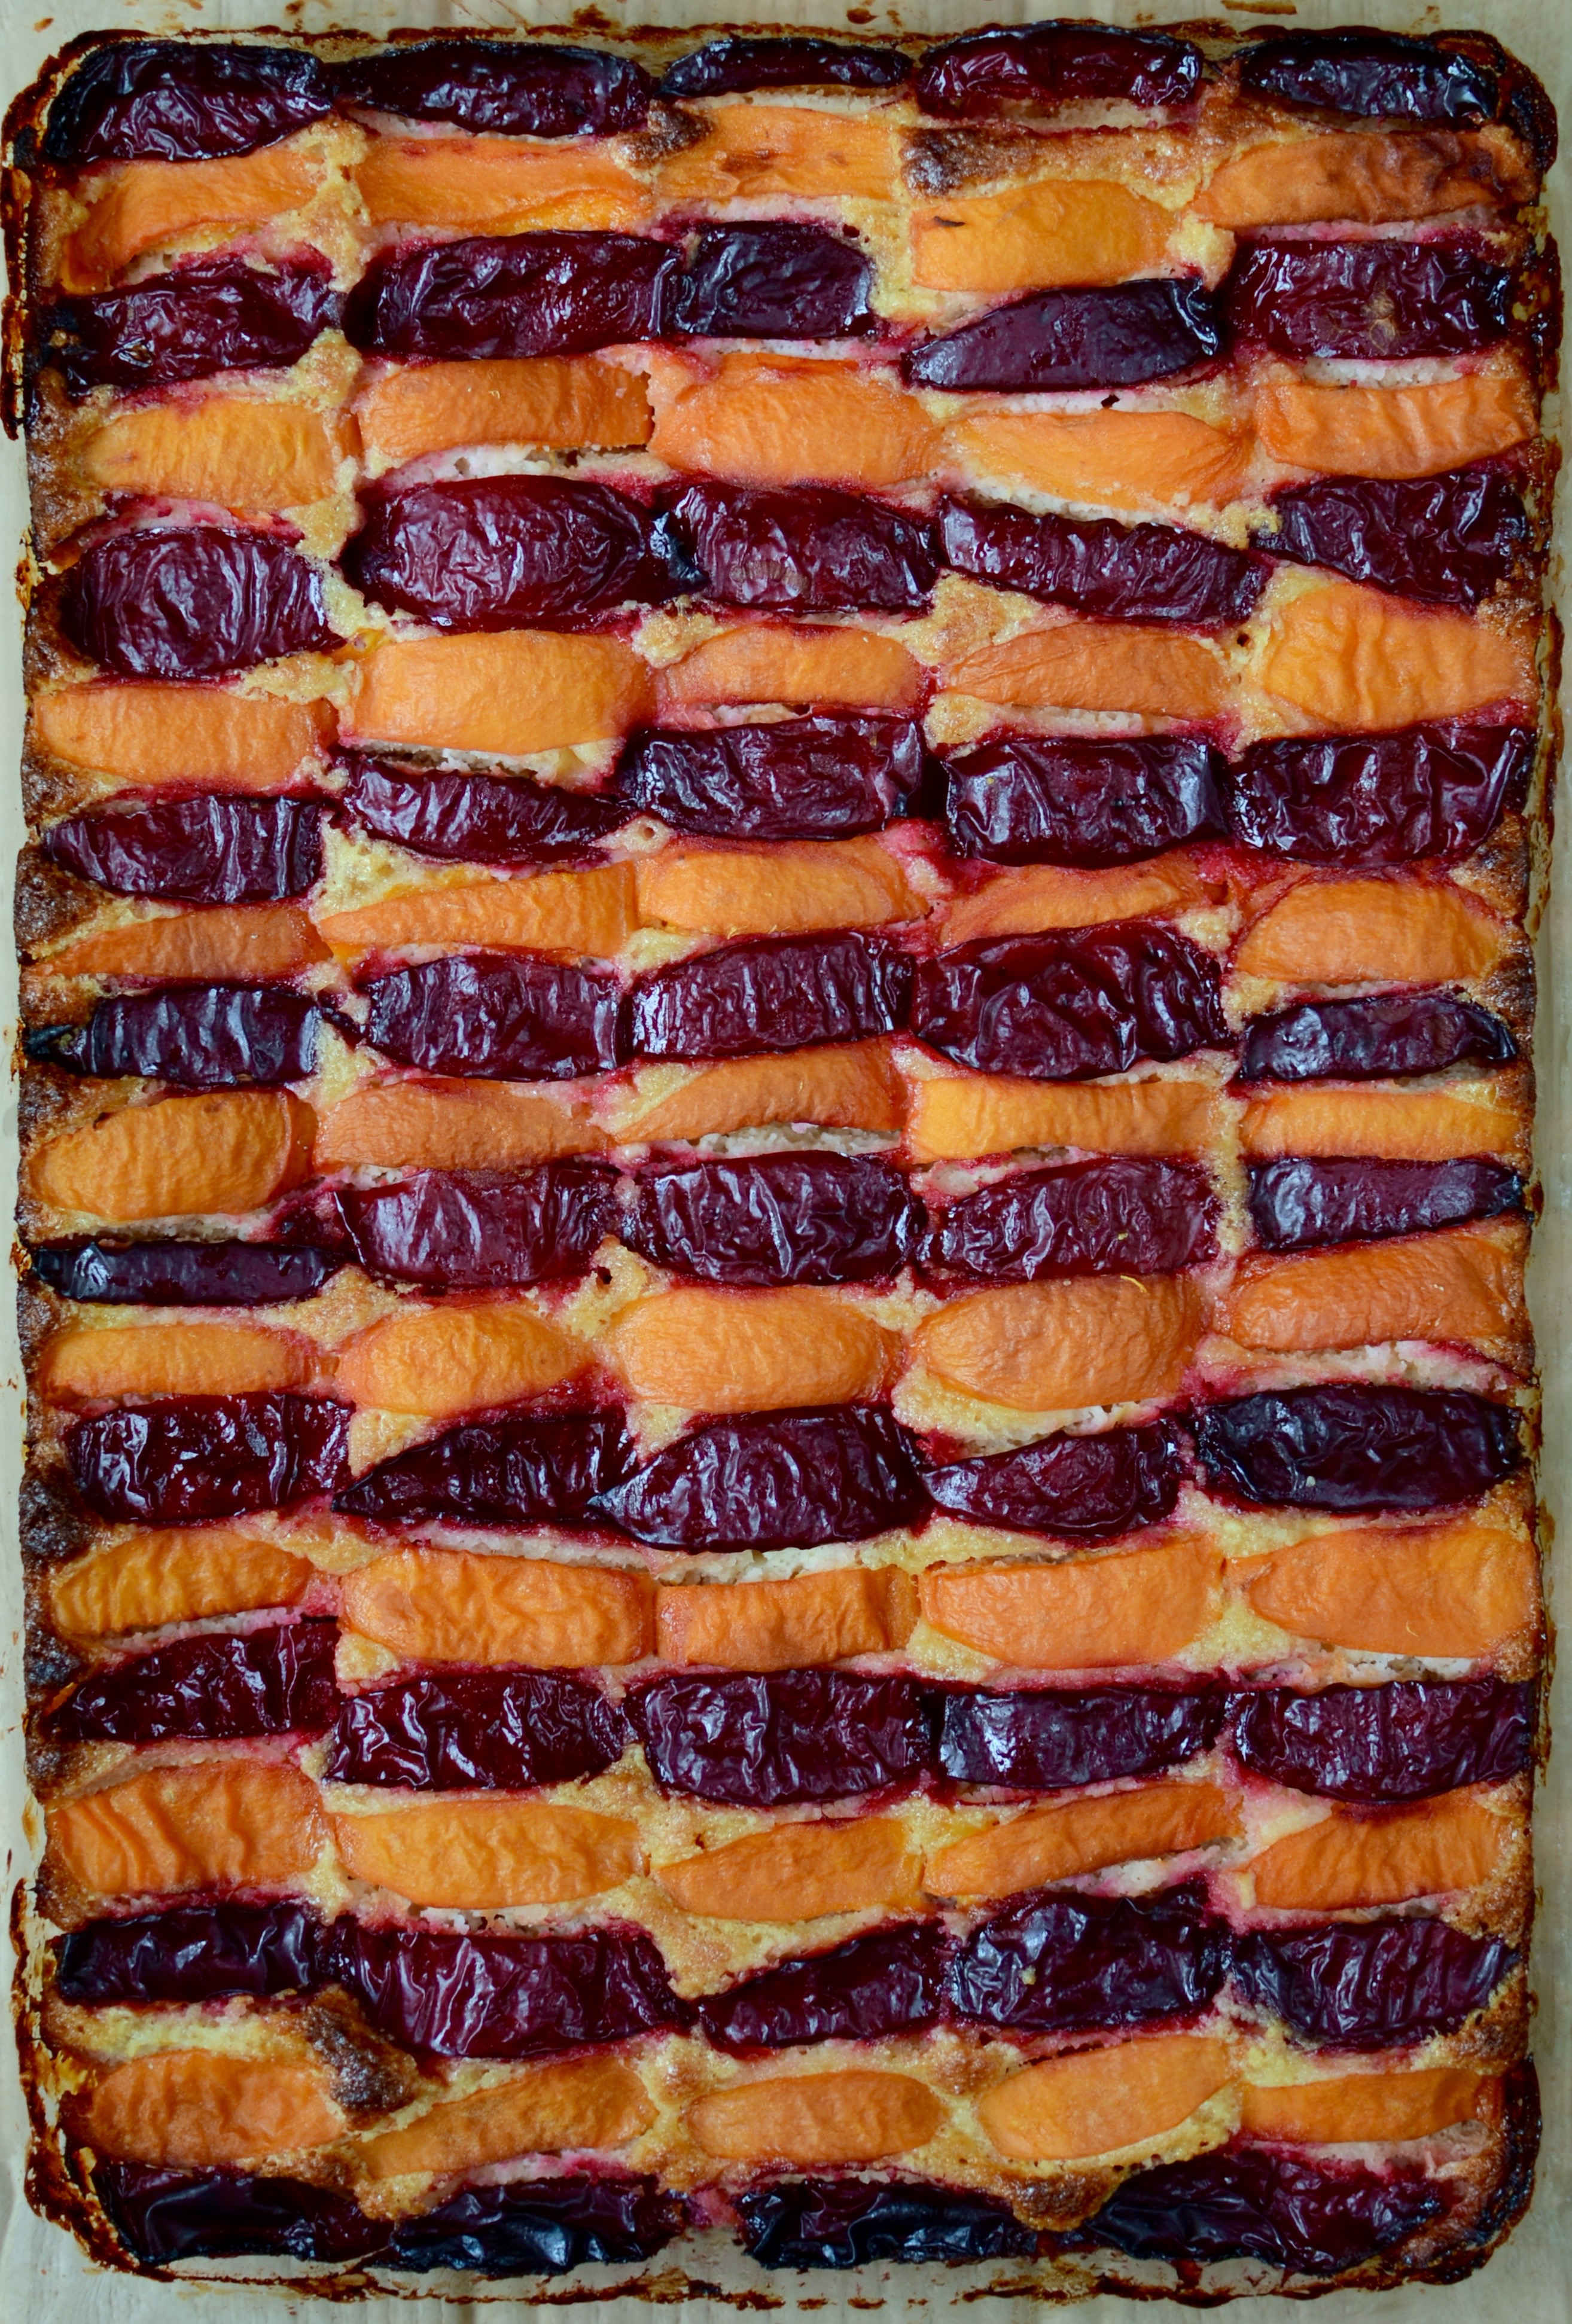
Stone fruit slices
Ingredients
3 medium eggs, at room temperature and separated
80ml (1/3 cup) oil (coconut oil, macadamia nut oil or melted butter)
80ml (1/3 cup) honey
1/2 teaspoon good quality almond extract
pinch of sea salt
finely grated zest of 1 lemon
230g (about 2 1/3 cups) ground almonds / almond flour
750g large apricots and small’ish plums (about 6 of each), halved, stones removed and sliced into eighths
Method
- Whisk together the egg yolks, oil, honey, almond extract, salt and lemon zest.
- Stir in the ground almonds and set aside.
- Preheat the oven to 180°C/360°F.
- Whisk the egg whites to firm (but not stiff) peaks, and gently fold into the almond mixture.
- Spread this mixture out in an even layer in a greased ovenproof baking dish (about 30 x 20 cm).
- Place the fruit slices skin-side up as close together as possible in the thin layer of batter – alternating the fruit as you go along. You could also use apricot halves only, which would be much quicker and easier, but not as pretty.
- Bake in the oven for 30 minutes, then turn the oven off and leave the cake in the oven for another 15 minutes, before removing and allowing to cool.
- Cut the cake into squares in the dish, then carefully slide an offset spatula under each row to carefully lift them out.
- Store in the fridge for several days or freeze.
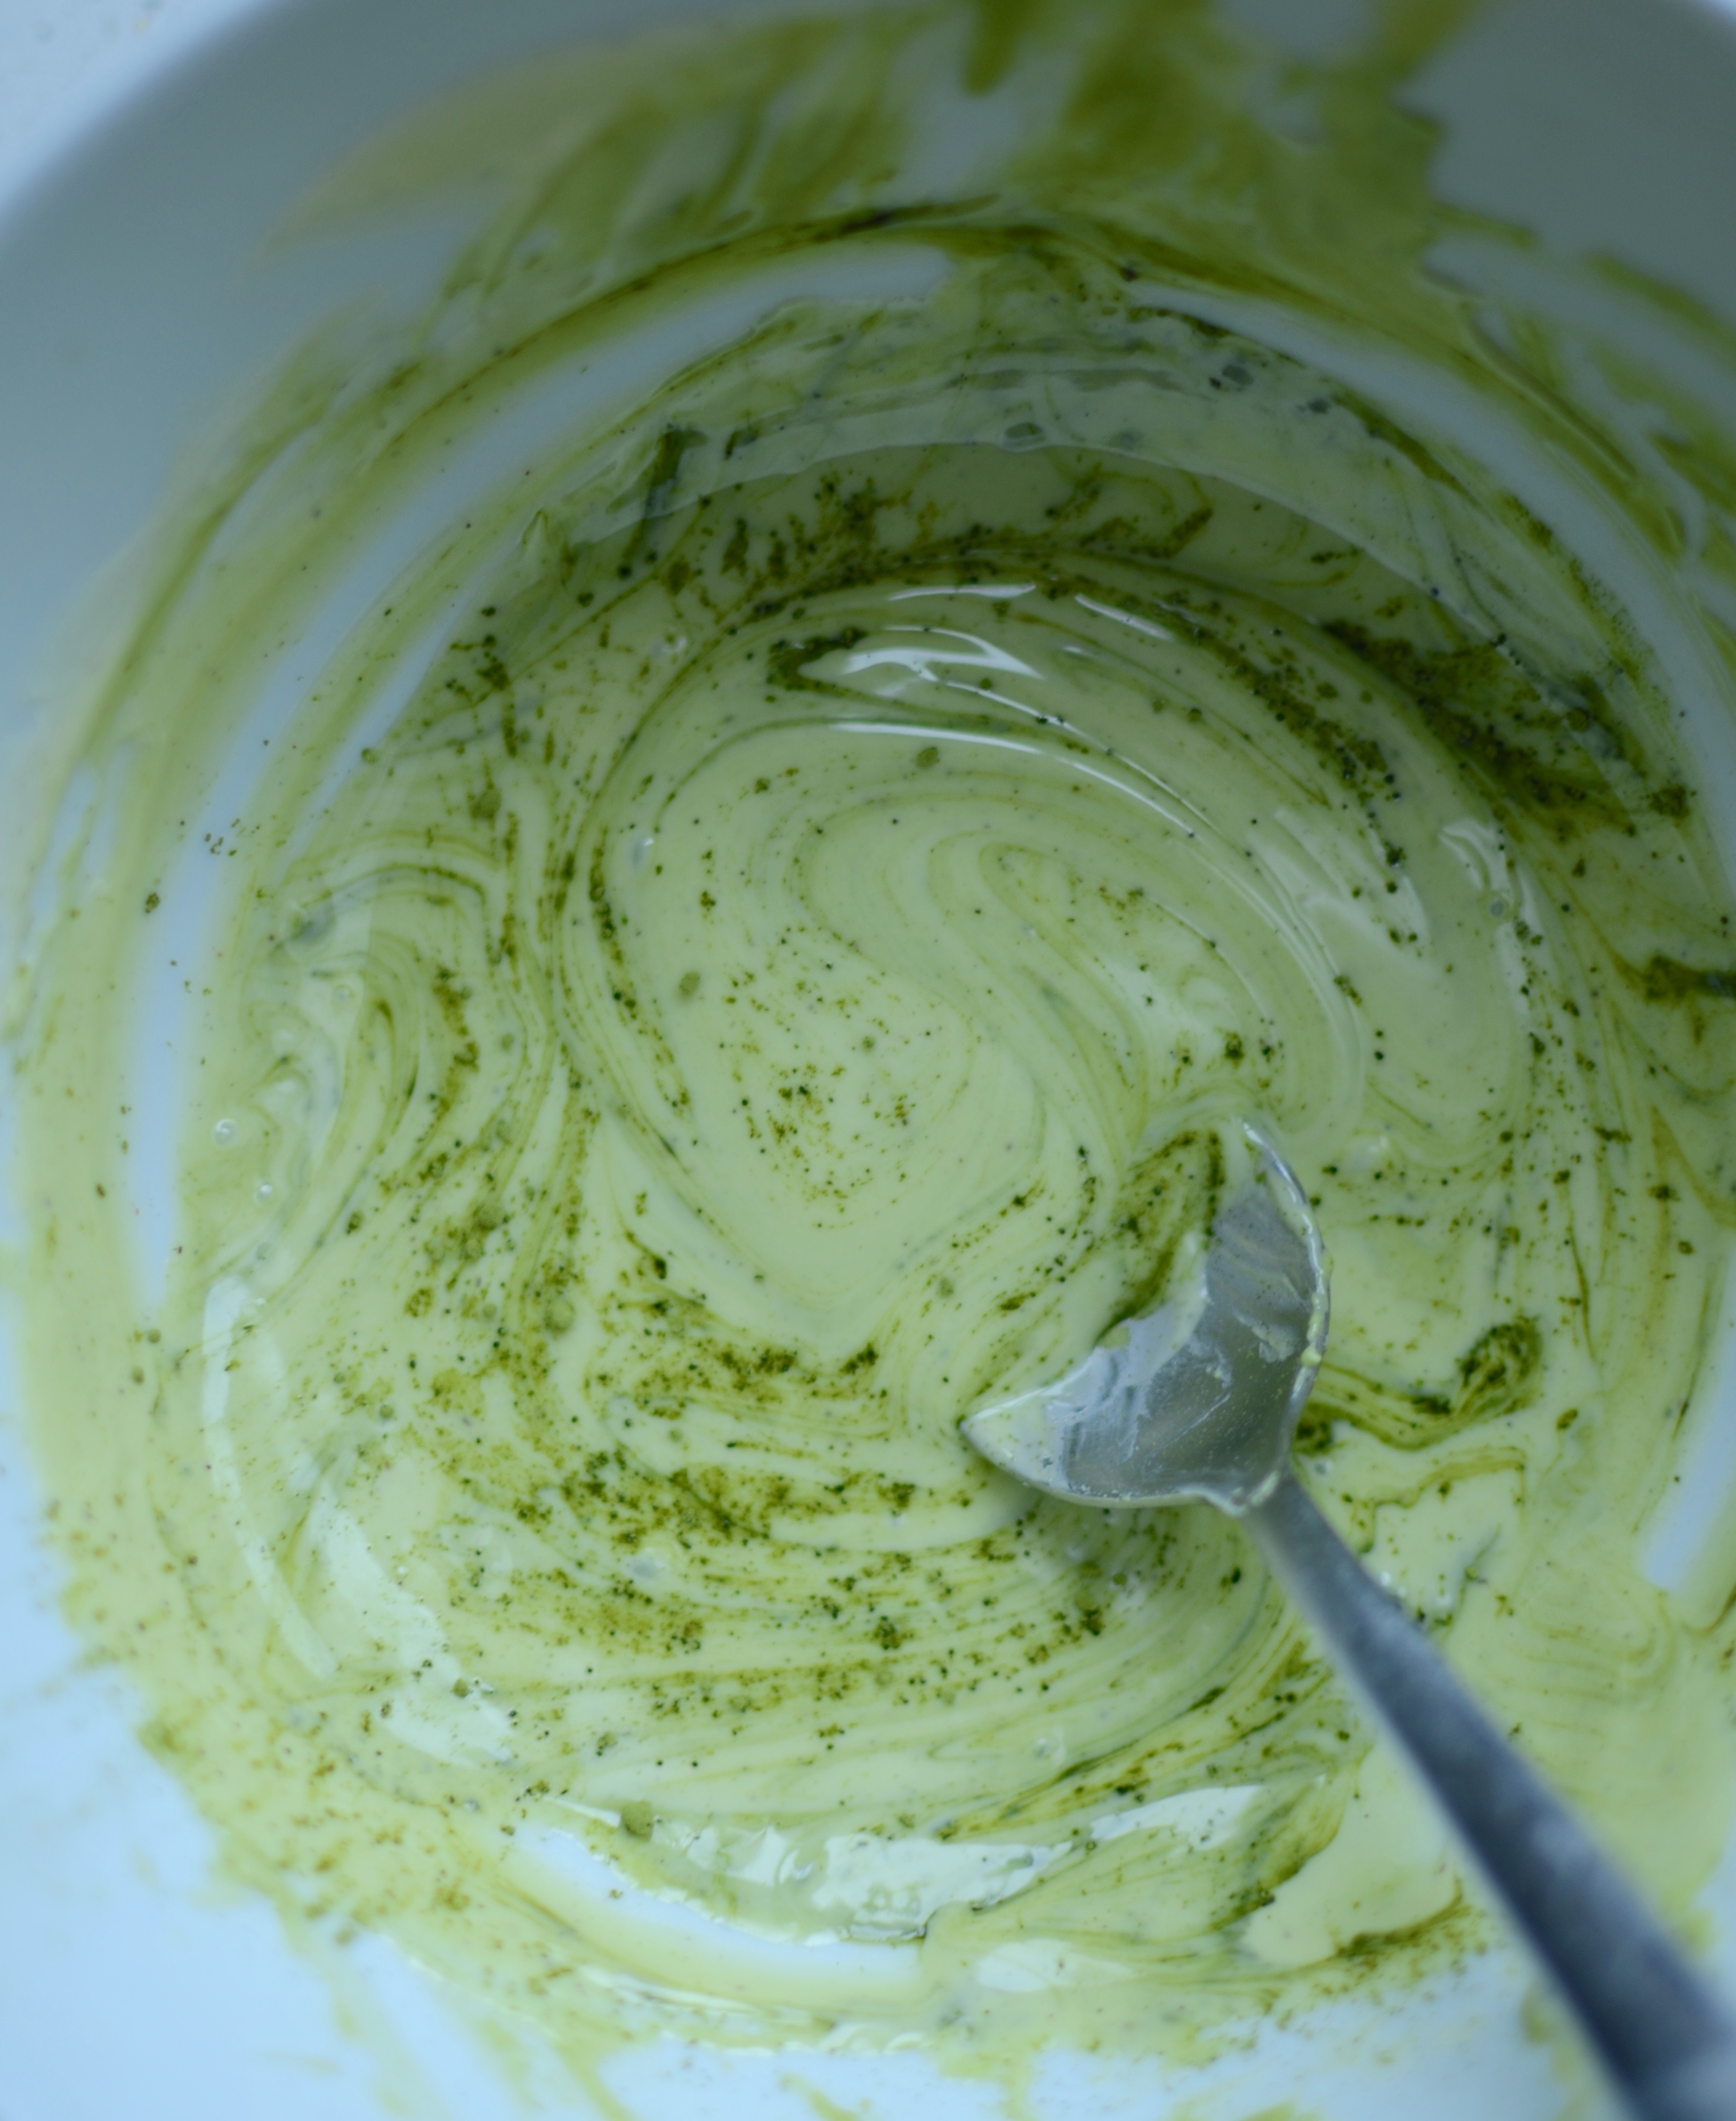
Cacao and matcha pinwheels
We all know that regularly enjoying a cup of green tea is beneficial to our health. Matcha powder is a concentrated powdered green tea that can be stirred into hot water to make a cuppa, but also be added to a variety of dishes, such as smoothies, porridge, lattes, chocolate truffles and cakes. The nutritional value and antioxidant content of matcha tea exceeds that of regular green tea tenfold, because the whole leaf, not just the brewed water, is ingested. Amongst its many benefits, matcha is packed with antioxidants, boosts metabolism and burns calories, detoxifies, calms, aids in concentration, contains vitamin C, selenium, chromium, zinc and magnesium, fights against viruses and bacteria, is rich in fibre, and lowers cholesterol and blood sugar. Well worth incorporating into your diet, it seems.
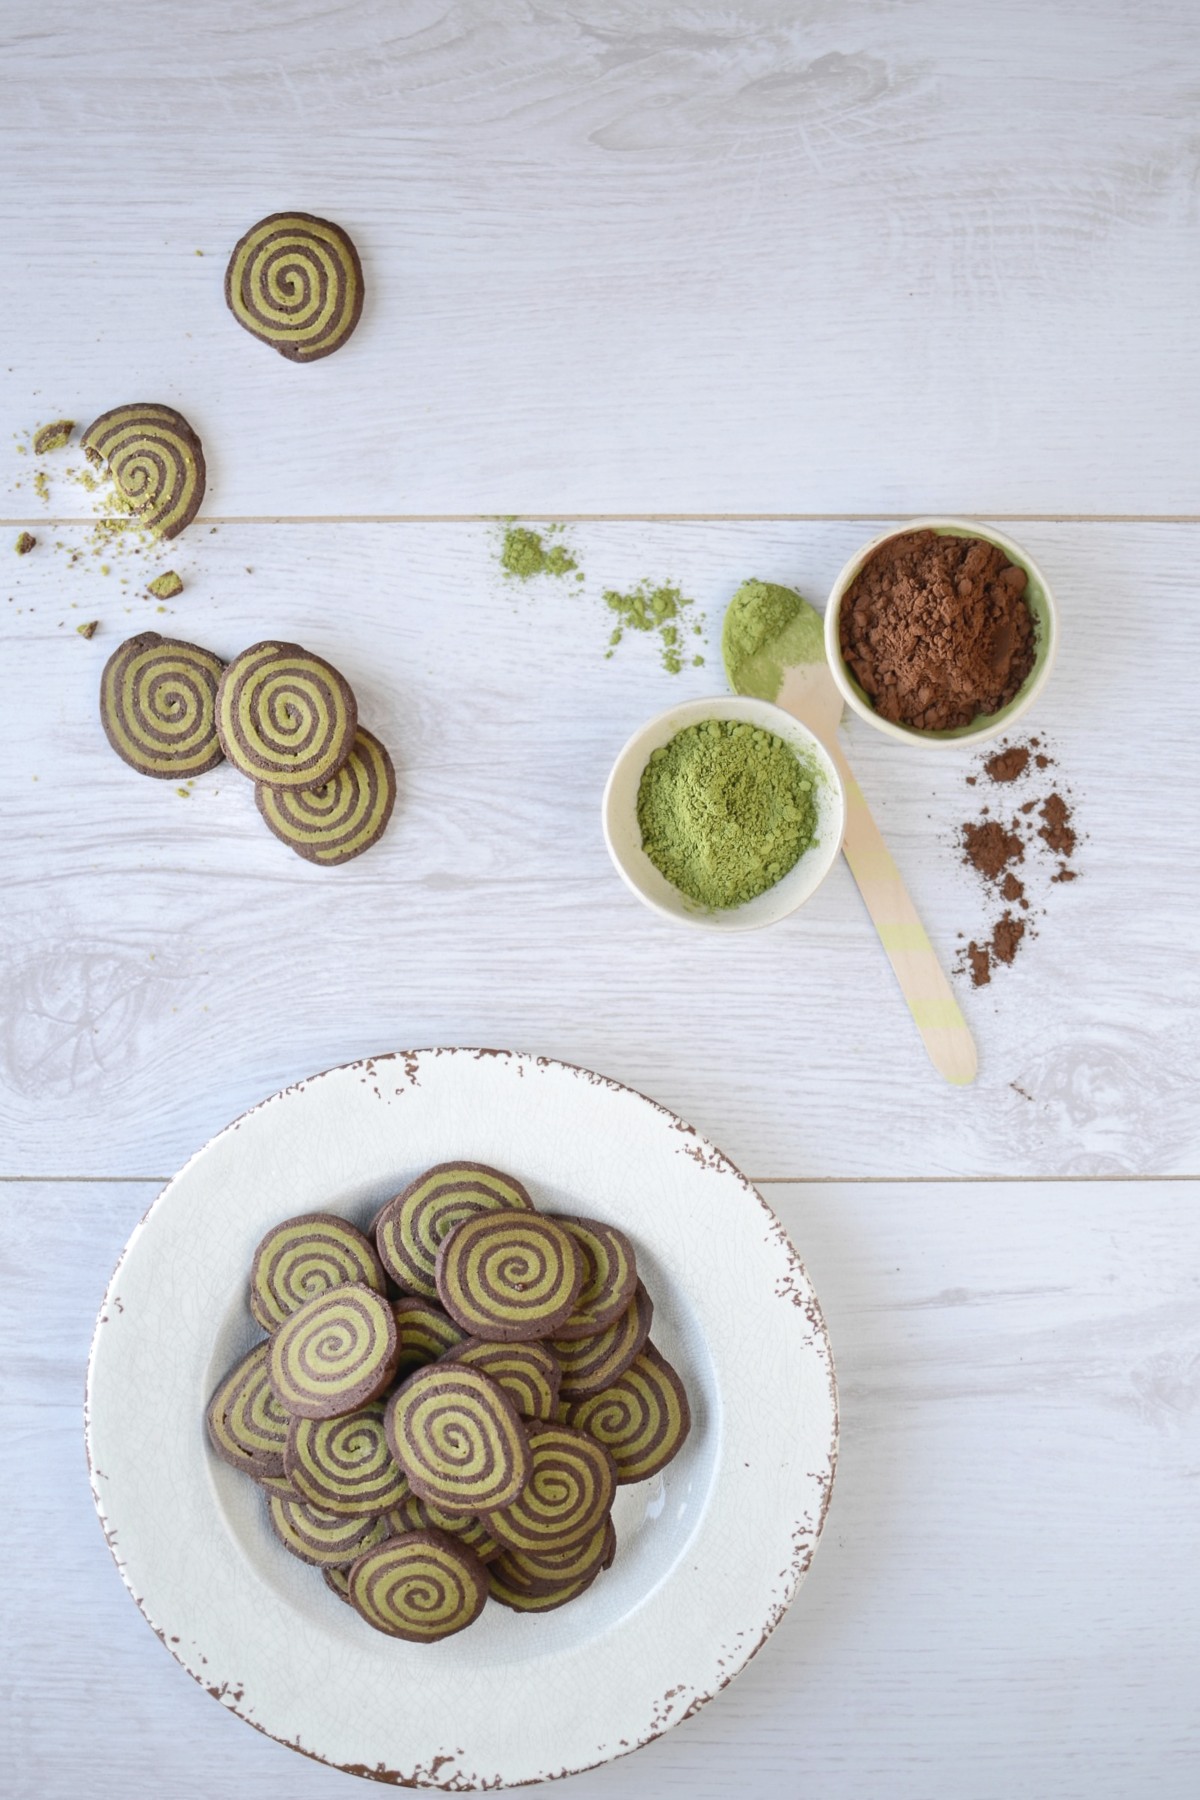
Gluten-free cacao and matcha pinwheel cookies
Makes 50 – 60 cookies, depending on thickness
Ingredients
110g butter, preferably organic and pastured
130 – 140g coconut sugar (you could also use unrefined brown sugar)
1 egg
250g gluten-free flour (try using one that contains no xanthan gum) or wholegrain spelt flour
1 teaspoon baking powder
pinch of salt
15g (2 tablespoons) unsweetened cacao powder
7g (1 tablespoon) matcha green tea powder
Method
- Preheat the oven to 180°C/350°F and line a large baking sheet with parchment paper.
- Cream together the butter and sugar until light and fluffy. Add the egg and mix until well incorporated.
- Combine the flour, baking powder and salt, then fold into the butter mixture.
- Now divide the mixture in half, add the cacao powder to one half and the matcha powder to the other. Use your hands to work the cacao and the matcha into the two balls of dough. The dough will be quite sticky, but should be workable. The matcha half may need a tiny bit more flour.
- Now flatten the cacao dough ball onto a large piece of parchment paper in a rectangular shape. Place another piece of baking parchment on top and roll out until you have a very thin large rectangle. Place in the fridge on a chopping board or tray.
- Repeat the process for the matcha dough half. Remove the cacao rectangle from the fridge, peel off the top piece of paper, and flip over onto the matcha rectangle. Cut off any overhang to patch any gaps.
- Sprinkle the piece of paper that you peeled off the cacao rectangle with flour, then flip the now stuck-together rectangles onto that.
- Carefully start rolling up the dough on the long side until you have a very long and tight sausage. Place this in the fridge for at least 30 minutes before moving on to the next step.
- When completely firm, cut the sausage in half, leave one half in the fridge and slice the other half into thin rounds. Place on the lined baking sheet and bake for 10 to 12 minutes, rotating the sheet once. Repeat for the other half of the sausage.
- Place on a wire rack to cool completely before storing in an airtight container.
Picnic à deux
Ok, full disclosure: I don’t really celebrate Valentine’s Day.
I used to, but that was before I married another Capricorn at the end of January. By the time Christmas, New Year’s Eve, our respective birthdays and our wedding anniversary have been duly celebrated, we are usually ready for a break.
I am a HUGE fan of romantic dates, however. Any time, any place. And if Valentine’s Day happens to be the next available opportunity to spoil your sweetheart, then make the most of it with this easy peasy, super sexy stay-at-home picnic for two. Open fires and games of scrabble optional.
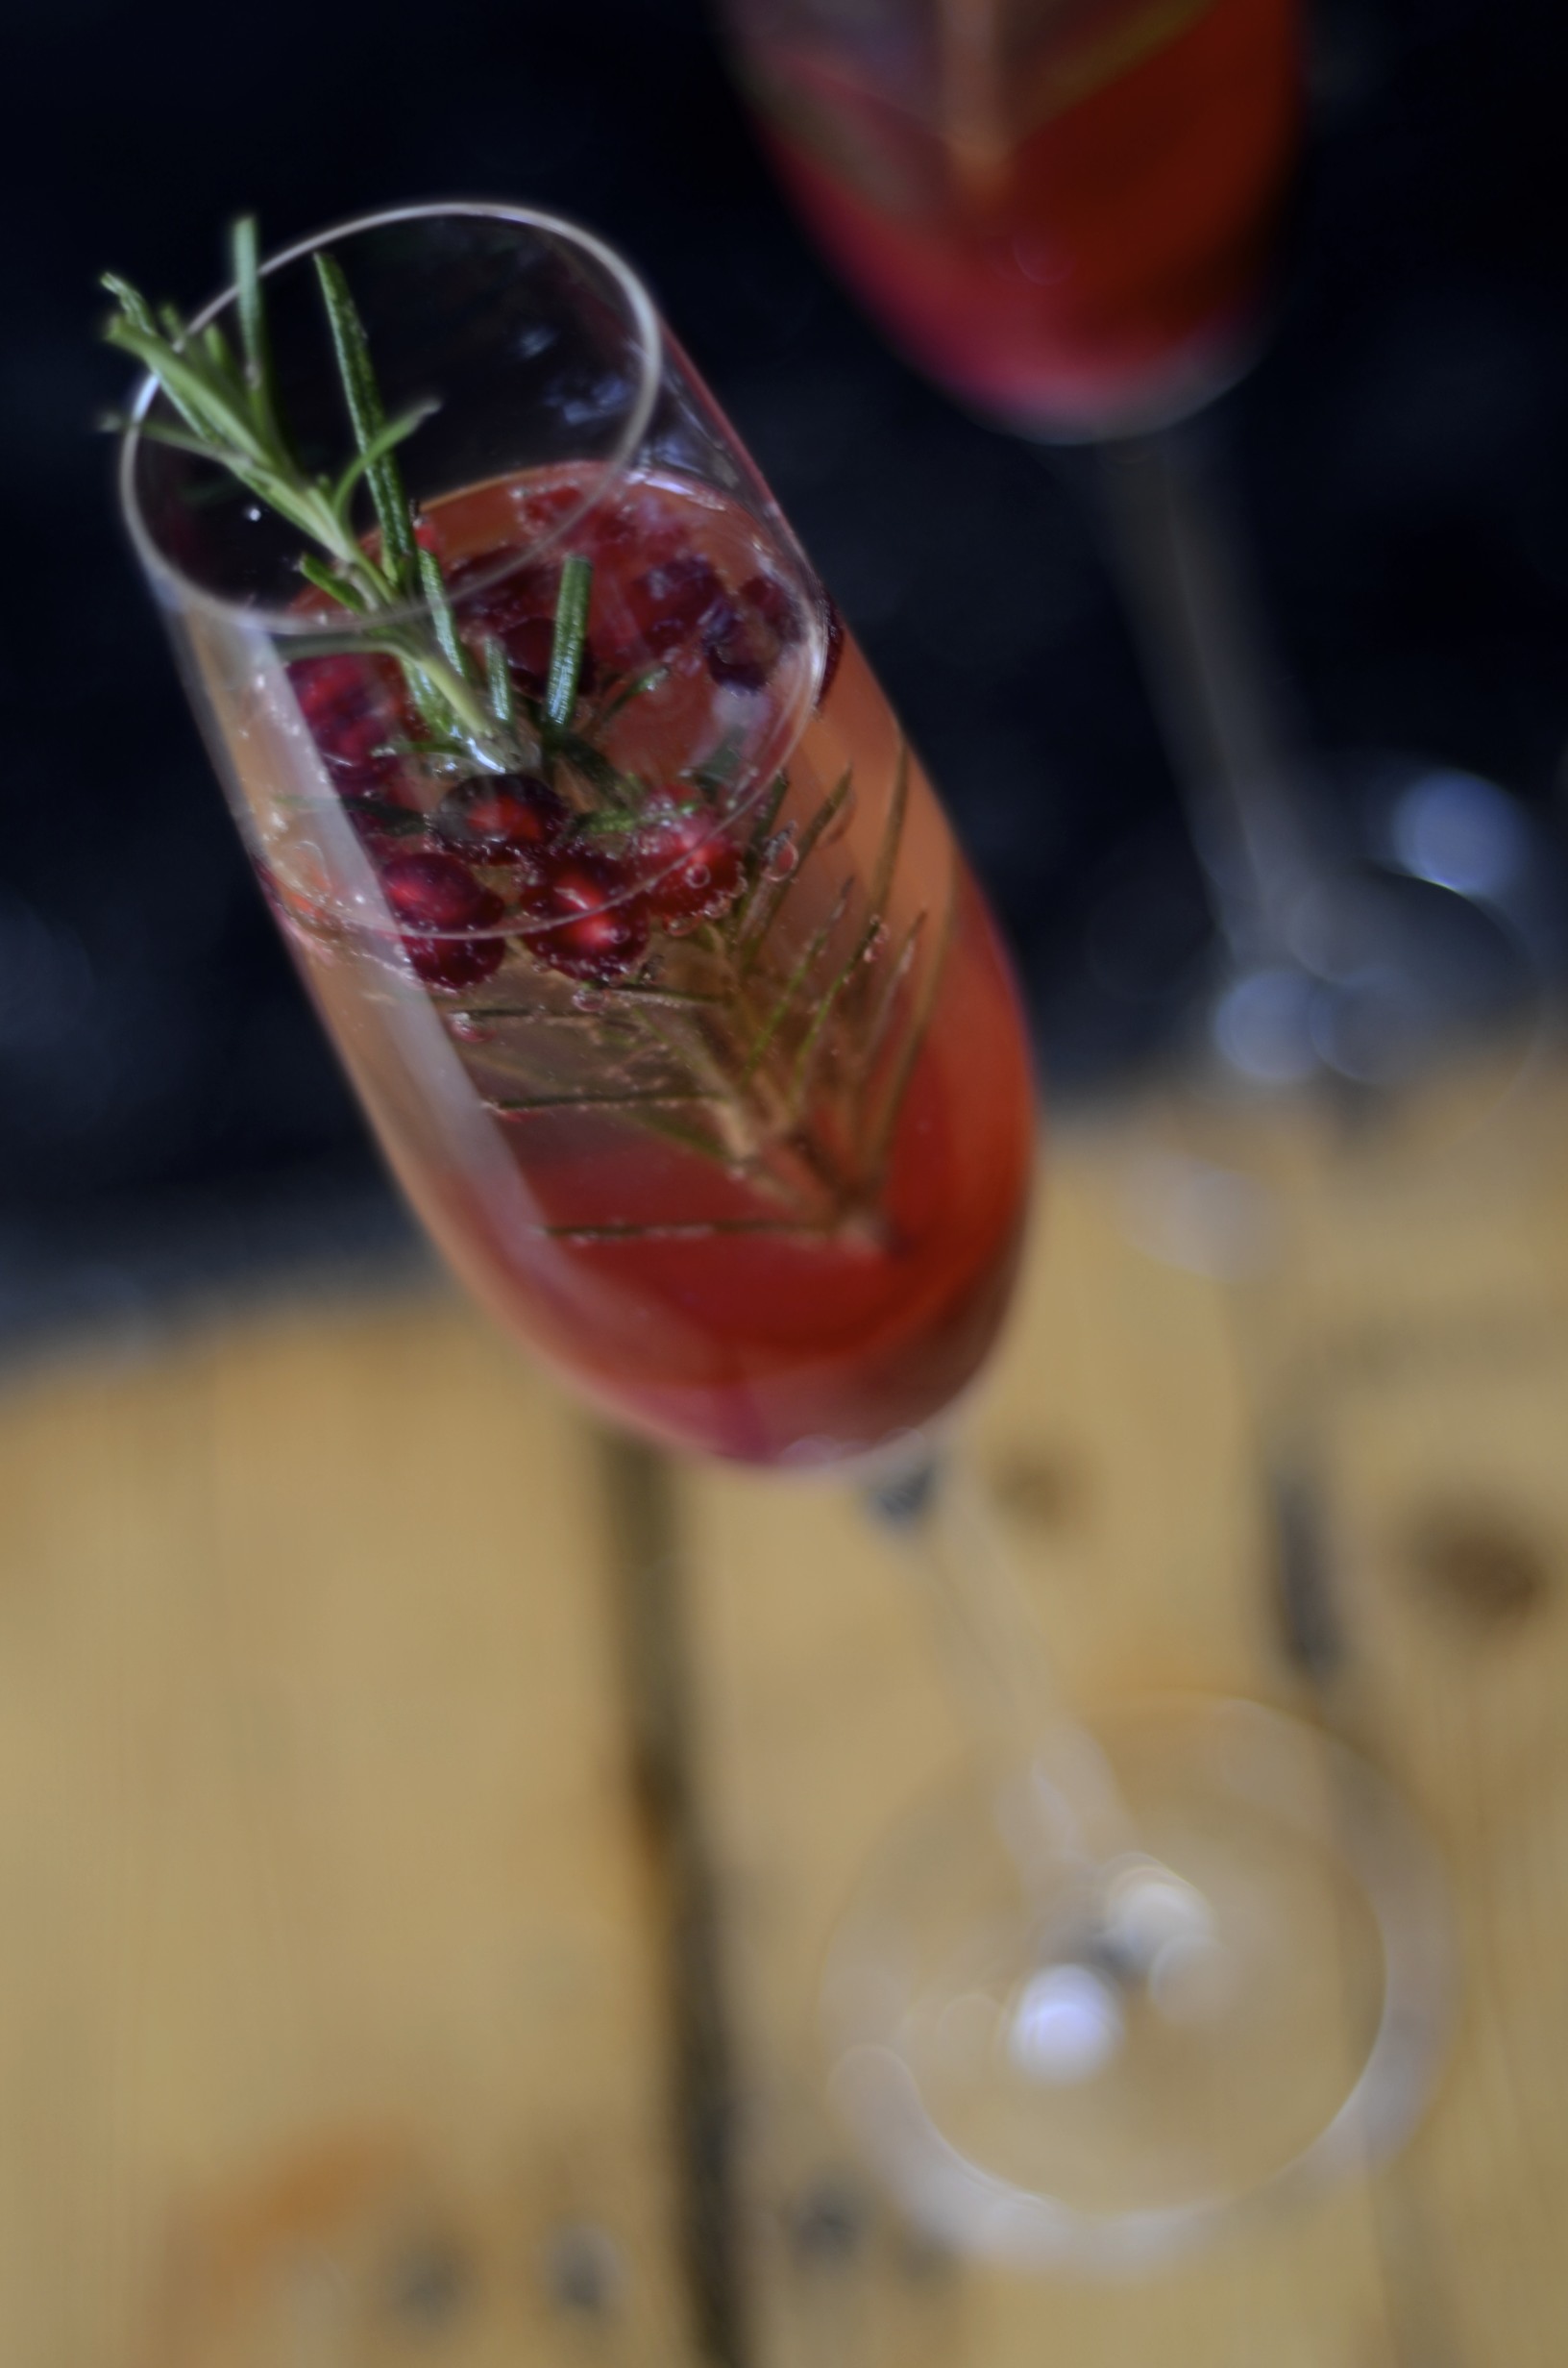
The Ruby Noir
Makes 2 cocktails
Ingredients
60ml (1/4 cup) 100% pomegranate juice, chilled
30ml (2 tablespoons) damson, plum, blackberry or sloe vodka
1 teaspoon sweetened lime juice (squeeze out half a lime and stir in 1 teaspoon honey)
Champagne or sparkling wine, chilled
1 teaspoon pomegranate seeds
2 small and fine rosemary twigs (optional)
Method
- Mix the pomegranate juice, vodka and lime juice, then divide between two champagne flutes, pouring through a funnel if you want to keep it extra neat.
- Top up with Champagne, by carefully pouring the bubbly into the glass over the back of a metal spoon to “float” it on top of the pomegranate mix.
- Carefully float a few pomegranate seeds on top and finish with a rosemary twig, if you like.
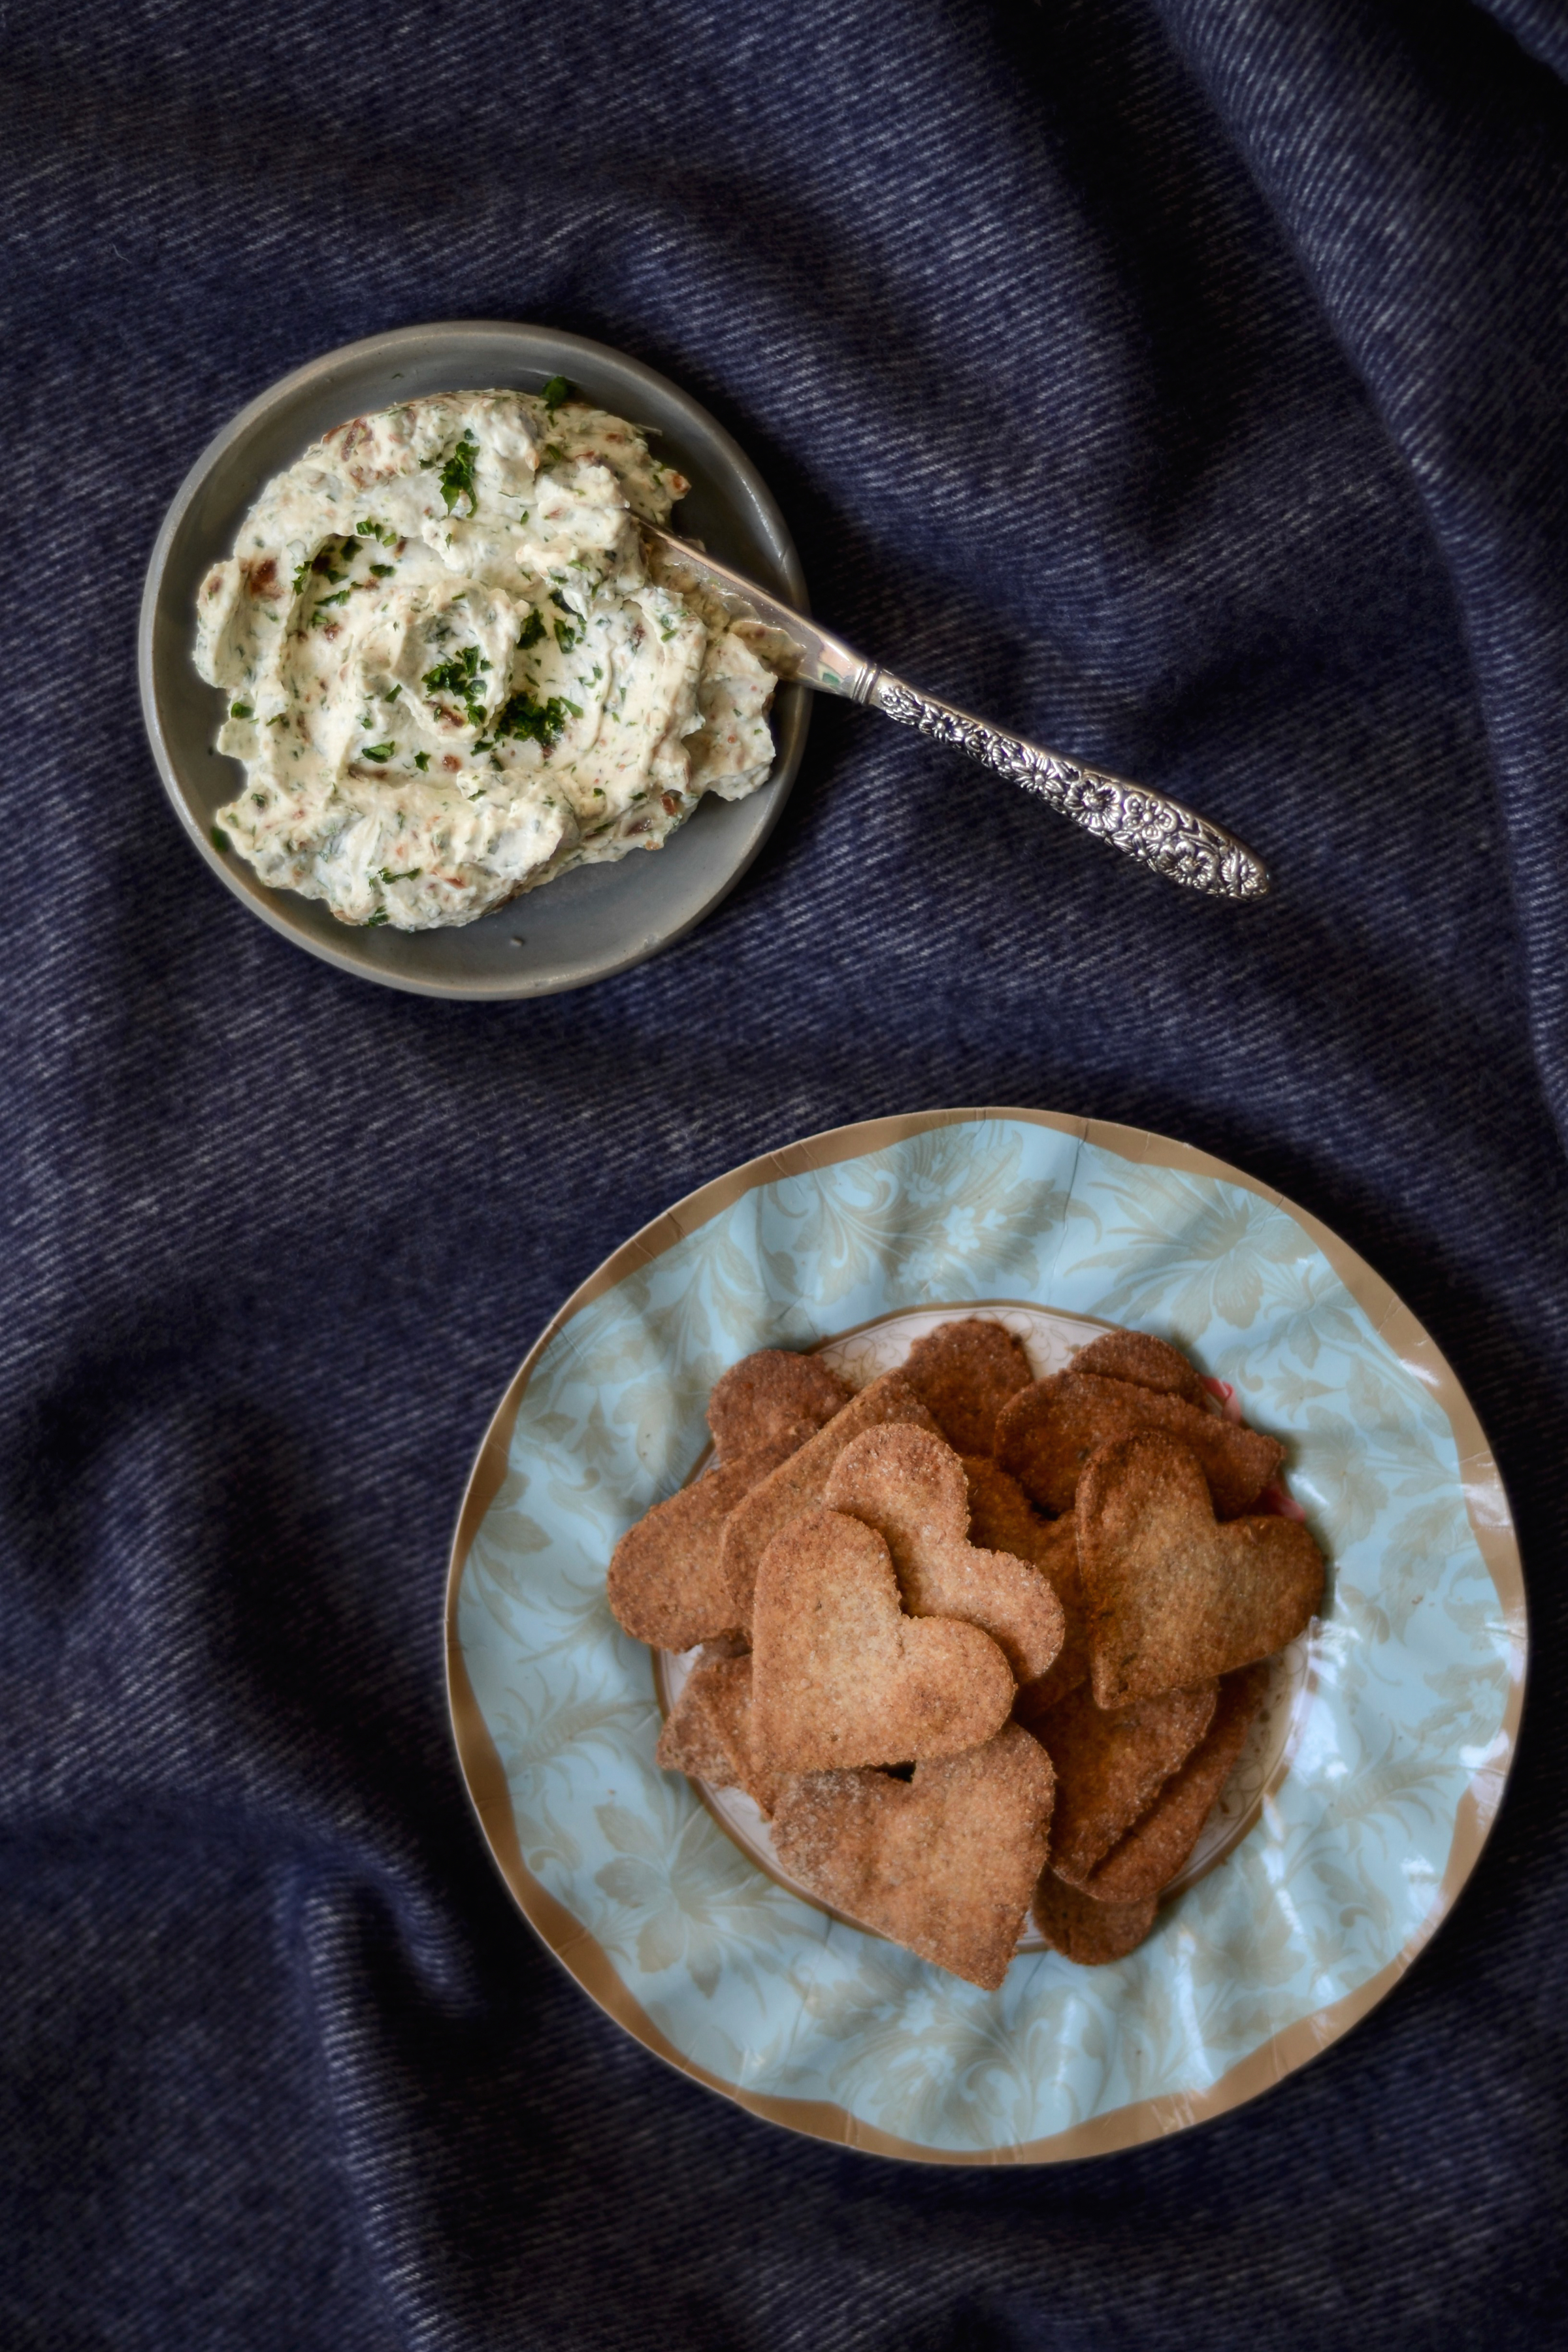
Spiced rye crackers with figgy goat’s cheese
Ingredients for the crackers
Makes about 18 small crackers, but feel free to double or triple the recipe – they keep well
50g (1/3 cup) stoneground rye flour
pinch of salt
pinch each of caraway seed, aniseed and cumin
10g (about 2 teaspoons) cold butter, cut into small cubes
15ml (1 tablespoon) or thereabouts milk of your choice (I used almond milk)
Ingredients for the figgy goat cheese
Enough for 2 people
70g (1/3 cup) soft goat cheese
1 large soft dried fig, finely chopped
1 teaspoon finely chopped parsley, leaves only
sea salt and freshly ground black pepper
aged Balsamic vinegar to serve (optional)
Method
- For the crackers: preheat the oven to 220°C / 420°F. Line a small baking sheet with parchment paper.
- Whisk together the flour, spices and salt. Using your finger tips, rub the butter into the flour until it resembles fine bread crumbs.
- Add the milk and knead the dough until it comes together in a soft ball – not too sticky, and not crumbly.
- Roll the dough out thinly and use a cookie cutter to cut out shapes. Place these on the prepared sheet.
- Bake for roughly 10 minutes, or until the edges have turned golden, then remove from the oven and allow to cool on a cooling rack.
- For the goat cheese: while the crackers are baking, mix all the ingredients for the cheese in a bowl, adjust seasoning and set aside.
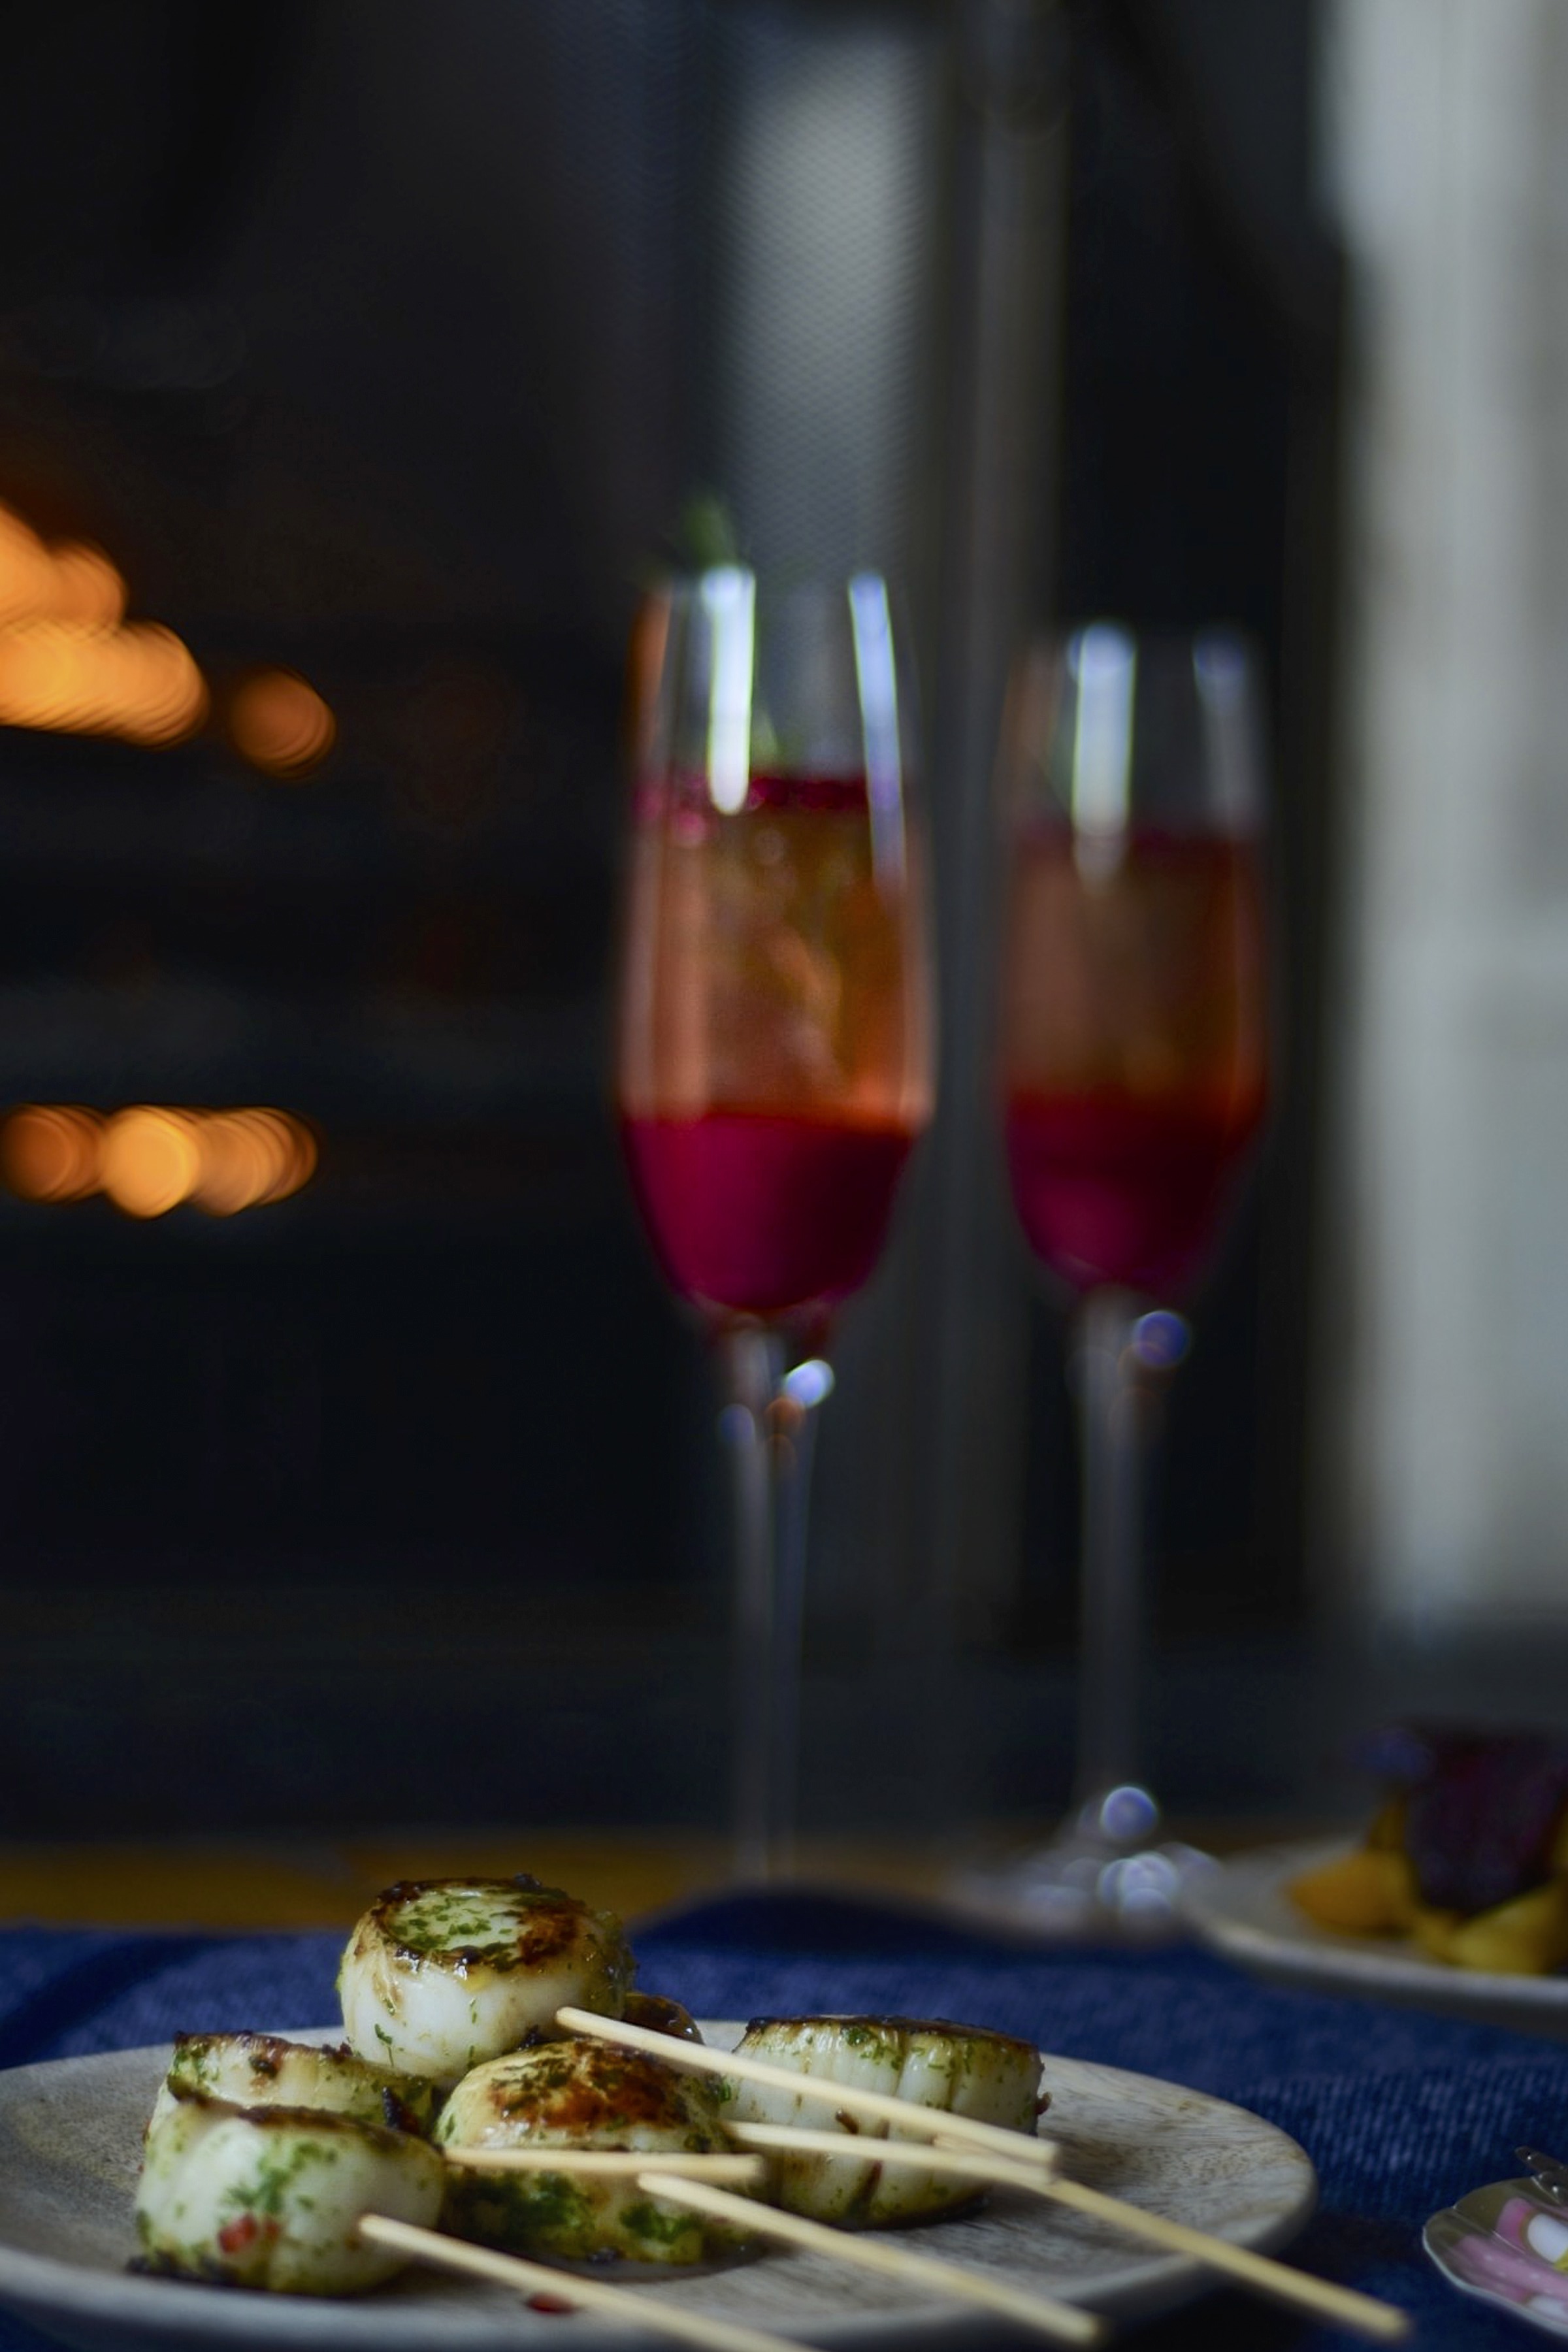
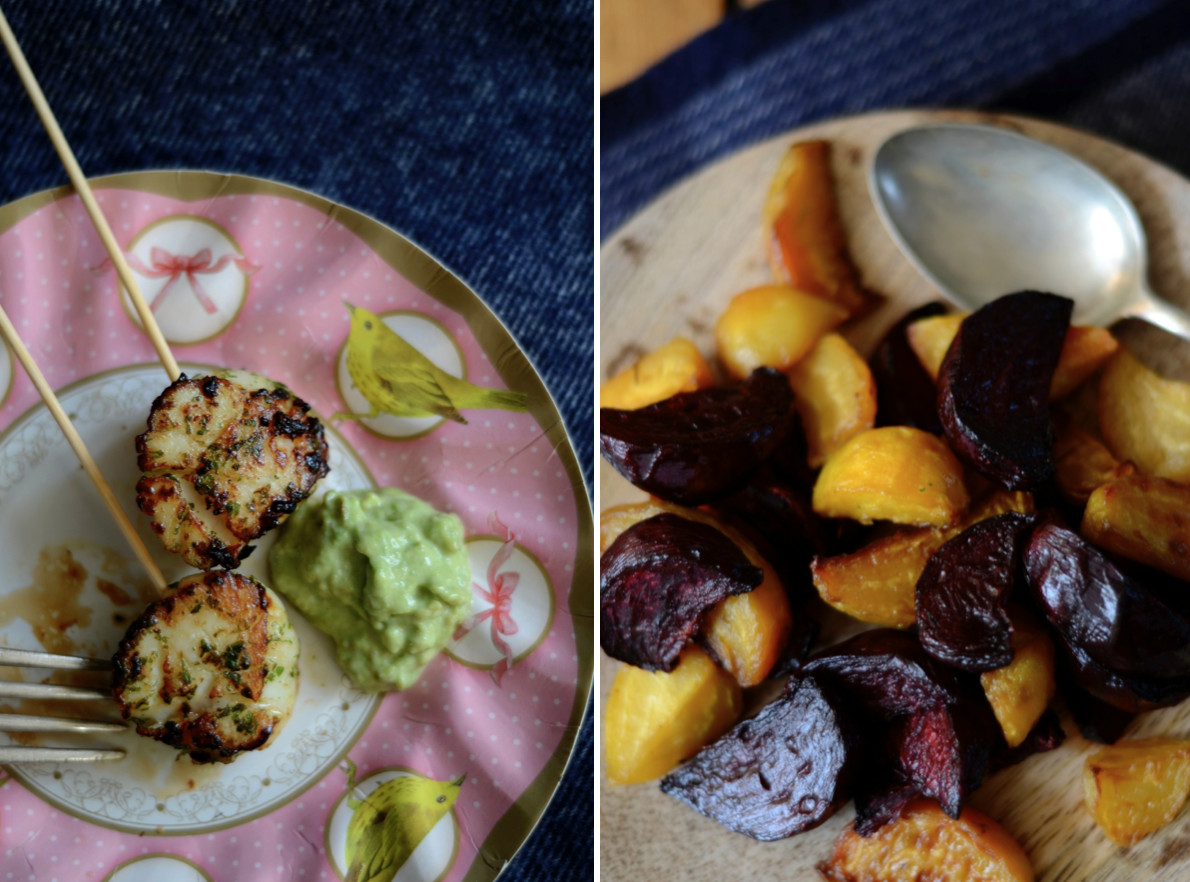
Scallop pops with avocado aïoli
What can be more seductive than nibbling on a sizzling scallop lollipop? These guys are the perfect mess-free picnic food and add just the right amount of spice to wake up the senses. Serve with a plate of gorgeous roasted mixed beets.
Ingredients for the marinade
handful of fresh coriander (cilantro), finely chopped
1 small red chilli, finely chopped (deseeded and membranes removed if you prefer it milder)
1 large garlic clove, thinly sliced
splash of olive oil
For the pops
6 large or 8 small scallops
knob of butter, preferably organic
4 to 6 wooden skewers
Ingredients for the avocado aïoli
1 small ripe avocado, mashed
1 – 2 tablespoons garlic aïoli or mayonnaise, preferably home-made
squeeze of lemon
sea salt
Method
- Mix all the ingredients for the marinade and rub it into the scallops. Set aside for at least half an hour.
- While the scallops are marinating, mix together the ingredients for the avocado aïoli and refrigerate.
- When you are ready to fry the scallops, pick out the garlic slices, as they burn too easily, and heat the butter in a heavy bottomed skillet or pan over a medium heat.
- Fry the scallops for a minute or two on each side – do not overcook them! – then slide one to two onto each skewer. Season with sea salt and serve with the avocado aïoli.
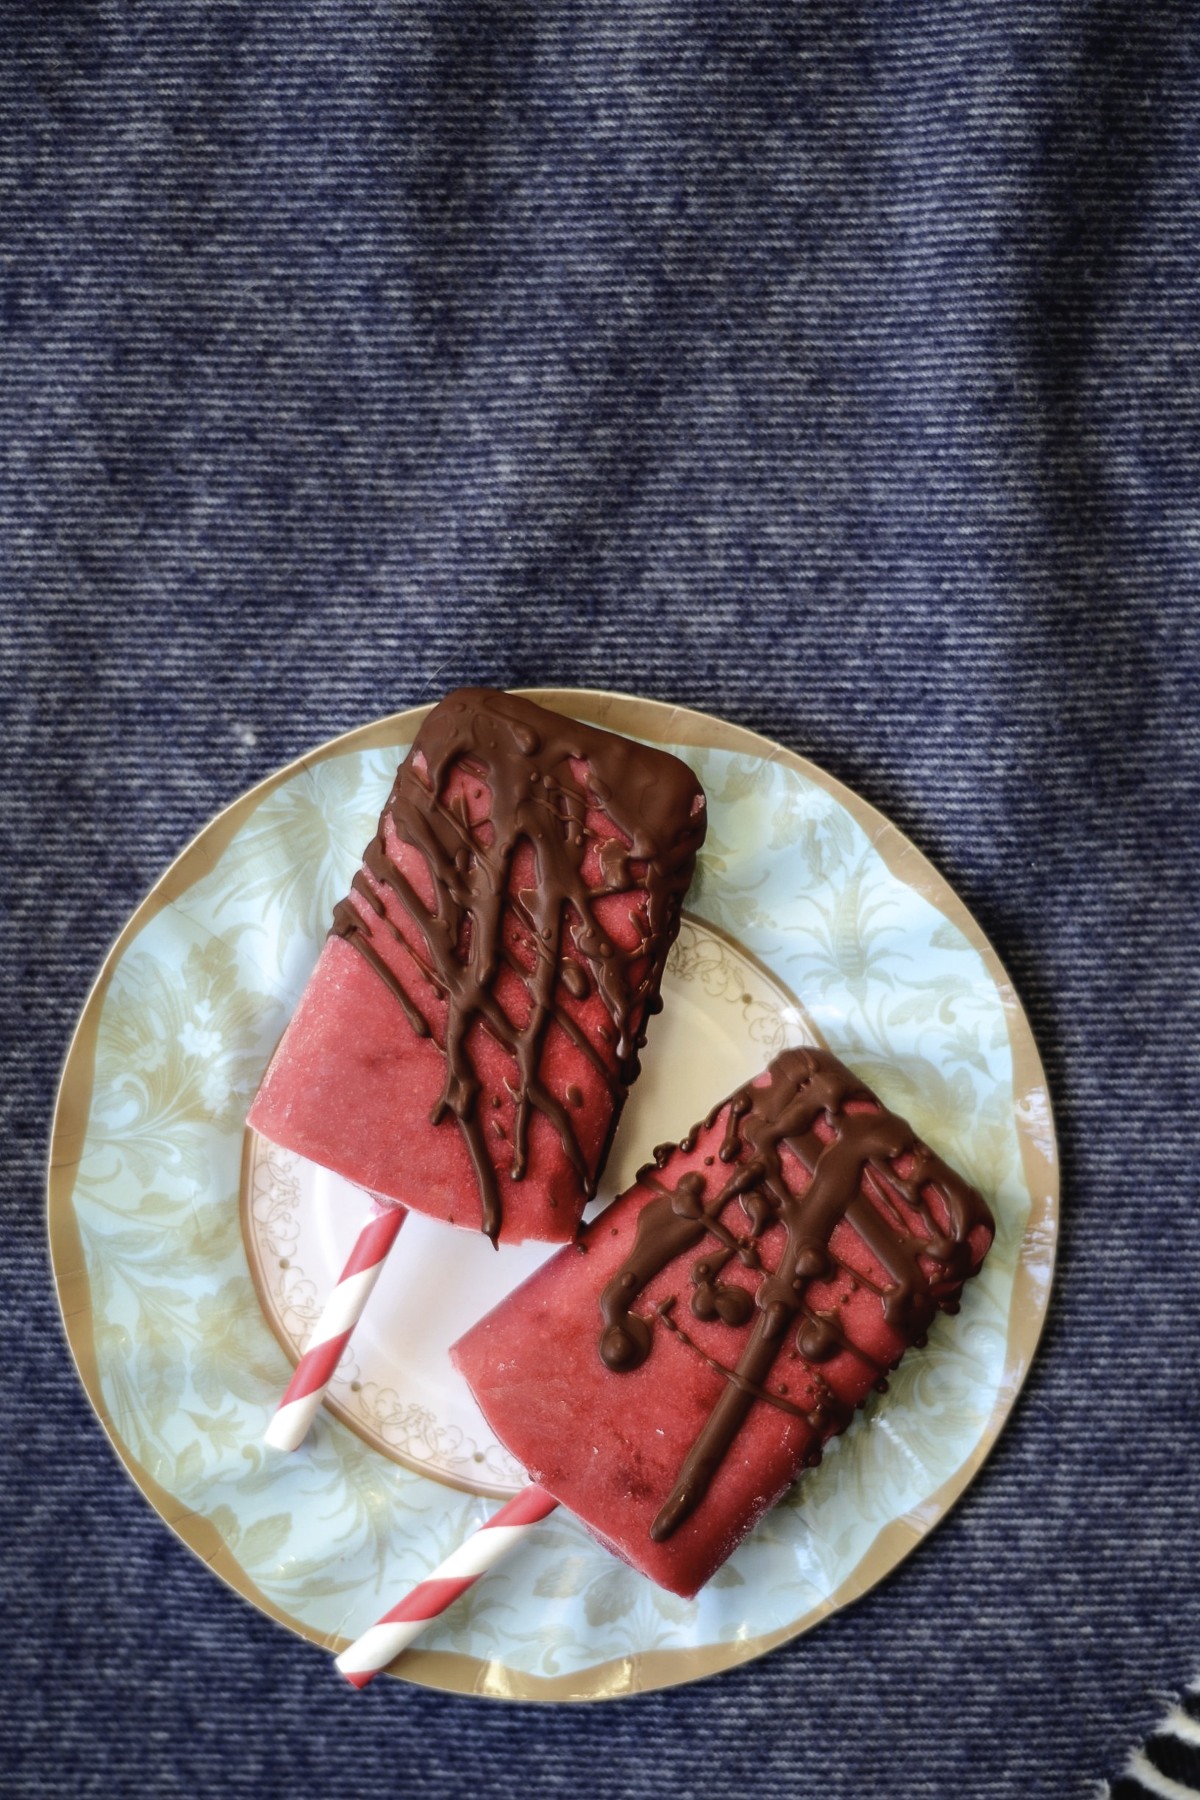
Chocolate-drizzled pear and raspberry lollies
For me, a romantic dinner has to be delicious, yes, but definitely not too filling. Who wants to feel stuffed and uncomfortable on a date? These refreshing, yet luscious lollies will hit the spot.
Makes 4 small or 2 large lollies
Ingredients for the lollies
teaspoon of coconut oil
2 pears, peeled, cored and quartered
1 teaspoon molasses sugar or dark brown muscovado sugar
80g (1/2 cup) frozen or fresh raspberries, plus a few extra
60ml (1/4 cup) milk of your choice (I used almond milk)
Ingredients for the chocolate drizzle
10g / 10ml (2 teaspoons) coconut oil
20g (about 6 squares) dark chocolate, broken into small pieces
Method
- For the lollies: heat the coconut oil in a heavy based saucepan until hot, then lay the pear quarters down, sprinkle over the sugar and do not turn until they’ve developed a lovely golden colour and the sugar has melted (about 5 to 10 minutes).
- Turn over and fry on the other side for another 5 minutes.
- Now blend the pears, raspberries and milk until smooth. Stir in the remaining raspberries (crush them if they are frozen) and fill the ice lolly moulds.
- Freeze for at least 4 to 5 hours.
- For the chocolate drizzle: put them coconut oil in a small saucepan and heat over a low heat until melted.
- Add the bits of chocolate and continue to warm over a medium heat until melted.
- Give it a quick whisk, then set aside to cool slightly.
- Run hot water over the moulds to remove the lollies. Using a spoon, drizzle some chocolate sauce over each and give it half a minute or so to set.
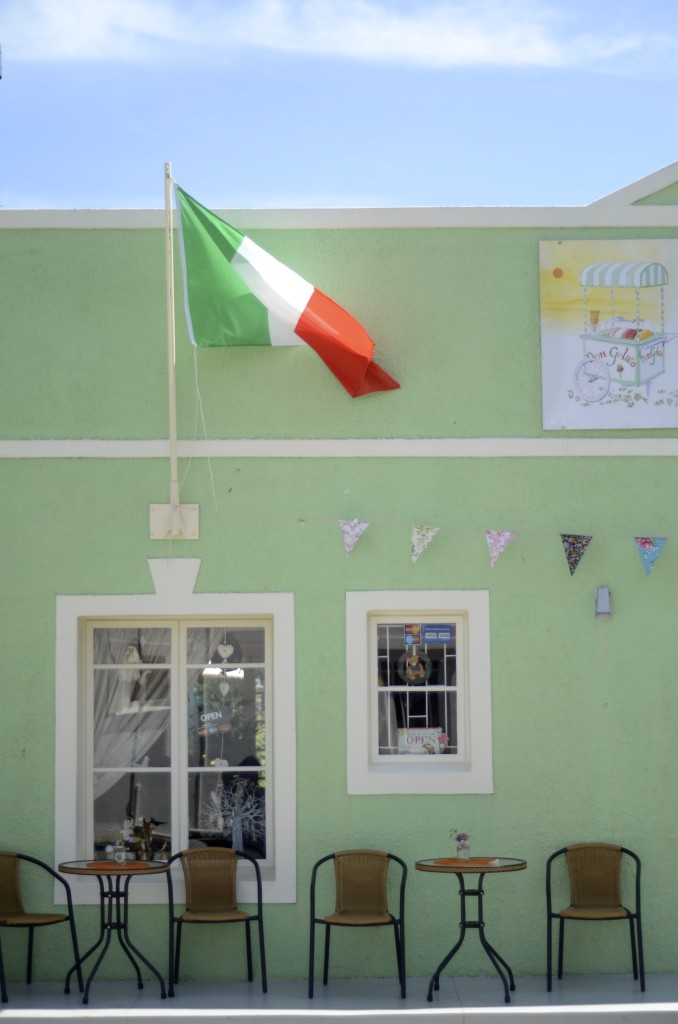
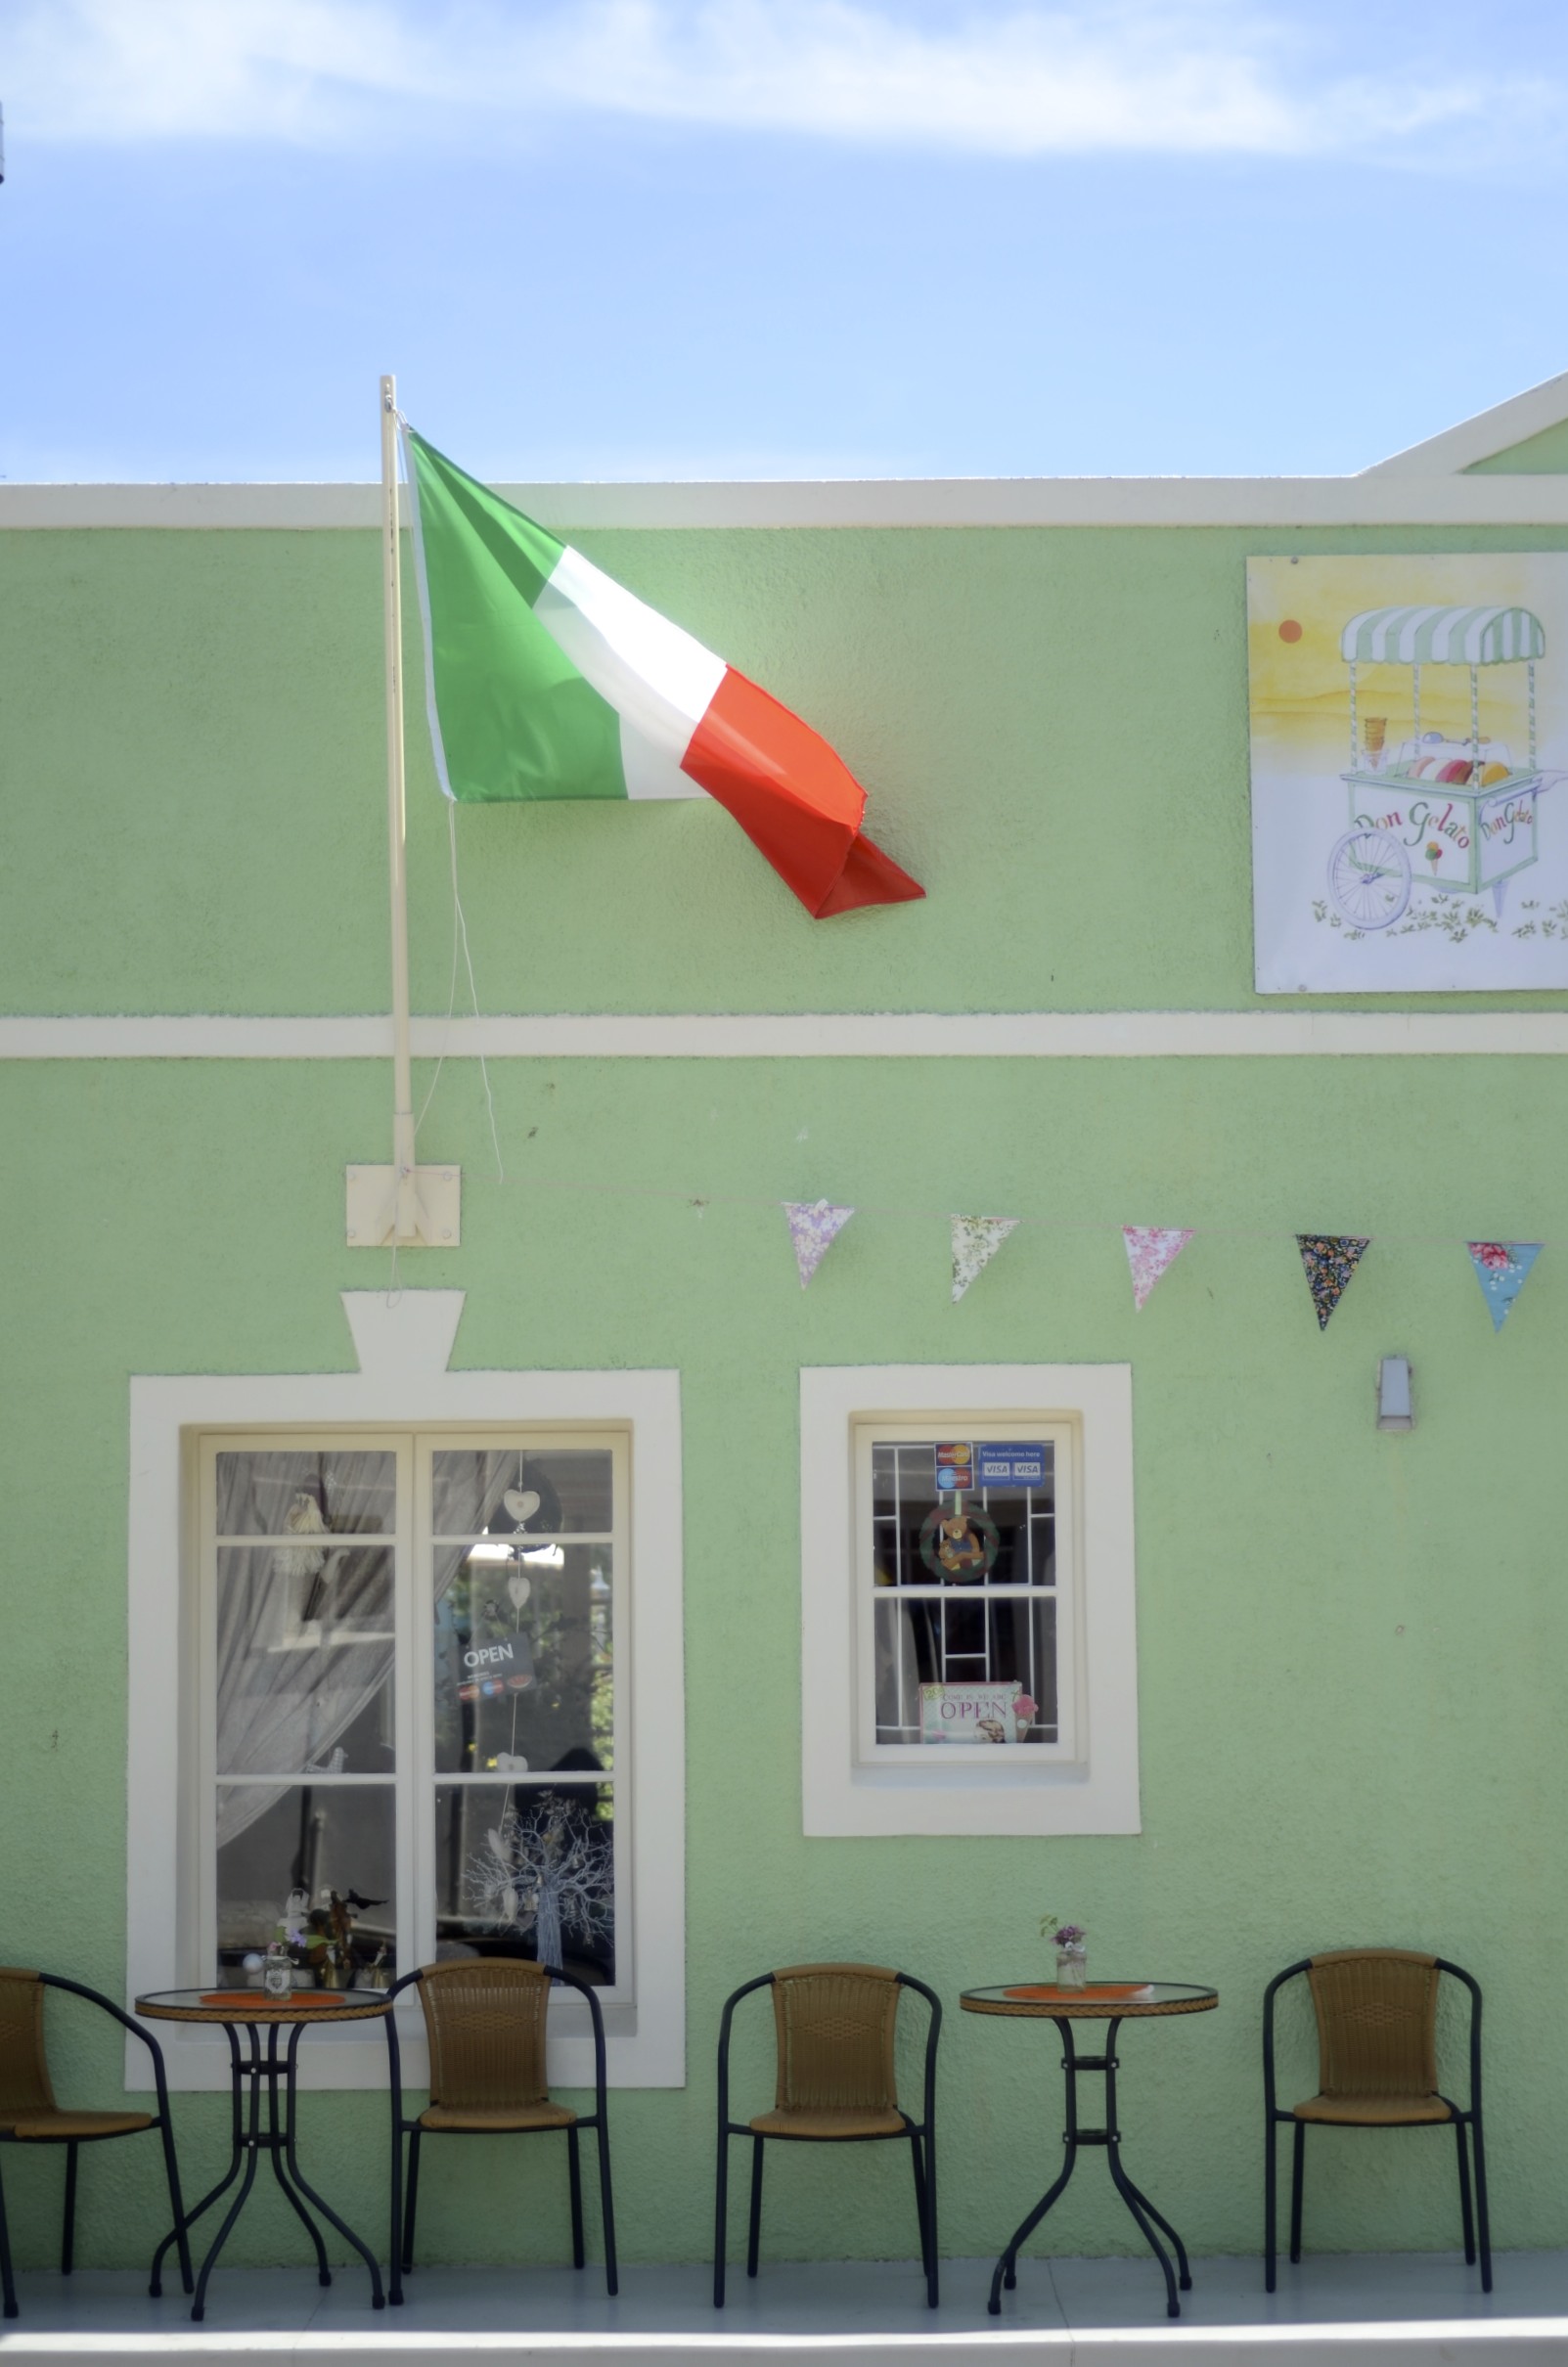
No-churn cape gooseberry ice cream
Our time in South Africa is almost at an end, and as usual I feel rather blue at the prospect of catching a flight back to a very wintry London. We met a charming Roman yesterday who relocated his entire family from Italy to make and sell delicious artisanal gelato in the Cape. He couldn’t quite understand why we had left paradise for greener pastures. They recently opened their first shop in Stanford, a sleepy little town near Walker Bay in the south. It happens to be where my grandmother farmed ostrich and sheep until she was deep into her eighties, so it holds a special place in my heart.
Now a popular weekend destination, the town also boasts some excellent restaurants, most notably Mariana’s, where we have had many a fabulous lunch on the vine-covered terrace. Our most recent meal ended with a trio of berry ice creams. They were all lush and delicious, but it was the Cape Gooseberry ice cream that impressed me most. Here is my very modest attempt at recreating it. It is a no-churn version, which means it is very easy to make, but also rather rich.

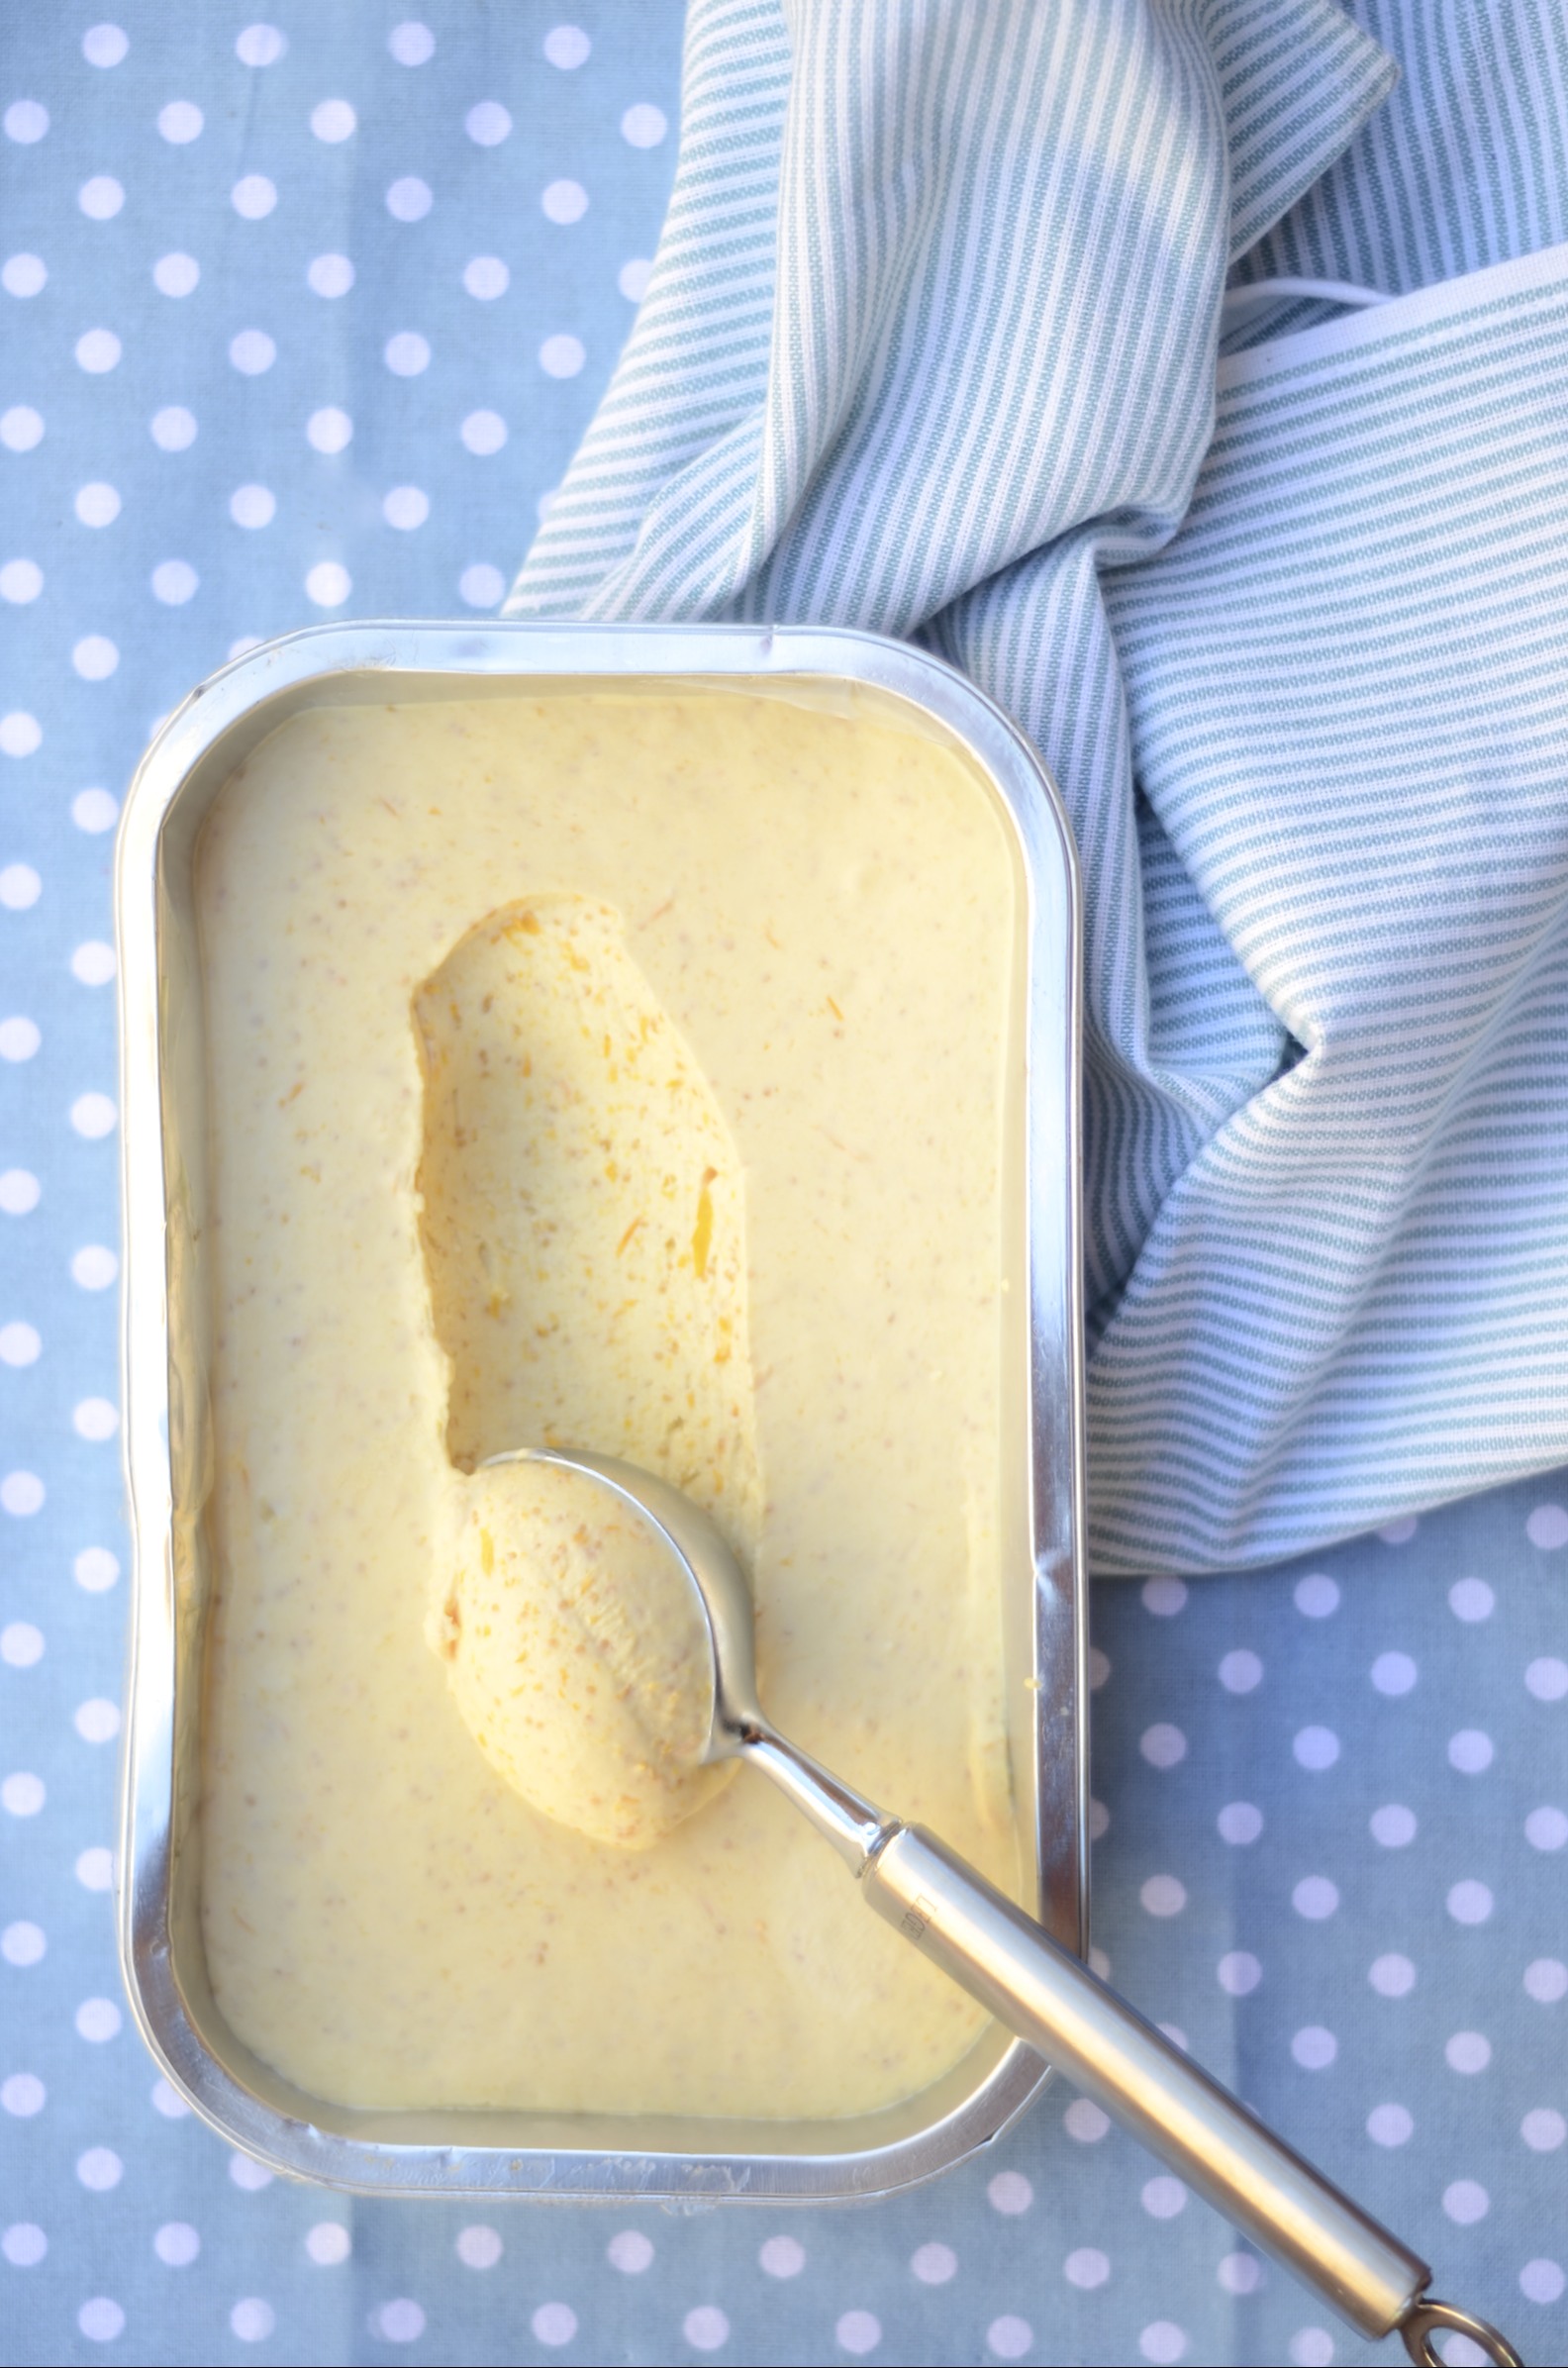
 Cape Gooseberry Ice Cream


Cape gooseberries, also called strawberry tomatoes, golden (goose)berries, or Chinese lanterns, and “apple sweethearts” in Afrikaans, are filled with tiny seeds and have a natural tart flavour.
Serves 6 – 8
Ingredients
300g de-husked cape gooseberries, roughly chopped
80 – 100g unrefined brown sugar
500ml (2 cups) heavy cream (48-50% fat content), preferably pastured and unpasteurised
freshly squeezed lemon juice to taste
Method
- In a small saucepan, gently heat the berries with the sugar until the sugar has dissolved and the berries have softened, stirring occasionally.
- Turn up the heat and simmer the berries for a couple of minutes before using a stick blender (or blender) to puree.
- Add enough lemon juice to give you a very tangy mixture, then set aside or stir over an ice bath until completely cool.
- Use a whisk to incorporate the cooled berry mix into the cream. Whip until it thickens and holds soft peaks, then spoon into a shallow container, cover and freeze until firm (about 5 hours).
- Serve in wafer cones or with crisp thin biscuits. If the ice cream is too firm to scoop, leave it at room temperature for 15 minutes or so and try again.


Four persimmons and a pumpkin pie
The autumn colours, sights and sounds stir a certain longing in most cooks to bake. For many North Americans this means pumpkin pie – a dish almost synonymous with the autumnal Thanksgiving celebrations. In South Africa, we grew up eating pumpkin fritters doused with cinnamon sugar alongside our Sunday roast, so a sweet dish with pumpkin as its star is no stranger to me. In my pie recipe, however, the pumpkin (or butternut squash) shares centre stage with some gorgeous persimmons.
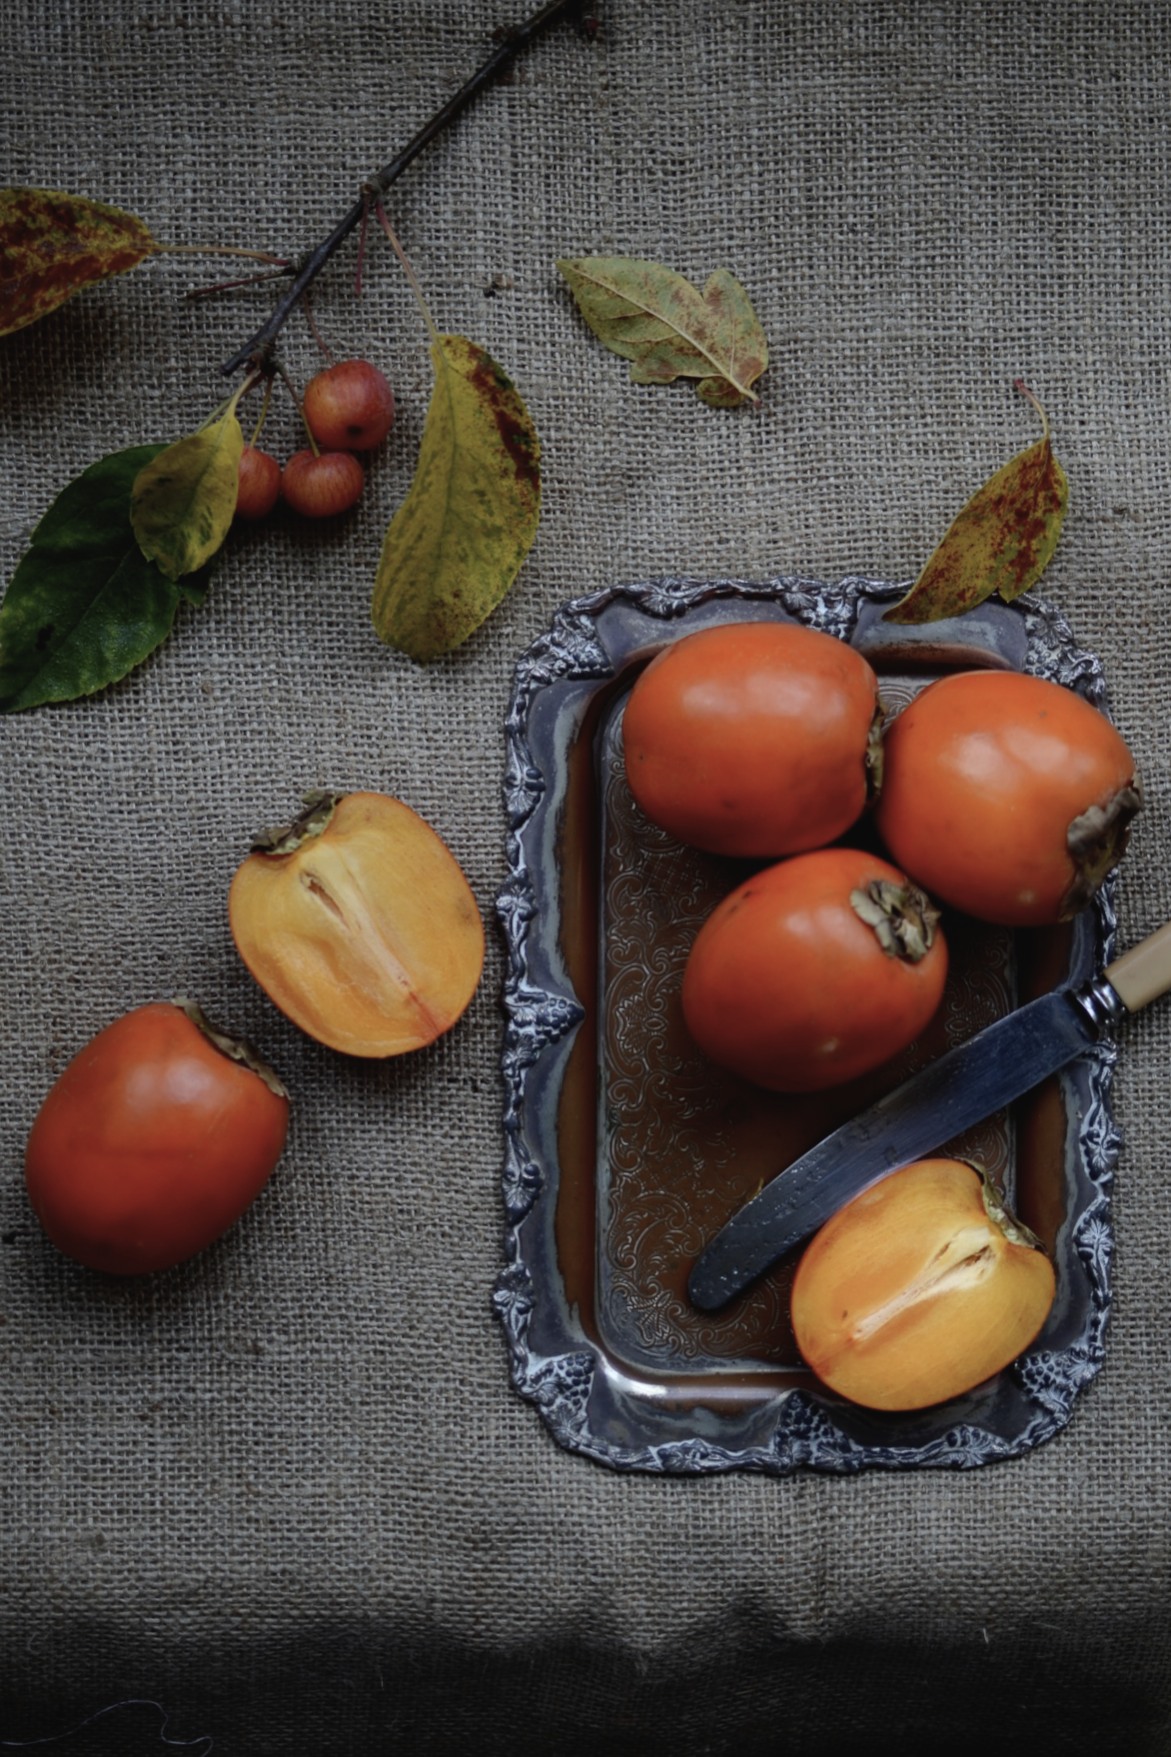
Persimmons vary in colour from golden yellow to burnt orange and red, and can be round or oval. Persimmon trees carry either astringent fruit (whilst unripe) or non-astringent fruits. The astringent cultivars (such as Eureka, Hachiya, Saijo, Tamopan, Tanenashi, Triumph, etc.), are high in tannins and must be allowed to ripen fully until the flesh attains a consistency akin to jelly. The non-astringent kinds (Fuyu, Gosho/Giant Fuyu/O’Gosho, Imoto, Izu, Jiro, Maekawajiro, Okugosho, Suruga, etc.) contain less tannins and can be eaten when still crispy.
Persimmon fruit, originally from East Asia, has a sweet, succulent flesh that holds several health promoting benefits. Persimmons contain flavonoid poly-phenolic anti-oxidants such as catechins and gallocatechins in addition to an important anti-tumour compound, betulinic acid. Catechins are known to have anti-infective, anti-inflammatory and anti-hemorrhagic properties. Fresh persimmons also contain other anti-oxidant compounds like vitamin A, vitamin B, vitamin C, beta-carotene, lycopene, lutein, zea-xanthin and cryptoxanthin. Together, these compounds functions as protective scavengers against oxygen-derived free radicals and reactive oxygen species that play a role in ageing and various disease processes. Fresh persimmons also contain minerals like potassium, manganese, copper, and phosphorus.
Pumpkin and persimmon pie
Makes one 28cm pie

Ingredients for crust
115g (about 1 cup) wholemeal spelt flour
60g (about ½ cup) stoneground rye flour
25g (2 tablespoons) date sugar or unrefined brown sugar
large pinch of sea salt
110g cold butter, cut into pea-sized pieces
15 – 30ml (1 – 2 tablespoons) ice cold water
Ingredients for filling
850g peeled and cubed butternut squash (about 1 medium butternut), roasted (should yield 360g or 1 ½ cups mashed roasted flesh)
flesh of 4 ripe persimmons (cut in half horizontally and scoop out with a spoon)
100g (about ½ cup) date sugar or unrefined brown sugar
60g (1/3 cup) unrefined brown sugar
2 teaspoons ground cinnamon
1 heaping teaspoon ground ginger
generous grating of nutmeg (about 1/2 a nut)
¼ teaspoon allspice
pinch of salt
125ml (½ cup) milk of your choice
125ml (½ cup) organic double (heavy) cream
3 large eggs
Method
- Grease a 28cm (or 11 inch) loose-bottomed tart form.
- For the pastry: put the flours, date sugar, salt and cold butter in the bowl of a food processor and blitz until it looks like coarse sand. This step can also be done by hand by rubbing the butter into the flour with your finger tips.
- With the motor running, add 1 to 2 tablespoons ice cold water or until the dough starts coming together. Or if you are doing it by hand, just keep sprinkling cold water on the dough until it starts to come together.
- Tip the pastry out into a bowl and knead very briefly until you have a smooth (not crumbly or sticky) ball of dough.
- Roll out thinly between two pieces of greaseproof paper, then fold it over your rolling pin and lay it across your greased tart form. Press the pastry into the edges and up along the sides, trimming where necessary. Refrigerate for at least half an hour.
- Preheat oven to 180°C / 360°F.
- When the pastry is completely firm, remove from fridge and place on a baking sheet. Partially blind bake in the hot oven for 10 minutes.
- To make the filling: in a food processor, puree the roasted squash, persimmon flesh, date and brown sugars, and spices until very smooth. Scrape the filling into a little pot and, stirring continuously, cook over medium heat until the mixture starts to bubble (about 5 – 7 minutes). Set aside.
- Whisk together the milk, cream and eggs, then whisk the pumpkin mixture into the egg mixture.
- Carefully pour the filling into the pastry shell and bake for 30 minutes or until filling is lightly cracked around edges and still a tiny bit wobbly in the centre. Allow to cool completely before slicing.
- Serve with Greek yoghurt, soured cream or crème fraîche.