Healthy lunch box ideas
Lunch boxes take me back to my school days and the AMAZING lunches my mum used to pack for us whenever we had after school activities, and couldn’t eat lunch at home. When I moved out, first to study, then to live and work abroad, I adopted the all too common approach of regularly skipping breakfasts, grabbing something quick and ready-made for lunch, and ending the day with a very late, and very large dinner. But the traditional saying “breakfast like a king and dinner like a pauper” is proving rather accurate, as the mounting research† in favour of intermittent fasting shows.
Frontloading your calory intake to the first half of the day reduces risk factors for heart disease, cancer, obesity and diabetes. People who don’t eat large meals in the latter half of the day also tend to sleep better, suffer less digestive issues and show less signs of ageing. This, and all the research I have been reading about children performing better at school, being better behaved and less prone to falling ill when they have a healthy breakfast and nutritious lunch, has convinced me to start making an effort to pack my family some decent lunches. Here are some ideas, which I put together for the team at Compass Fostering to help inspire parents to pack a punch on the lunch box front.
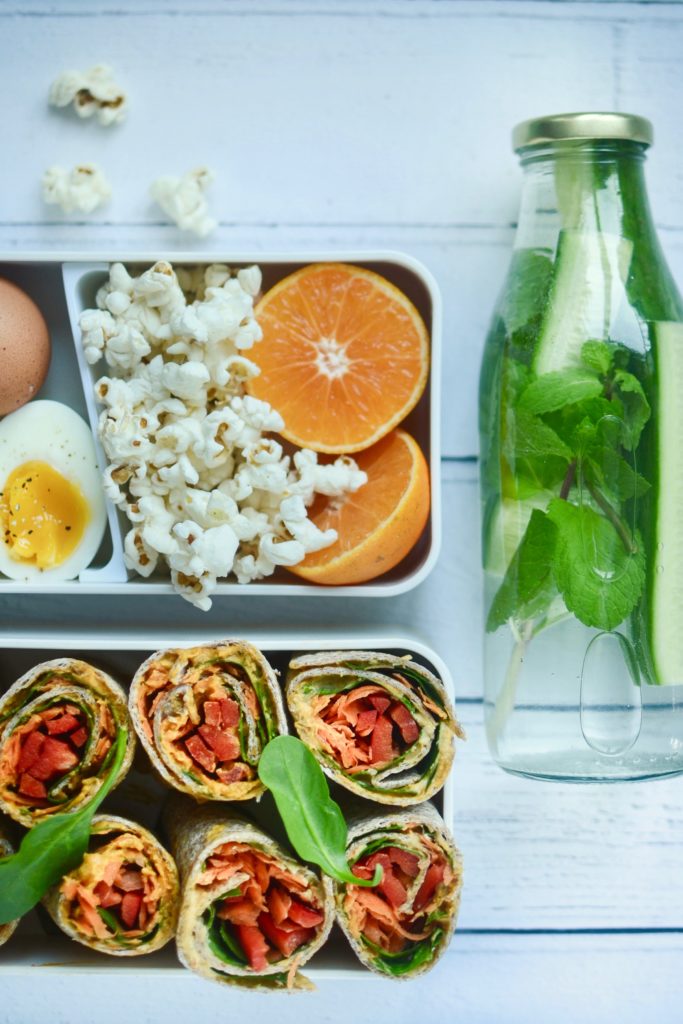
Lunch box 1
Fruit water (cucumber and mint)
Tangerine
Lightly salted popcorn
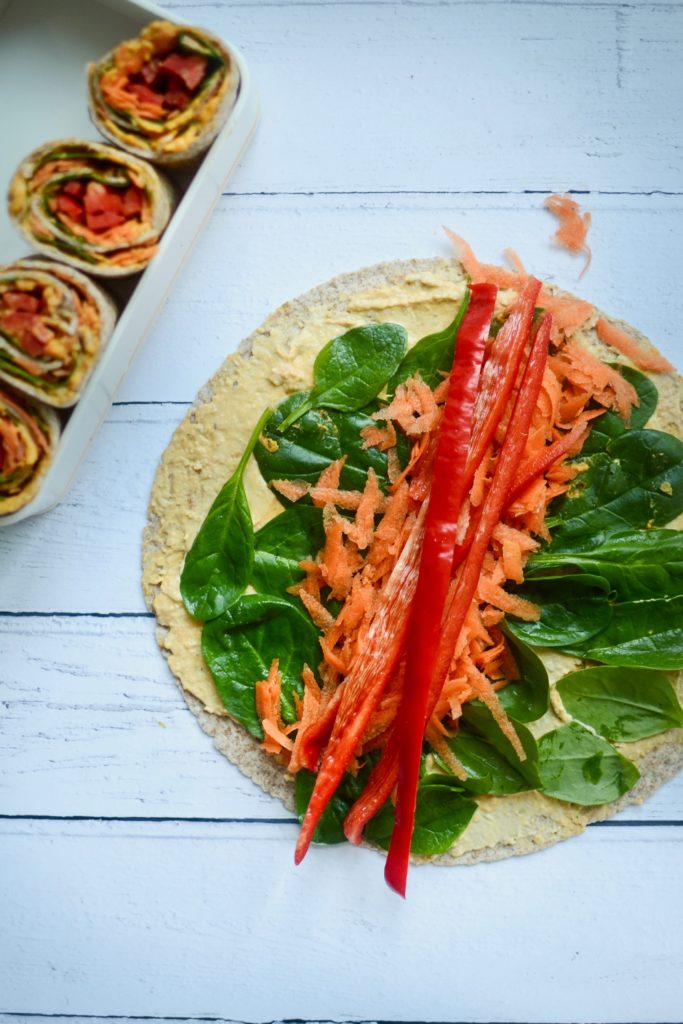
Rainbow wrap
Boiled egg
Ingredients for the rainbow wrap
wholemeal wrap or flatbread
1 – 2 tablespoons hummus or red pepper hummus
small handful baby leaf spinach
1 small carrot, coarsely grated
1/4 red pepper, cut into long strips (the long Romano variety works well here)
Method
1. Spread the hummus evenly onto the wrap, leaving a border along the top end.
2. Place the spinach leaves down in a single layer, pile grated carrot into the centre and lay pepper sticks across.
3. Fold the bottom half over the fillings, ensuring you have a tight roll, then roll upward towards the top end. Cut in half or slice into thirds.
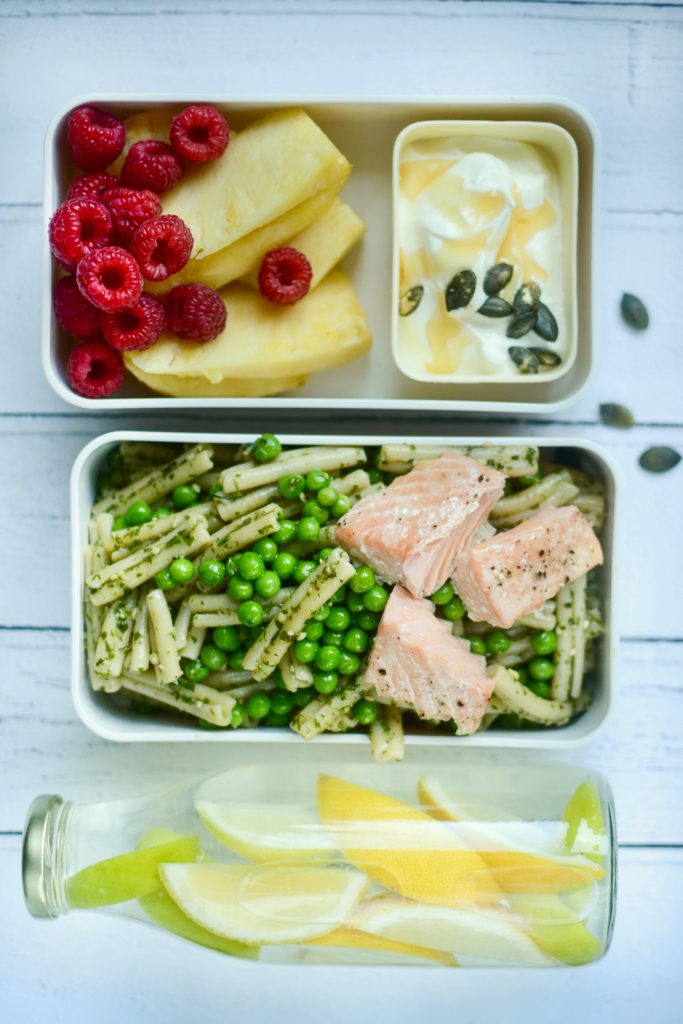
Fruit water (lemon and lime)
Pineapple wedges, raspberries
Wholemeal pesto pasta salad with salmon and peas
Natural Greek yoghurt with pumpkin seeds and raw honey
Ingredients for the pasta
medium bunch basil
small bunch dill, thickest part of stems discarded
medium bunch parsley, thickest part of stems discarded
1 small garlic clove, peeled
salt and pepper
about 80ml (1/3 cup) extra virgin olive oil
cooked salmon (left-overs work well here)
cooked wholemeal pasta (save some of the cooking liquid)
handful of frozen peas
Method
- Put the herbs, garlic, pinch of salt and black pepper in a food processor and blitz until roughly chopped.
- With the motor running, slowly add the olive oil until you reach your desired consistency (the green “pesto” sauce should be loose enough to fold into cooked pasta).
Combine the pesto with cooked pasta, cooked salmon or deboned trout, and defrosted frozen peas. - Add a little more olive oil and pasta cooking liquid if it needs it.
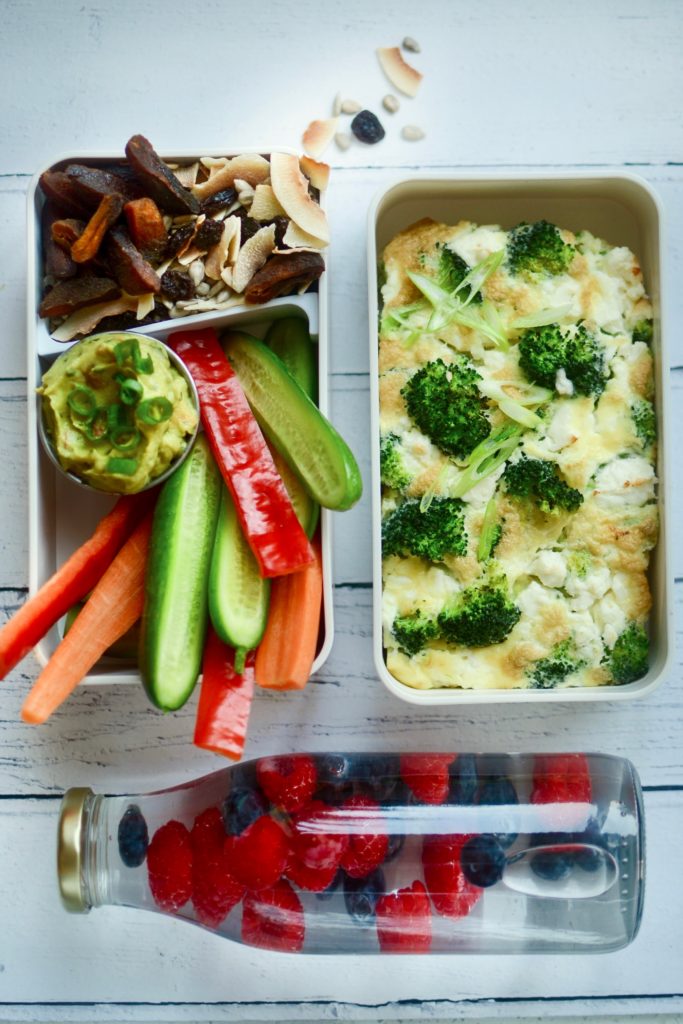
Lunch box 3
Fruit water (raspberries and blueberries)
Cucumber and carrot sticks with guacamole
Trail mix (sunflower seeds, coconut chips, chopped dates)
Mini frittata with broccoli and feta
Ingredients for the frittata
2 eggs
1 tablespoon water
small pinch of salt
freshly ground black pepper
2 spring onions, thinly sliced
small knob of butter
handful of steamed broccoli florets (left-overs are great for this) 25g crumbled feta
Method
- Whisk the eggs with the water, salt and pepper. Stir in the sliced spring onions.
- Heat the butter in a small ovenproof skillet or pan over a medium heat until sizzling, then pour the egg mix into the pan, and scatter over the broccoli and feta cheese.
- Cover the pan, turn the heat down and cook for 5 to 10 minutes or until the egg has just set.
- Pop the pan under a hot grill for half a minute if you’d like, to add some colour. Cool, turn out and slice to serve.
This post was written in collaboration with Compass Fostering. All opinions, words and images are my own.
†Intermittent Fasting: the surprising update
†Fasting: Molecular Mechanisms and Clinical Applications
Gluten free strawberry and elderflower tart
I have been so busy getting into the rhythm with my new teaching job (which I love, btw), that I have not shared a new recipe since August last year!!! And here I am posting a strawberry and elderflower recipe with both strawberry and elderflower season just about done for this year. Boo! But it is so delicious, that I thought it would be worthwhile adding anyway. Hope you will have a chance to make it!
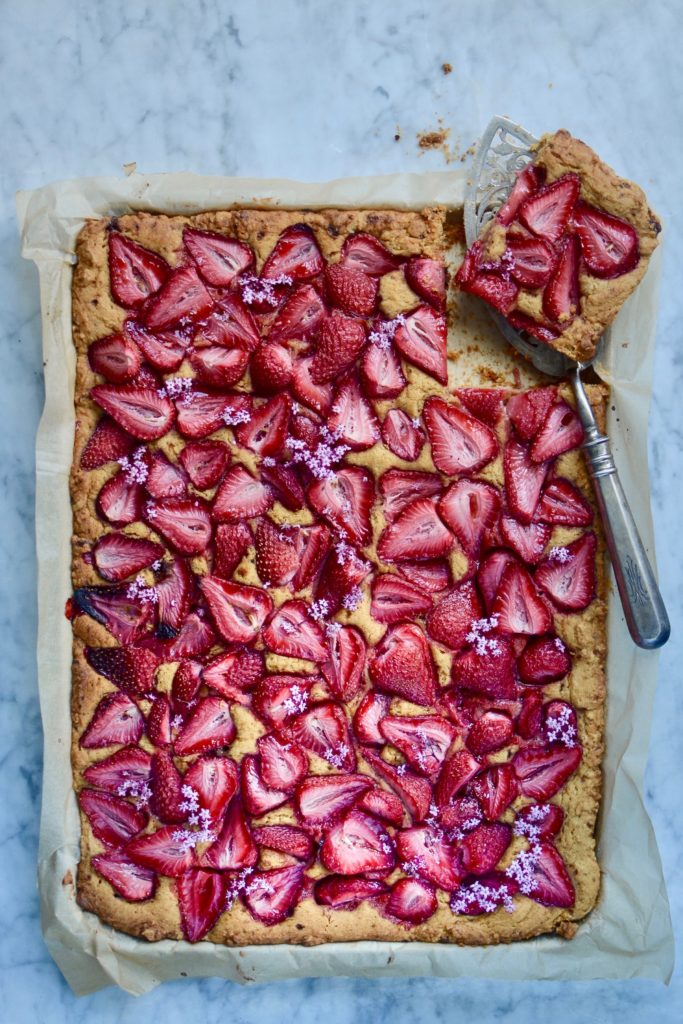
Gluten free strawberry and elderflower tart
Serves 8
Ingredients
185g flour (you can use gluten-free)
75g soft brown sugar
1/4 teaspoon salt
1 teaspoon baking powder
1 teaspoon vanilla paste or seeds from 1 pod
120g unsalted butter, chilled and diced
1 medium egg, lightly whisked
40ml double (heavy whipping) cream, chilled
1.2 kg delicious sweet strawberries, hulled and halved
elderflower syrup for drizzling
Method
- Preheat oven to 190˚C and line an lipped baking sheet with parchment paper.
- Combine the dry ingredients and mix. Rub or cut the cubed butter into the flour for 1 to 2 minutes, or until the pastry resembles wet sand (you could use a food processor for this). Set aside.
- Whisk the vanilla, egg and cream until blended, then drizzle over the flour mixture and mix until it just comes together. Do not over-mix!!!!
- Spoon the pastry onto the baking sheet in dollops and spread out evenly with a spatula or the back of a large metal spoon. You might need an extra pair of hands to hold the paper in place.
- Scatter over the halved strawberries, pressing them into the pastry slightly, and bake for 20 – 30 min, or until the pastry has risen and is golden and crunchy around the edges. Remove from the oven and serve with whipped cream and a drizzle of elderflower syrup.
Cornbread for breakfast
I often get asked by exhausted and slightly fed-up parents what they should serve their kids for breakfast. I find it so hard to answer that, as my children have had spinach soup, dhal and left-over stew for breakfast… but how do you compress your entire food philosophy into an answer to the simple question: “What’s for breakfast?” The way I’ve explained it to my family is that ANYthing that breaks the fast in the morning qualifies, and if you look at the myriad of breakfasts served around the globe every day, there really are no rules.
A well-balanced meal is your best bet, whatever you choose to serve. In other words it contains enough protein to keep you full for a few hours and prevent cravings, enough carbohydrates to get you going, and enough healthy fat to slow down the absorption of glucose in the bloodstream, providing satiation while helping to avoid major insulin spikes.
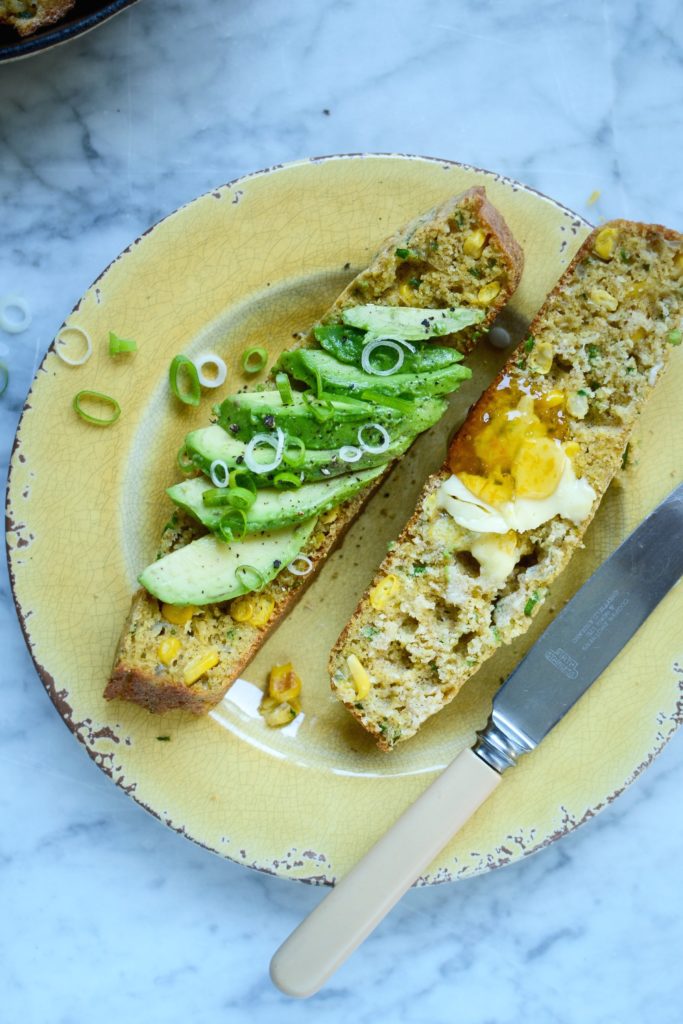
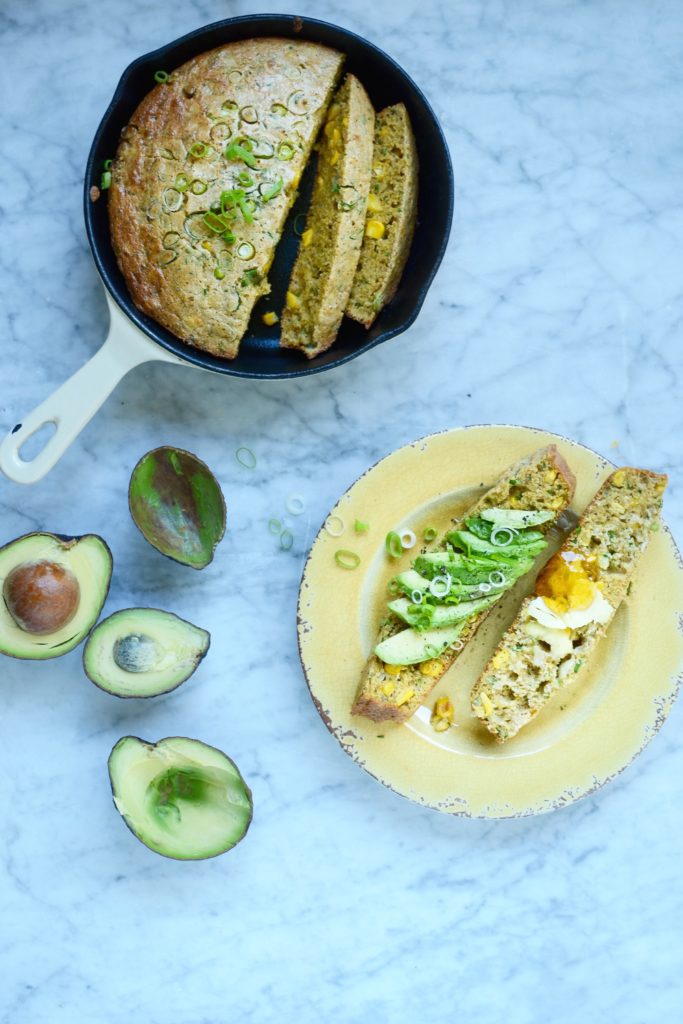
This cornbread is a delicious alternative to boxed cereal or toast when served with avocado, chilli jam and eggs, or these delicious homemade baked beans on the savoury version, or nut butter and honey on the blueberry version. It’s easy to prepare the batter the night before – remember to add the baking soda and baking powder only just before baking! – and needs only 20 – 25 minutes or so in a hot oven. There are so many versions of recipes for cornbread, but I have played around for a long time with the proportions and this is one of my favourite end results. Now, this cornbread is certainly not only a breakfast food in our house (in fact, I most often make it as a side dish when we have friends over for a BBQ), so hopefully you will get a chance to try it out soon, morning, noon or night!
Cornbread
Makes two 8” or 20cm skillet cornbreads, or one large bread
Ingredients
230 – 250g (about 1 1/4 cup) cornmeal or polenta bramata (the exact amount depends on how coarsely the cornmeal is ground and the water content of the coconut milk – you are aiming for a wet, but not runny, mixture)
120g (about 1 cup) wholemeal spelt flour (you can also use your favourite gluten-free flour, although the bread won’t be as crispy)
20g (about 2 tablespoons) coconut palm sugar (or use muscovado)
1/2 teaspoon salt
1 tsp baking powder
1/2 tsp baking soda
1 x 400g can coconut milk (full fat and preferably organic)
3 eggs, lightly whisked
15ml (1 tablespoons) apple cider vinegar
Method
- Preheat oven to 200°C.
- Combine the polenta, flour, sugar, salt, baking powder and baking soda in a medium bowl and set aside.
- Place the can of coconut milk in a small heatproof bowl and cover with hot water from the tap for a couple of minutes (this will not be necessary if you live in a hot country!).
- Pour the coconut milk and vinegar into the beaten eggs in a thin stream, constantly whisking.
- Pour the liquid ingredients into the dry ingredients, whisking as you do so.
- Heat some coconut oil in a cast iron skillet(s) or other pan with a heavy base on the hob until hot (but not smoking). Or if you are using a small roasting tin / baking sheet with a heavy bottom, heat it in the oven with the oil.
- Scrape the cornbread mixture into the hot pan(s) and bake for 20 – 25 minutes or until browned on top and the centre springs back when lightly pressed.
- Remove from the oven and allow to cool for a few minutes before turning out and serving hot. (You could also re-heat the bread in a medium hot oven the next day.)
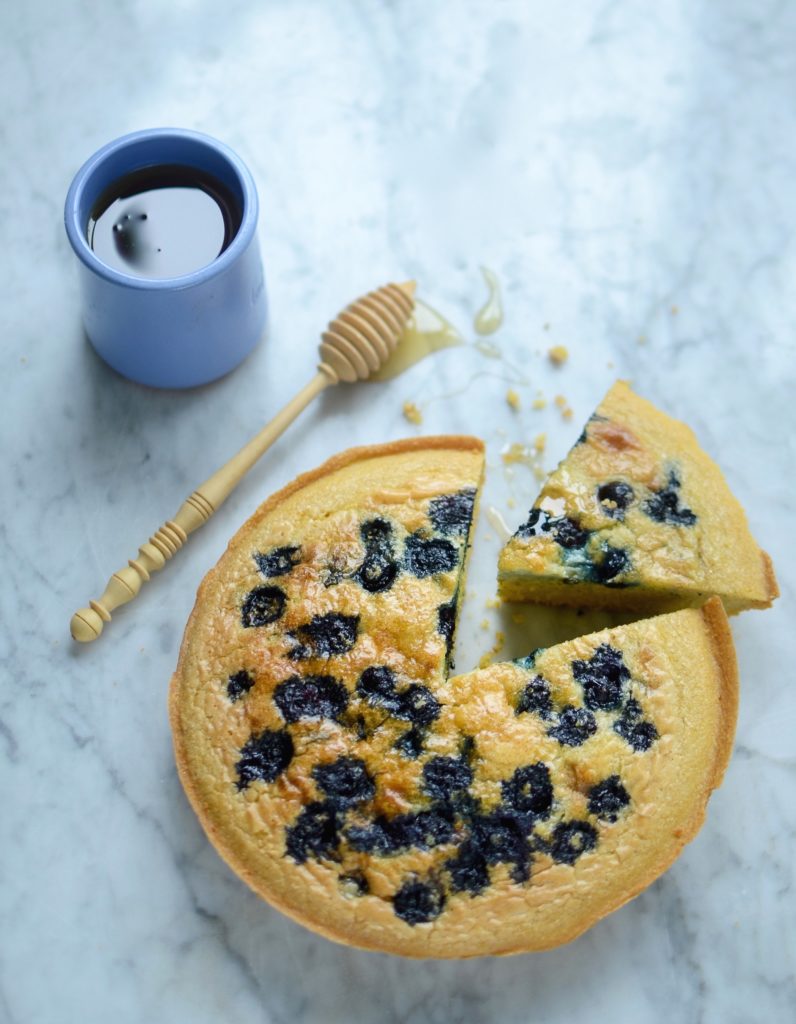
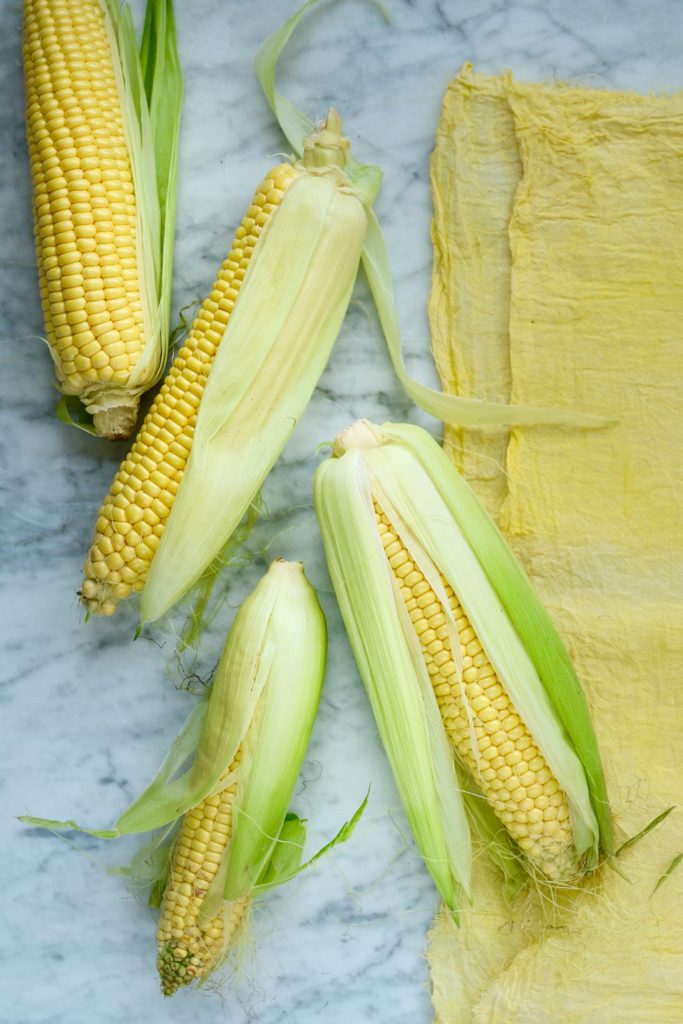
- For a savoury version, add caramelised onions, corn kernels (about 1 1/2 cups of fresh or frozen), chilli flakes and chopped coriander to the batter before baking and scatter some sliced spring onions on top. For a sweet version add a punnet of blueberries and vanilla powder to the batter, then sprinkle some brown sugar on top before baking.
Gluten-free buckwheat and oat granola
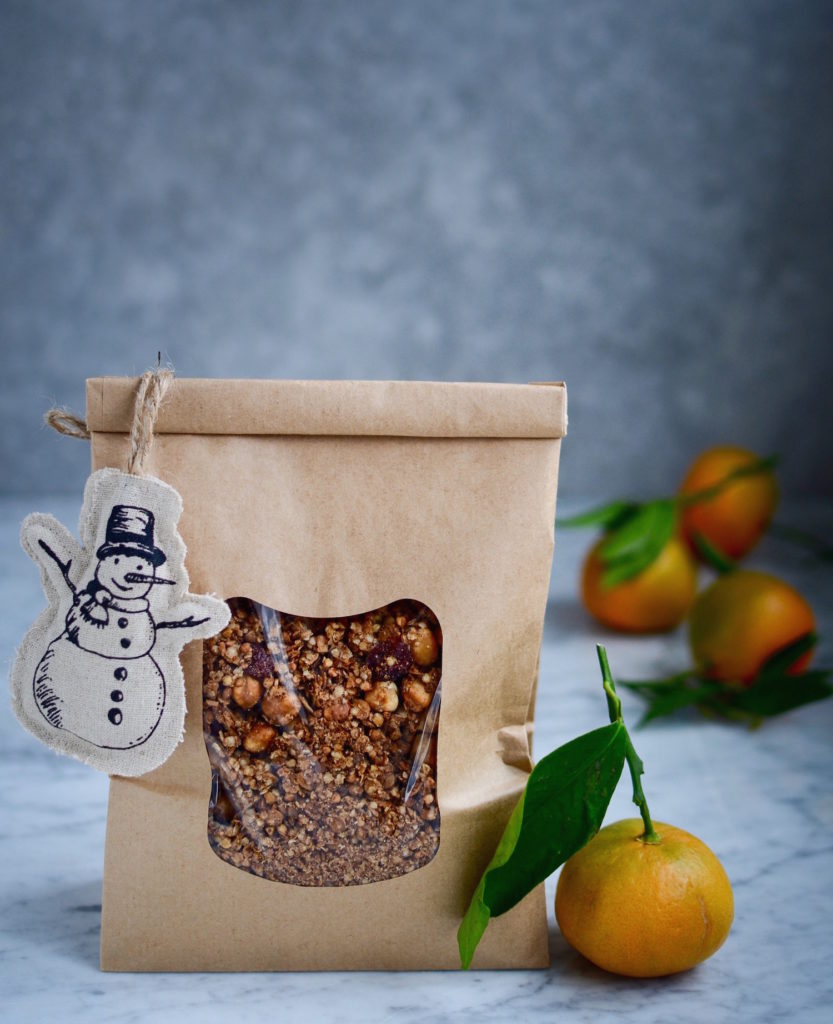
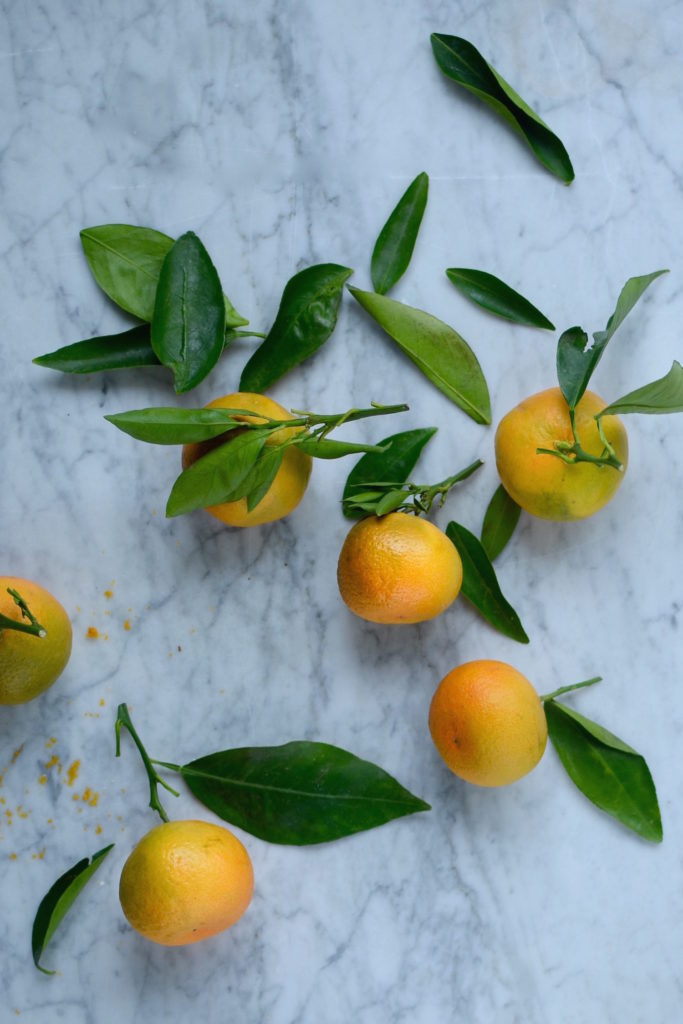
Home-made granola is one of the loveliest gifts to give! It doesn’t have to be eaten straight away, you can add many different spices and ingredients to suit the occasion or mood (here I’ve added a gingerbread spice mix and tangerine zest to my gluten-free granola to give it that Christmas vibe), and it can be packaged beautifully.
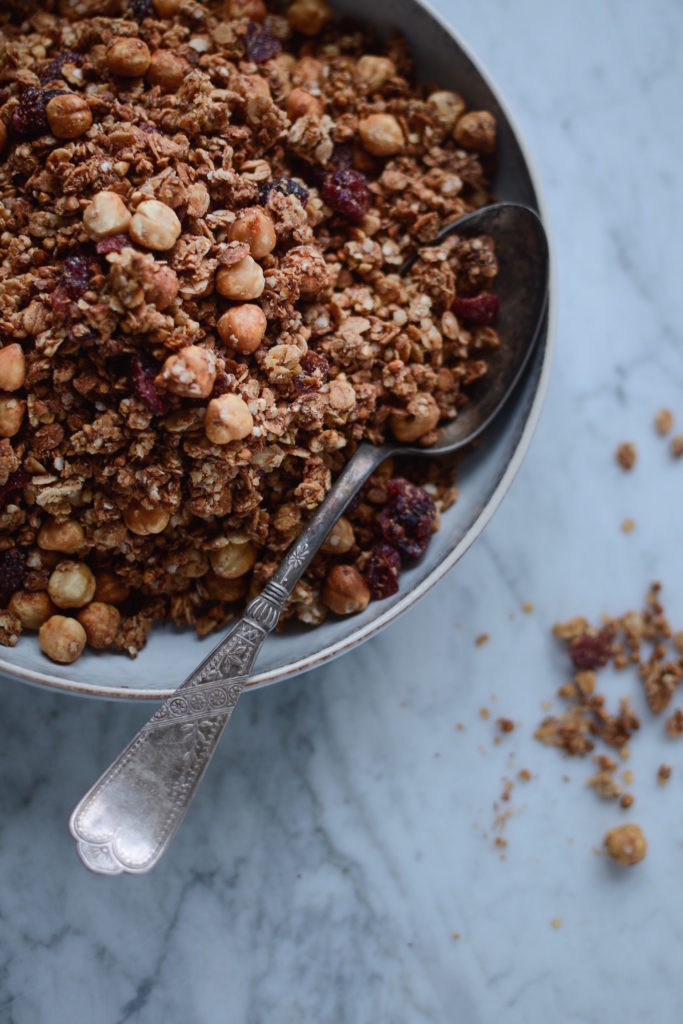
In this recipe for gluten-free buckwheat granola I suggest soaking the buckwheat groats overnight, to increase digestibility. Grains, pulses, legumes, nuts and seeds generally contain phytic acid, which binds to minerals in the gastrointestinal tract and may lead to mineral deficiencies. By soaking in warm water with added Lactobacilli cultures (found in yoghurt, kefir, whey etc) or an acid, the digestive enzyme (phytase) is activated that helps to break down the phytic acid in as little as 12 hours.
Gluten-free buckwheat and oat granola
Makes 6 cups
Ingredients
100g (1 cup) raw buckwheat groats
300g (3 cups) rolled oats
100g (1 cup) quinoa flakes
70g (1/2 cup) blanched hazelnuts
80ml (1/3 cup) melted coconut oil or butter
80ml (1/3 cup) honey or maple syrup
1/4 teaspoon fine grain sea salt
1 teaspoon ground cinnamon
1/2 teaspoon ground cloves
1/2 teaspoon ground ginger
heaped 1/2 teaspoon ground nutmeg
zest from 4 tangerines
70-80g (1/2 cup) dried cranberries
Method
- Rinse the buckwheat groats, then soak overnight in enough water to cover with an inch. Add a tablespoon of apple cider vinegar, yoghurt, kefir or lemon juice, as an acidic solution. The next morning drain the buckwheat and tip into a large mixing bowl.
- Preheat oven to 160°C.
- Add the oats, quinoa and roughly chopped hazelnuts to the bowl with the buckwheat.
- Whisk the melted coconut oil (or butter) with the maple syrup (or honey), salt, spices and citrus zest.
- Pour this over the dry ingredients and mix well to coat.
- Spread the granola mixture out in an even layer on two lined baking sheets. Use a spatula or a large metal spoon to compress the mixture, then bake for 30 to 40 minutes. Carefully flip pieces over half-way through baking time, as the bits on the edges may burn otherwise.
- Allow to cool completely before mixing in the cranberries and storing in an airtight container. Will keep for several weeks.
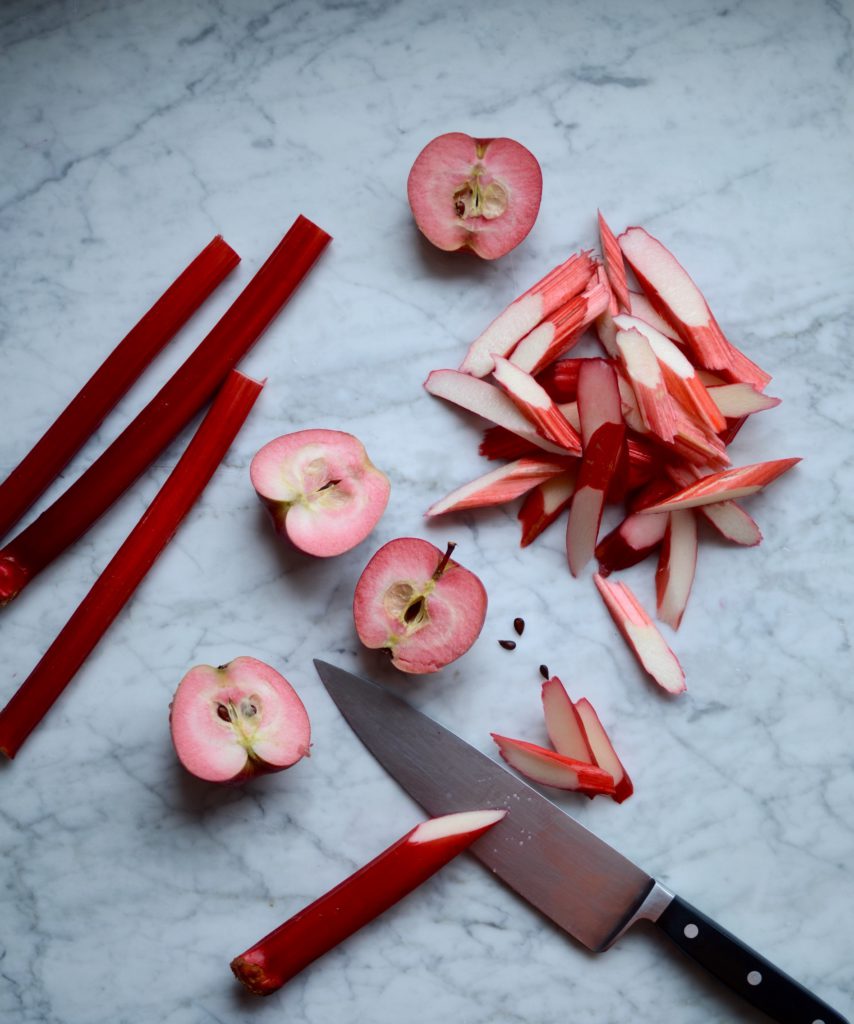
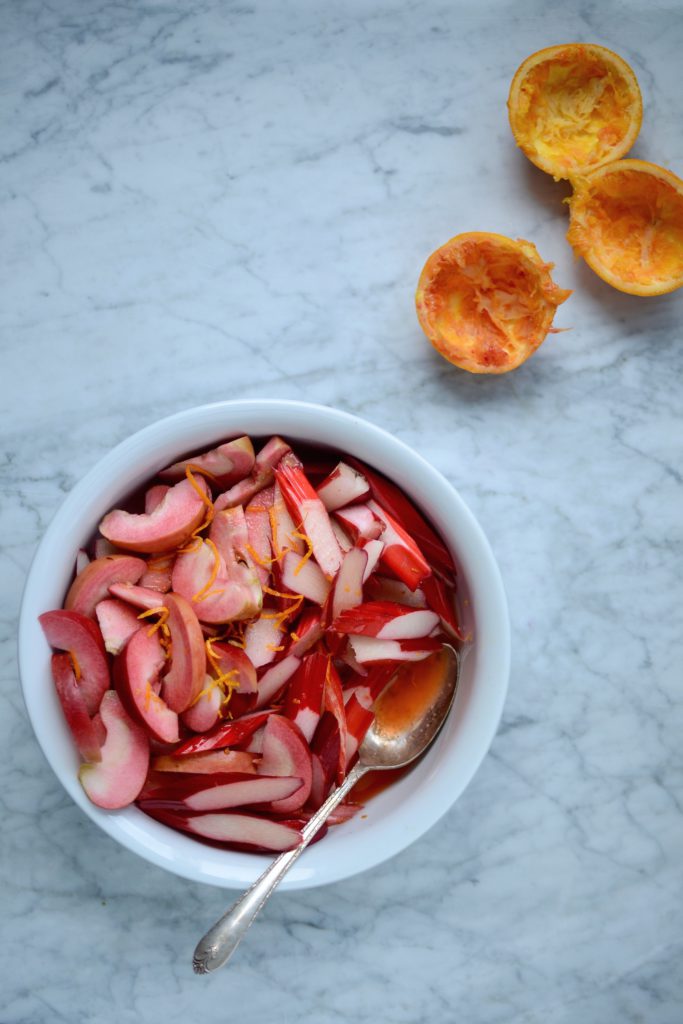
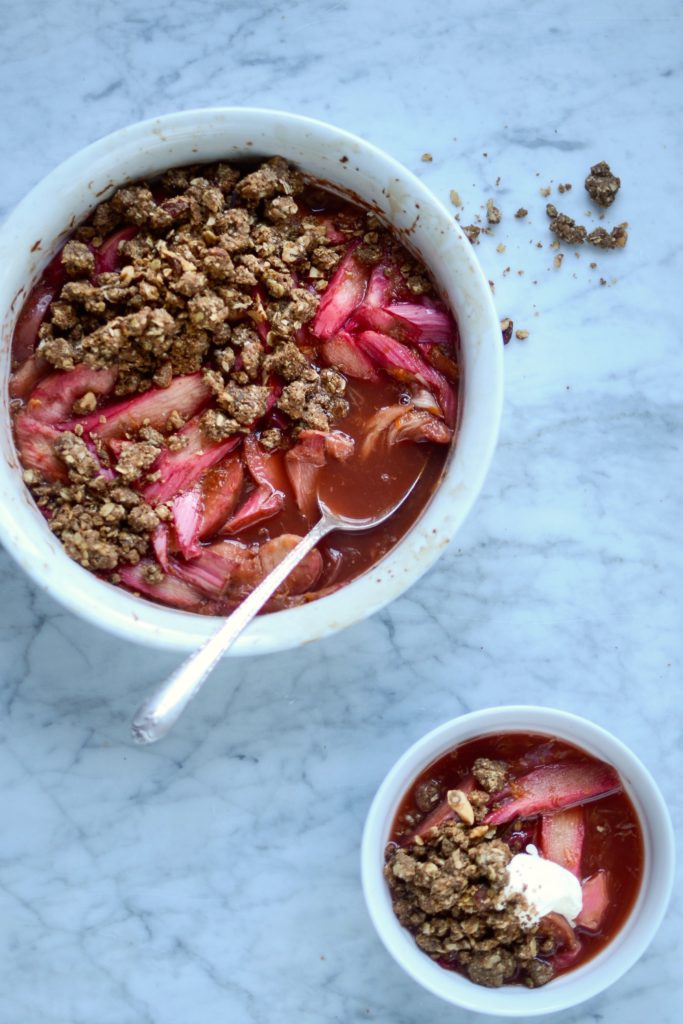
Rhubarb and apple crumble
It’s rhubarb season! The word “forced” used to lead me to believe that this kind of rhubarb is somehow inferior, but I have since come to love this delicious late winter treat. Lifting sections of the rhubarb roots and bringing them under the cover of a greenhouse or other warmer place, shutting out all light, creates stems that grow pale. This means the light-starved plants desperately reach out in search of light and thereby produce smooth, bright crimson stems (rather than green ones created post photosynthesis). The Rhubarb Triangle in West Yorkshire produces some of the world’s finest. Forced rhubarb is less bitter than the traditional, non-forced stalks and needs less sugar to balance the tartness. Pretty in pink and less astringent – perfect!
Rhubarb and apple crumble
Serves 4 – 6
Ingredients for the fruit filling
500g rhubarb, washed and sliced into 1/2 cm pieces
2 apples, cored and thinly sliced
zest of 1 orange
juice of 2 oranges
40g dark muscovado sugar
1 cinnamon stick, broken into 2 or 3 pieces
Ingredients for the topping
85g cold unsalted butter (preferably organic) or ice cold coconut oil, cut into little cubes
50g mixed nuts, roughly chopped (I used a combination of almonds, pecans and walnuts)
30g demerara sugar
70g muesli base (mine is a mix of oat, rye and quinoa flakes, but you can use any combination)
70g wholemeal rye flour (or use wholemeal spelt or you favourite gluten-free mix)
1 teaspoon ground cinnamon
pinch of salt
Method
- Preheat the oven to 180°C (370°F).
- Mix all the ingredients for the filling in a large bowl, then transfer to a medium ovenproof dish and cover with a lid or foil. Bake for 45 minutes (or until the fruit is tender when tested with a sharp knife), stirring carefully half-way through the cooking time.
- In the meantime, place all the topping ingredients apart from the butter in a bowl and mix well. Now add the butter (or coconut oil) and quickly rub into the dry ingredients until it comes together and you are able to form large clumps. Spread the clumps out on a baking sheet and place in the oven with the fruit. The crumble topping should be ready after about 30 minutes, but use a spatula to turn the pieces over gently half way.
- To serve, divide the fruit amongst 4 – 6 bowls, spoon over the delicious juices, scatter the crumble over the fruit and serve with vanilla-sweetened whipped cream or vanilla ice cream of your choice.
Note: If you use coconut oil and gluten-free flour, your crumble will be a much finer texture, but still crunchy and delicious.
Roasted pumpkin with green sauce
I spent some time in beautiful Hamburg in my early 20’s. My neighbour opposite was also a keen cook and I remember chatting to him about his favourite local dishes (his was Steckrübeneintopf). When he asked me whether there were any particular South African specialities I loved, it took about 1 second for “Pumpkin Fritters” to leave my mouth, a little more loudly than I had intended. He was horrified. “Pumpkin? That is what the pigs eat here in Germany…” Say what?! Naturally I rose to the challenge and, once I had finally sourced a pumpkin, made him some Pampoenkoekies. I believe he was a converted man.
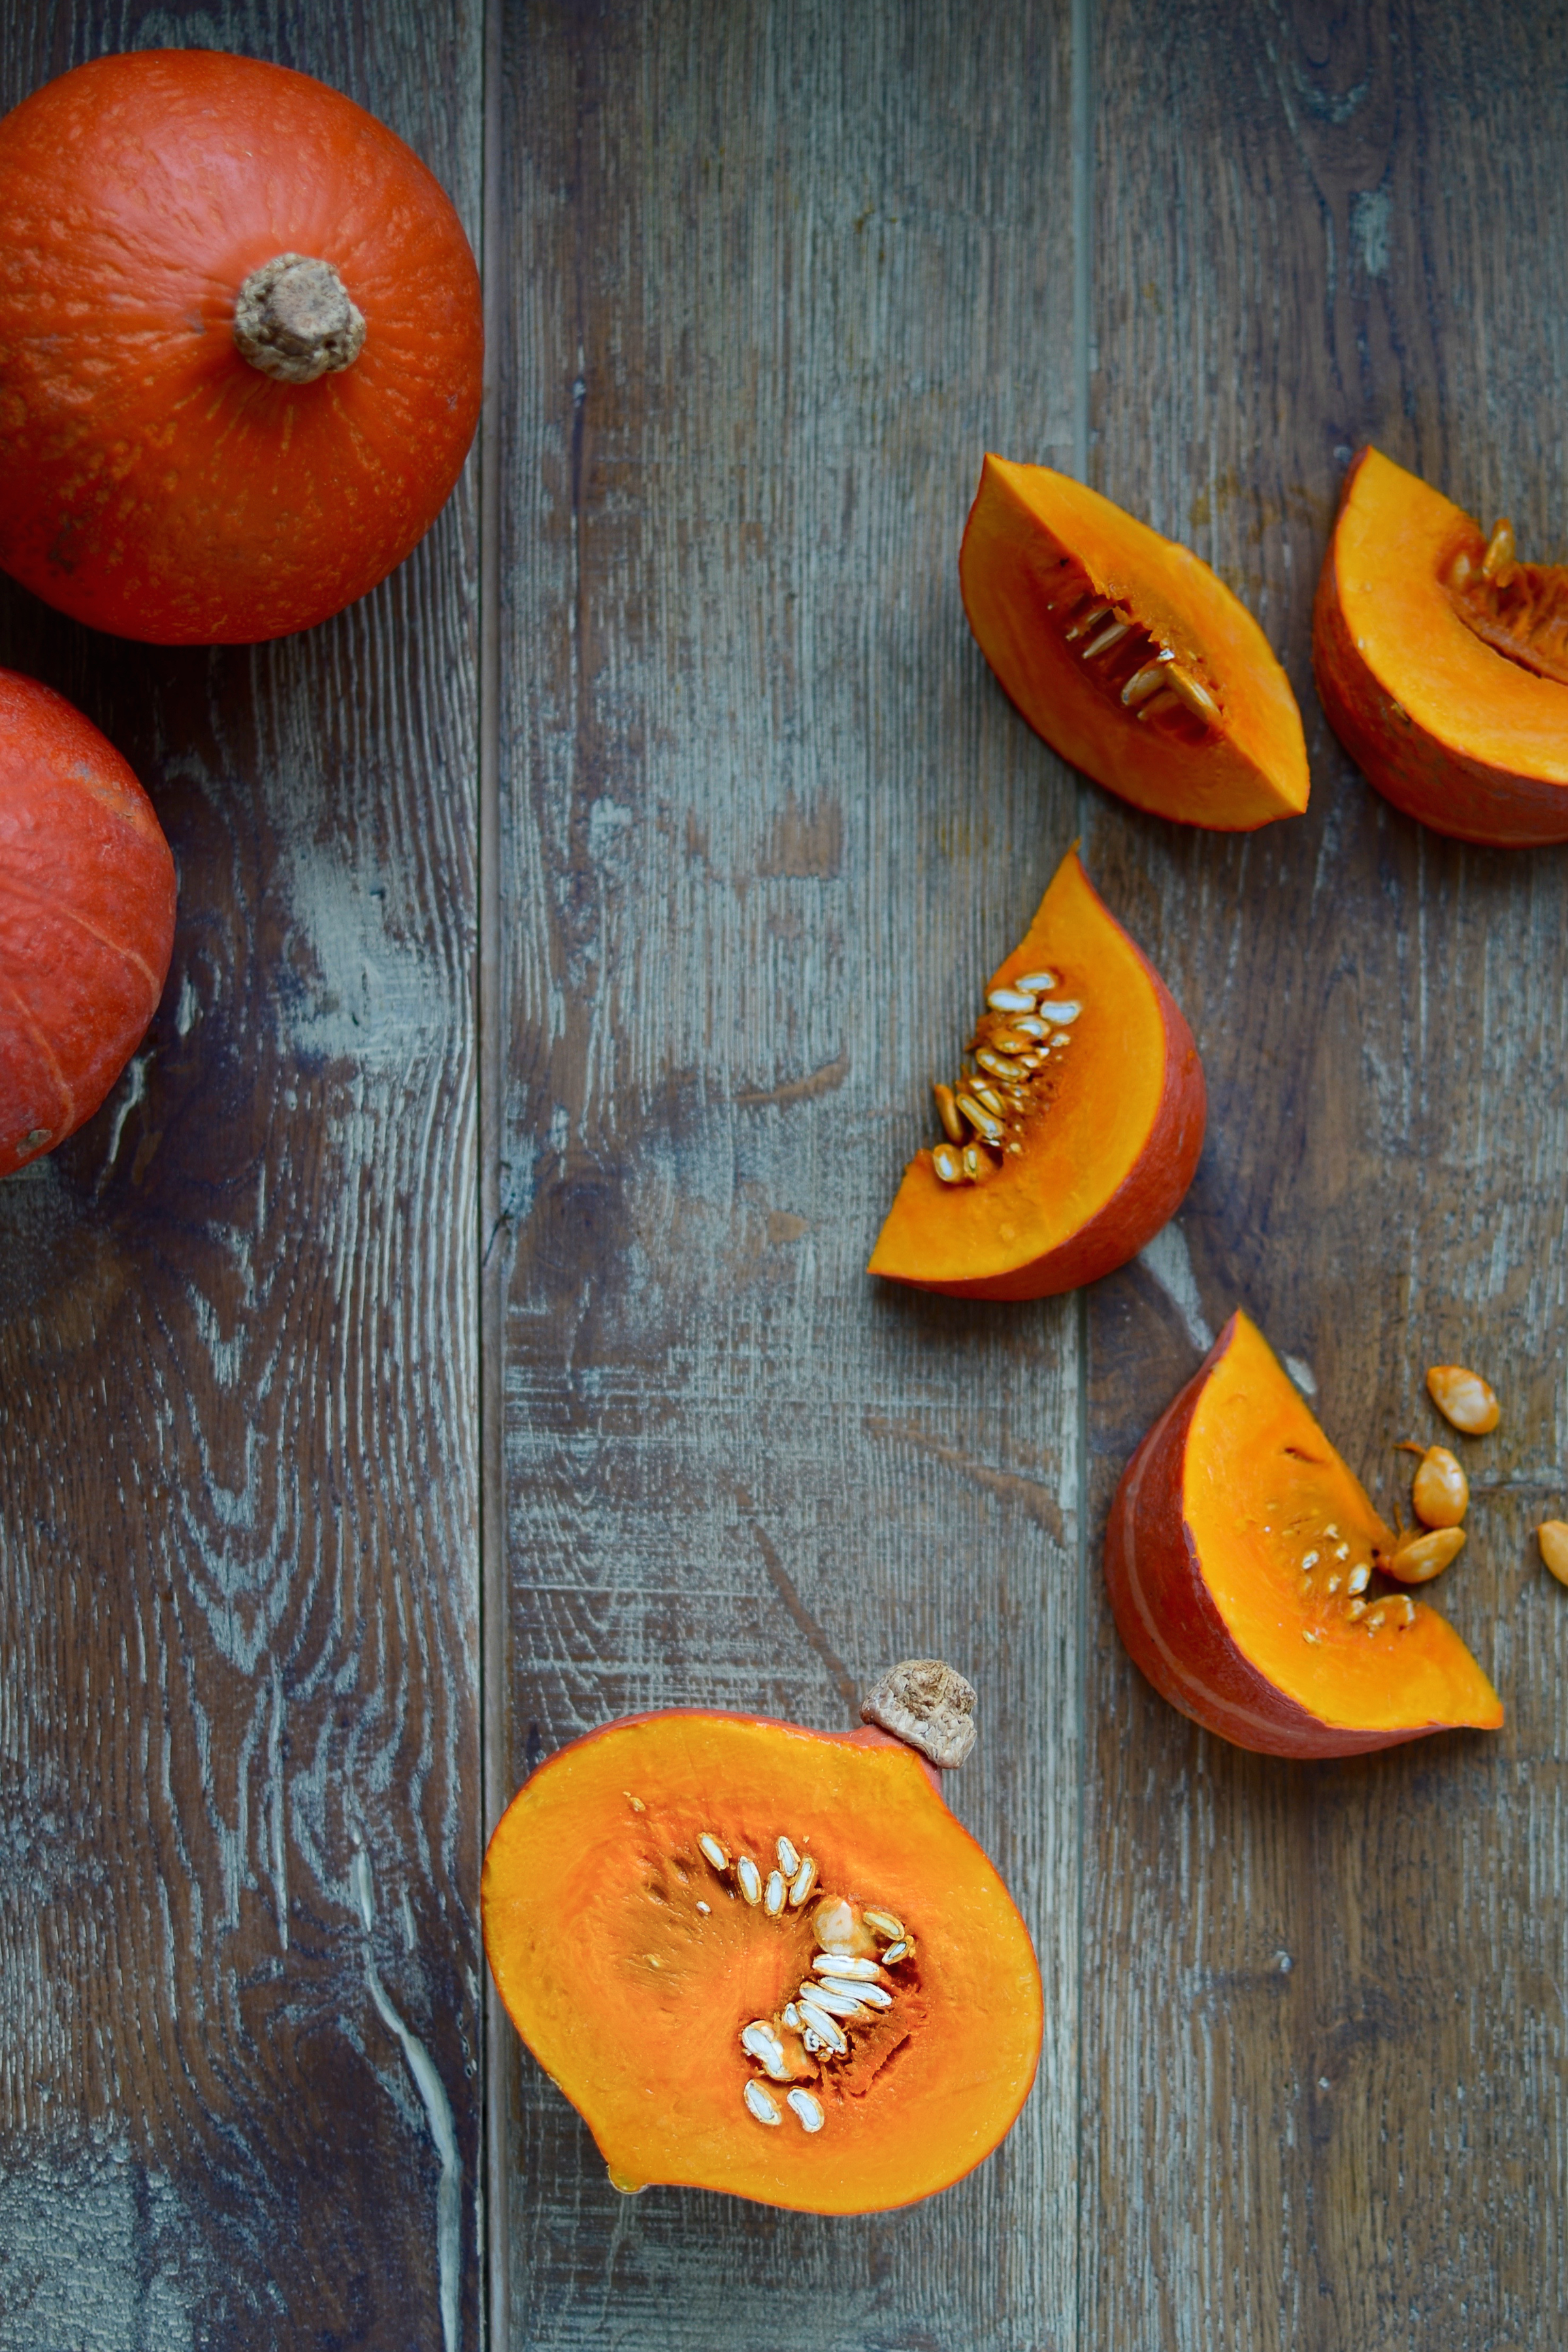
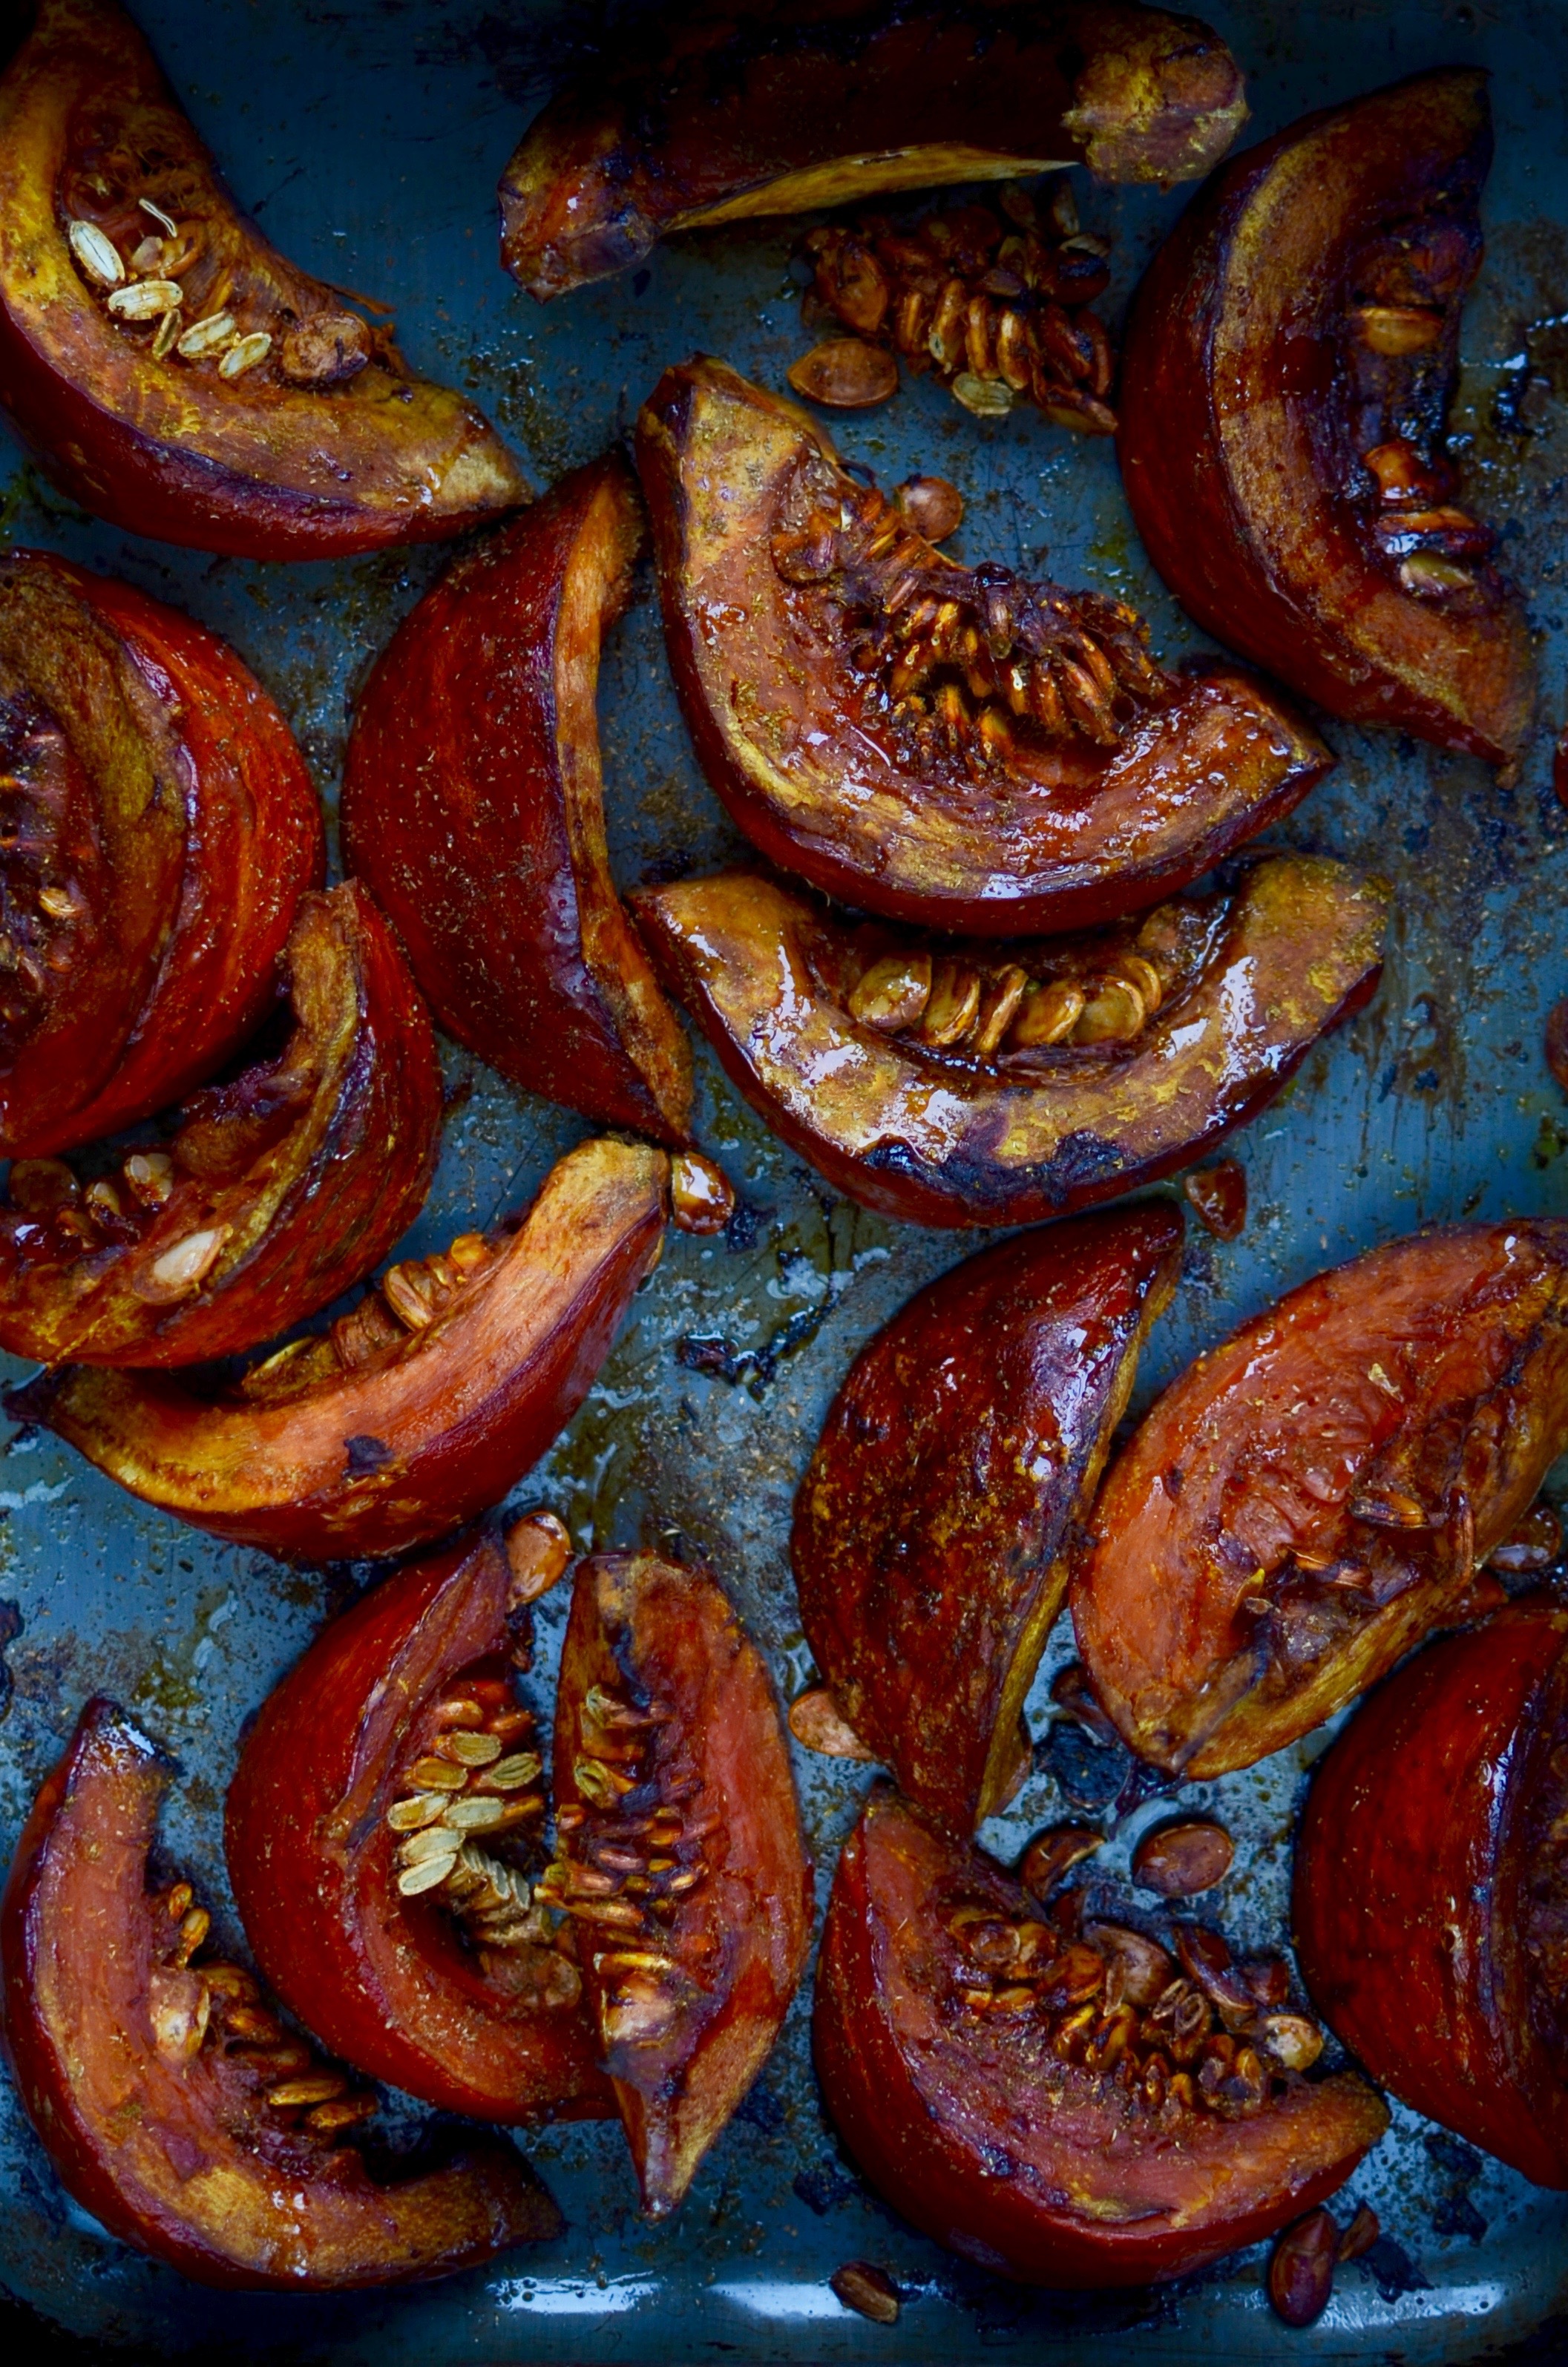
This dish is a lovely make-ahead option for the colder months. Use whatever squash or pumpkin you have, but it is particularly delicious with sugar pumpkin. The green sauce is very moreish and good with any type of grain or pulse-based salad. It will thicken in the fridge, but just give it a good whisk and it should be pourable.
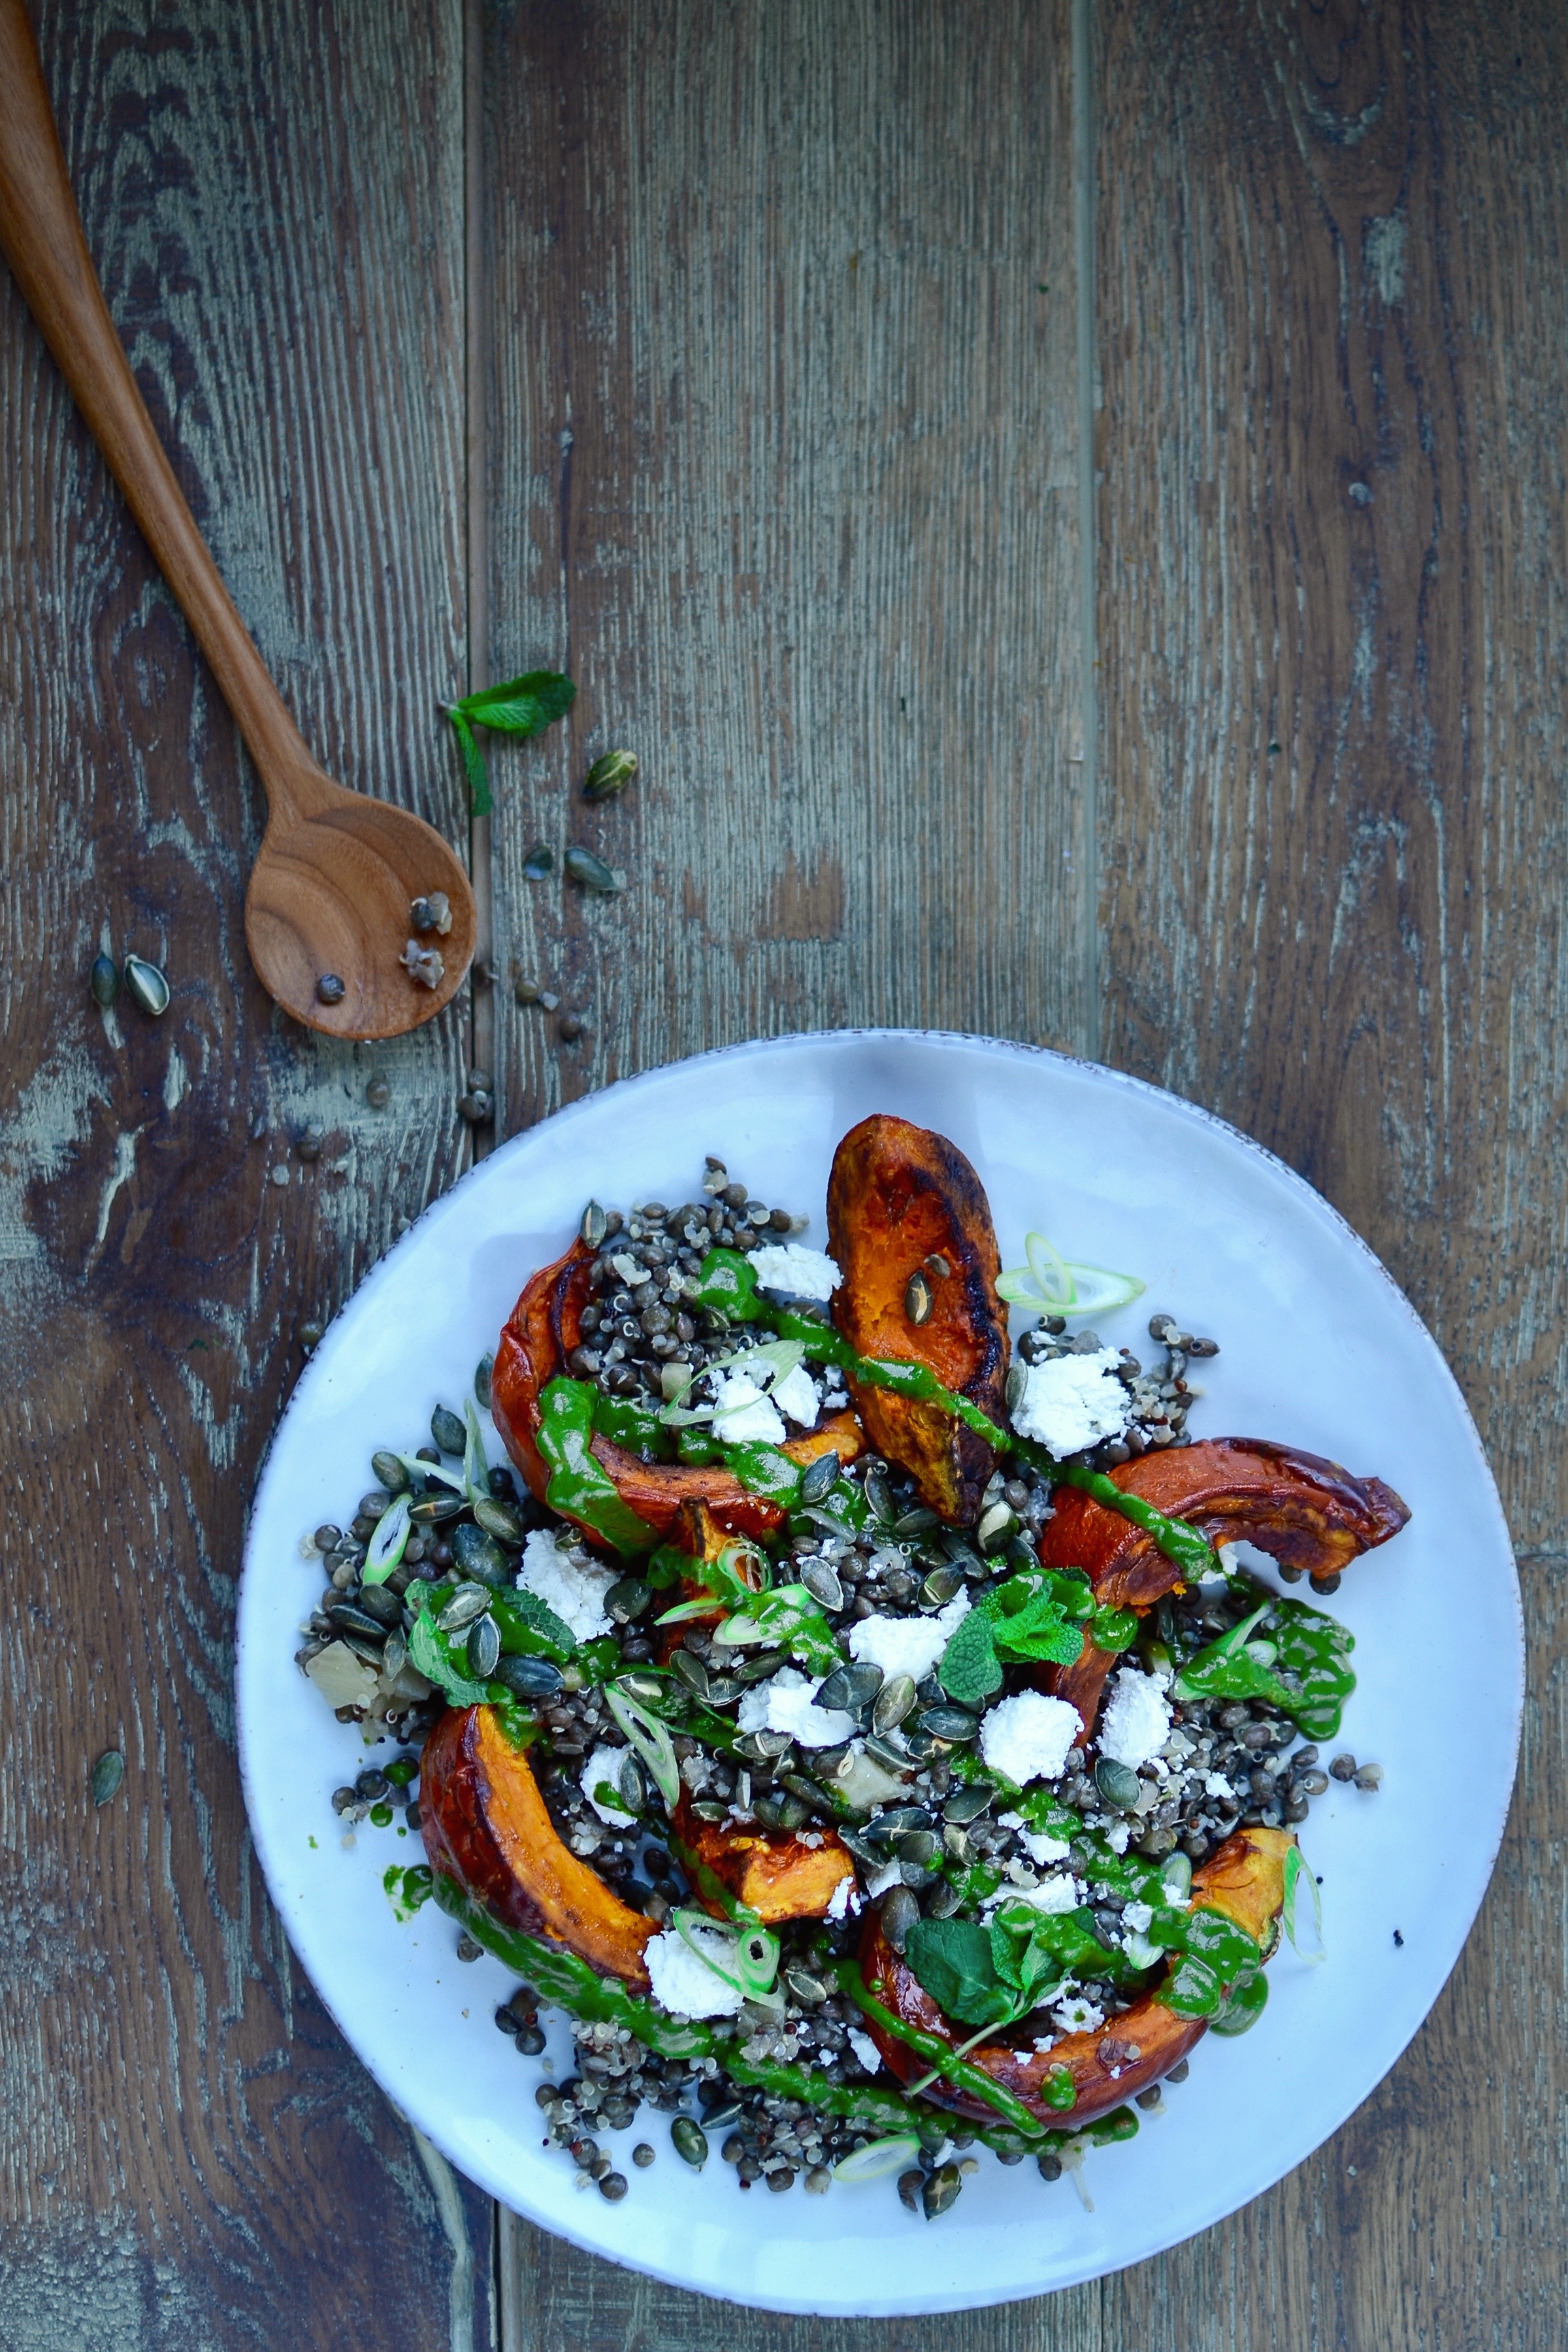
Roasted pumpkin with green sauce
Serves 4 – 6
Ingredients for the sauce
80ml (1/3 cup) coconut milk (if using organic, stand the tin in warm water to melt the fat)
30ml (2 tablespoons) lime juice (about 2 medium limes)
1/2 teaspoon unrefined salt
1/2 small avocado
Juice of 1 tangerine
1 spring onion
large bunch (100g) fresh coriander, leaves and stalks
medium bunch (50g) fresh mint, leaves only
1 teaspoon raw honey
1 green chilli (more or less to taste), seeds removed if you prefer it less spicy
For the rest
1 fennel bulb, the tough outer layer peeled (or a couple of stalks celery)
1 spring onion, finely sliced
3 cups cooked lentils and/ or quinoa
unrefined salt
crumbled goats cheese
roasted pumpkin (I used kabocha squash, but for an extra delicious option, try sugar pumkin)
toasted pumpkin seeds
Method
- Put all the ingredients for the dressing in a blender and blend until smooth. Set aside.
- Separate the layers of the fennel bulb, then chop into small squares. Sauté in a little coconut oil until tender.
- Combine the fennel with the rest of the ingredients, dress with the dressing and serve.
Apricot, red currant & butternut cake
I absolutely love cooked apricots, whether in a cake, jam, compote, tart or savoury dish. I find that they offer the perfect balance of flavour, and the vibrant colour is always a treat. This cake has a firm texture and is not very crumbly, so makes for an ideal dessert to take along on a picnic. Use frozen red currants if you can’t find fresh.
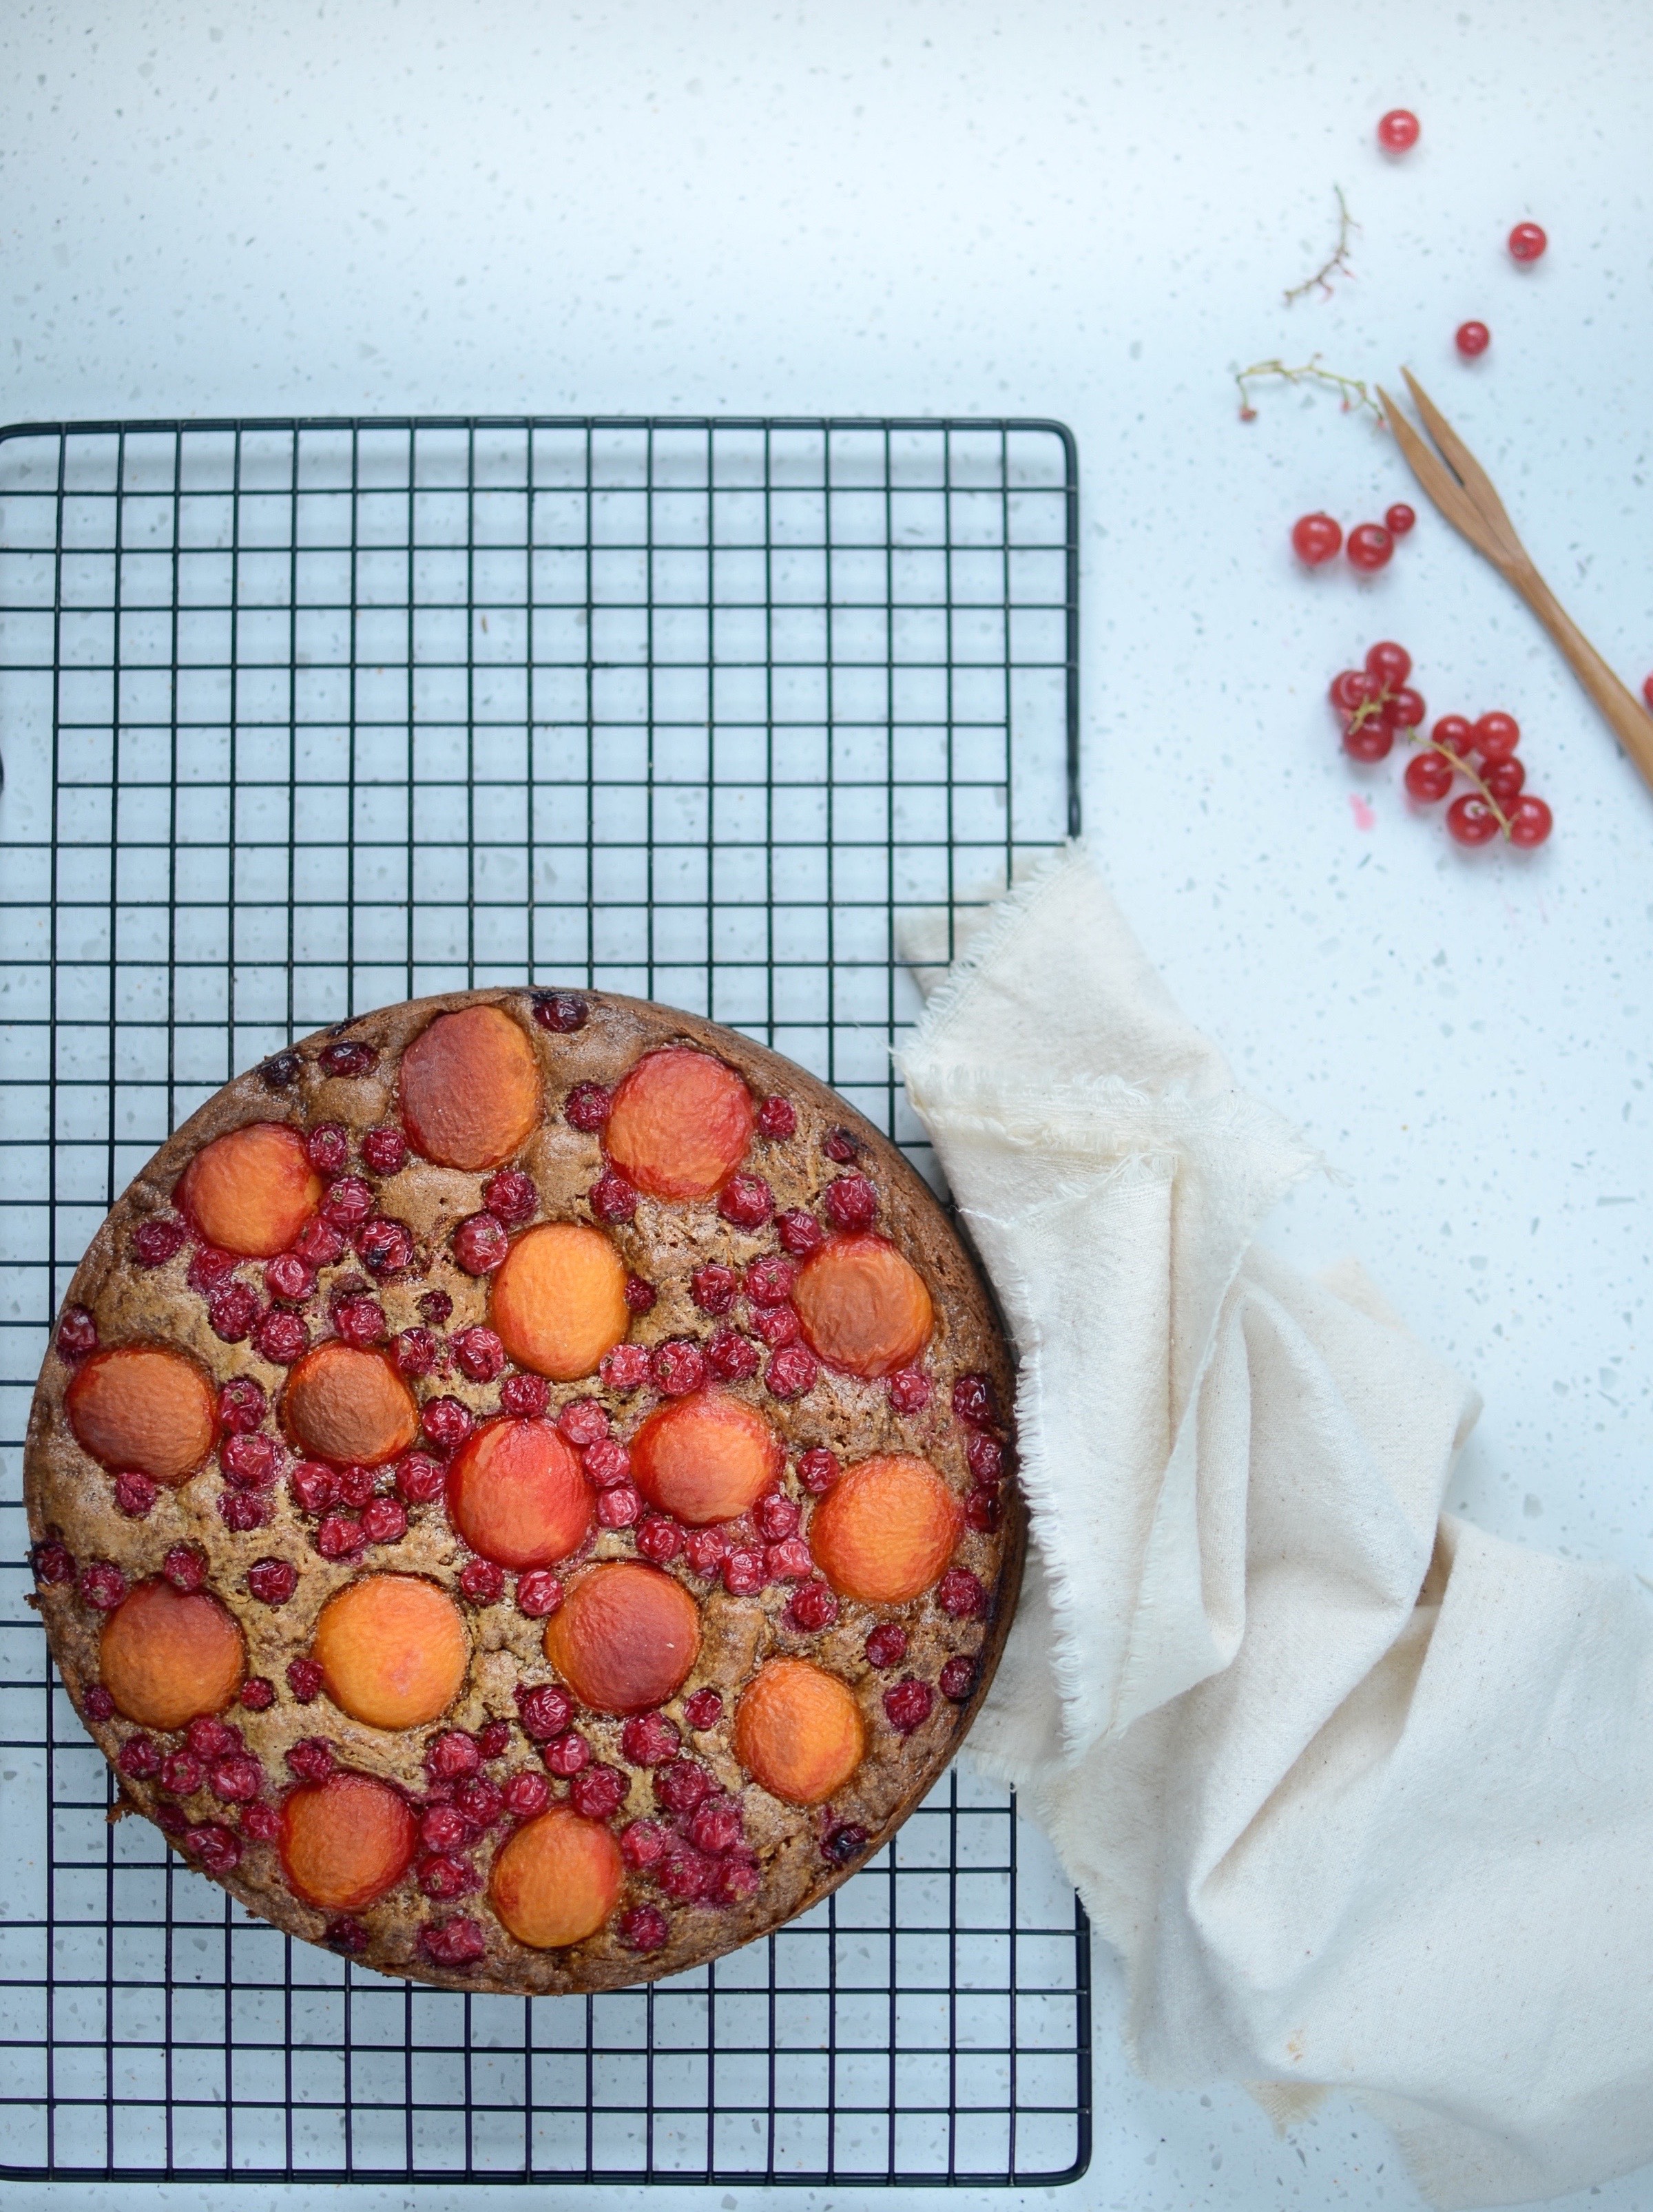
Apricot, red currant and butternut squash cake
Makes one 20cm cake
Ingredients
3 medium eggs
150ml (1/2 cup plus 2 tablespoons) macadamia nut or extra virgin olive oil
140g (1 cup) palm sugar or dark muscovado sugar
1 vanilla pod, cut into smaller pieces (or just the seeds if you are not using a high-speed blender)
130g (1 cup) wholemeal spelt or buckwheat flour
1 teaspoon baking soda
1 teaspoon baking powder
pinch of sea salt
165g (1 1/2 cups) grated peeled butternut squash
150g red currants, stripped from the stalks
8 small apricots, halved and stone removed
Toasted macadamias, optional
Method
- Pre-heat the oven to 180°C/360°F, and grease a 20cm spring form.
- In a blender, whisk together the eggs, oil, sugar and vanilla pod pieces (or vanilla seeds, if not using a strong blender).
- Mix together the flour, baking soda, baking powder and salt. Make a well in the centre and add the egg mix. Stir until just combined.
- Stir in the butternut and half the red currants, then scrape into prepared tin.
- Place the apricot halves, cut sides down, onto the cake batter and scatter the rest of the currants on top. Use the back of a large spoon to gently press the fruit into the batter.
- Bake for about 60 minutes or until a toothpick inserted in the centre of the cake comes out clean or with a few dry crumbs. It may need a little longer, depending on your oven.
- Let the cake cool in the pan for 10 minutes, then turn out onto a wire rack to cool.
- Serve with whipped cream and toasted macadamia nuts.
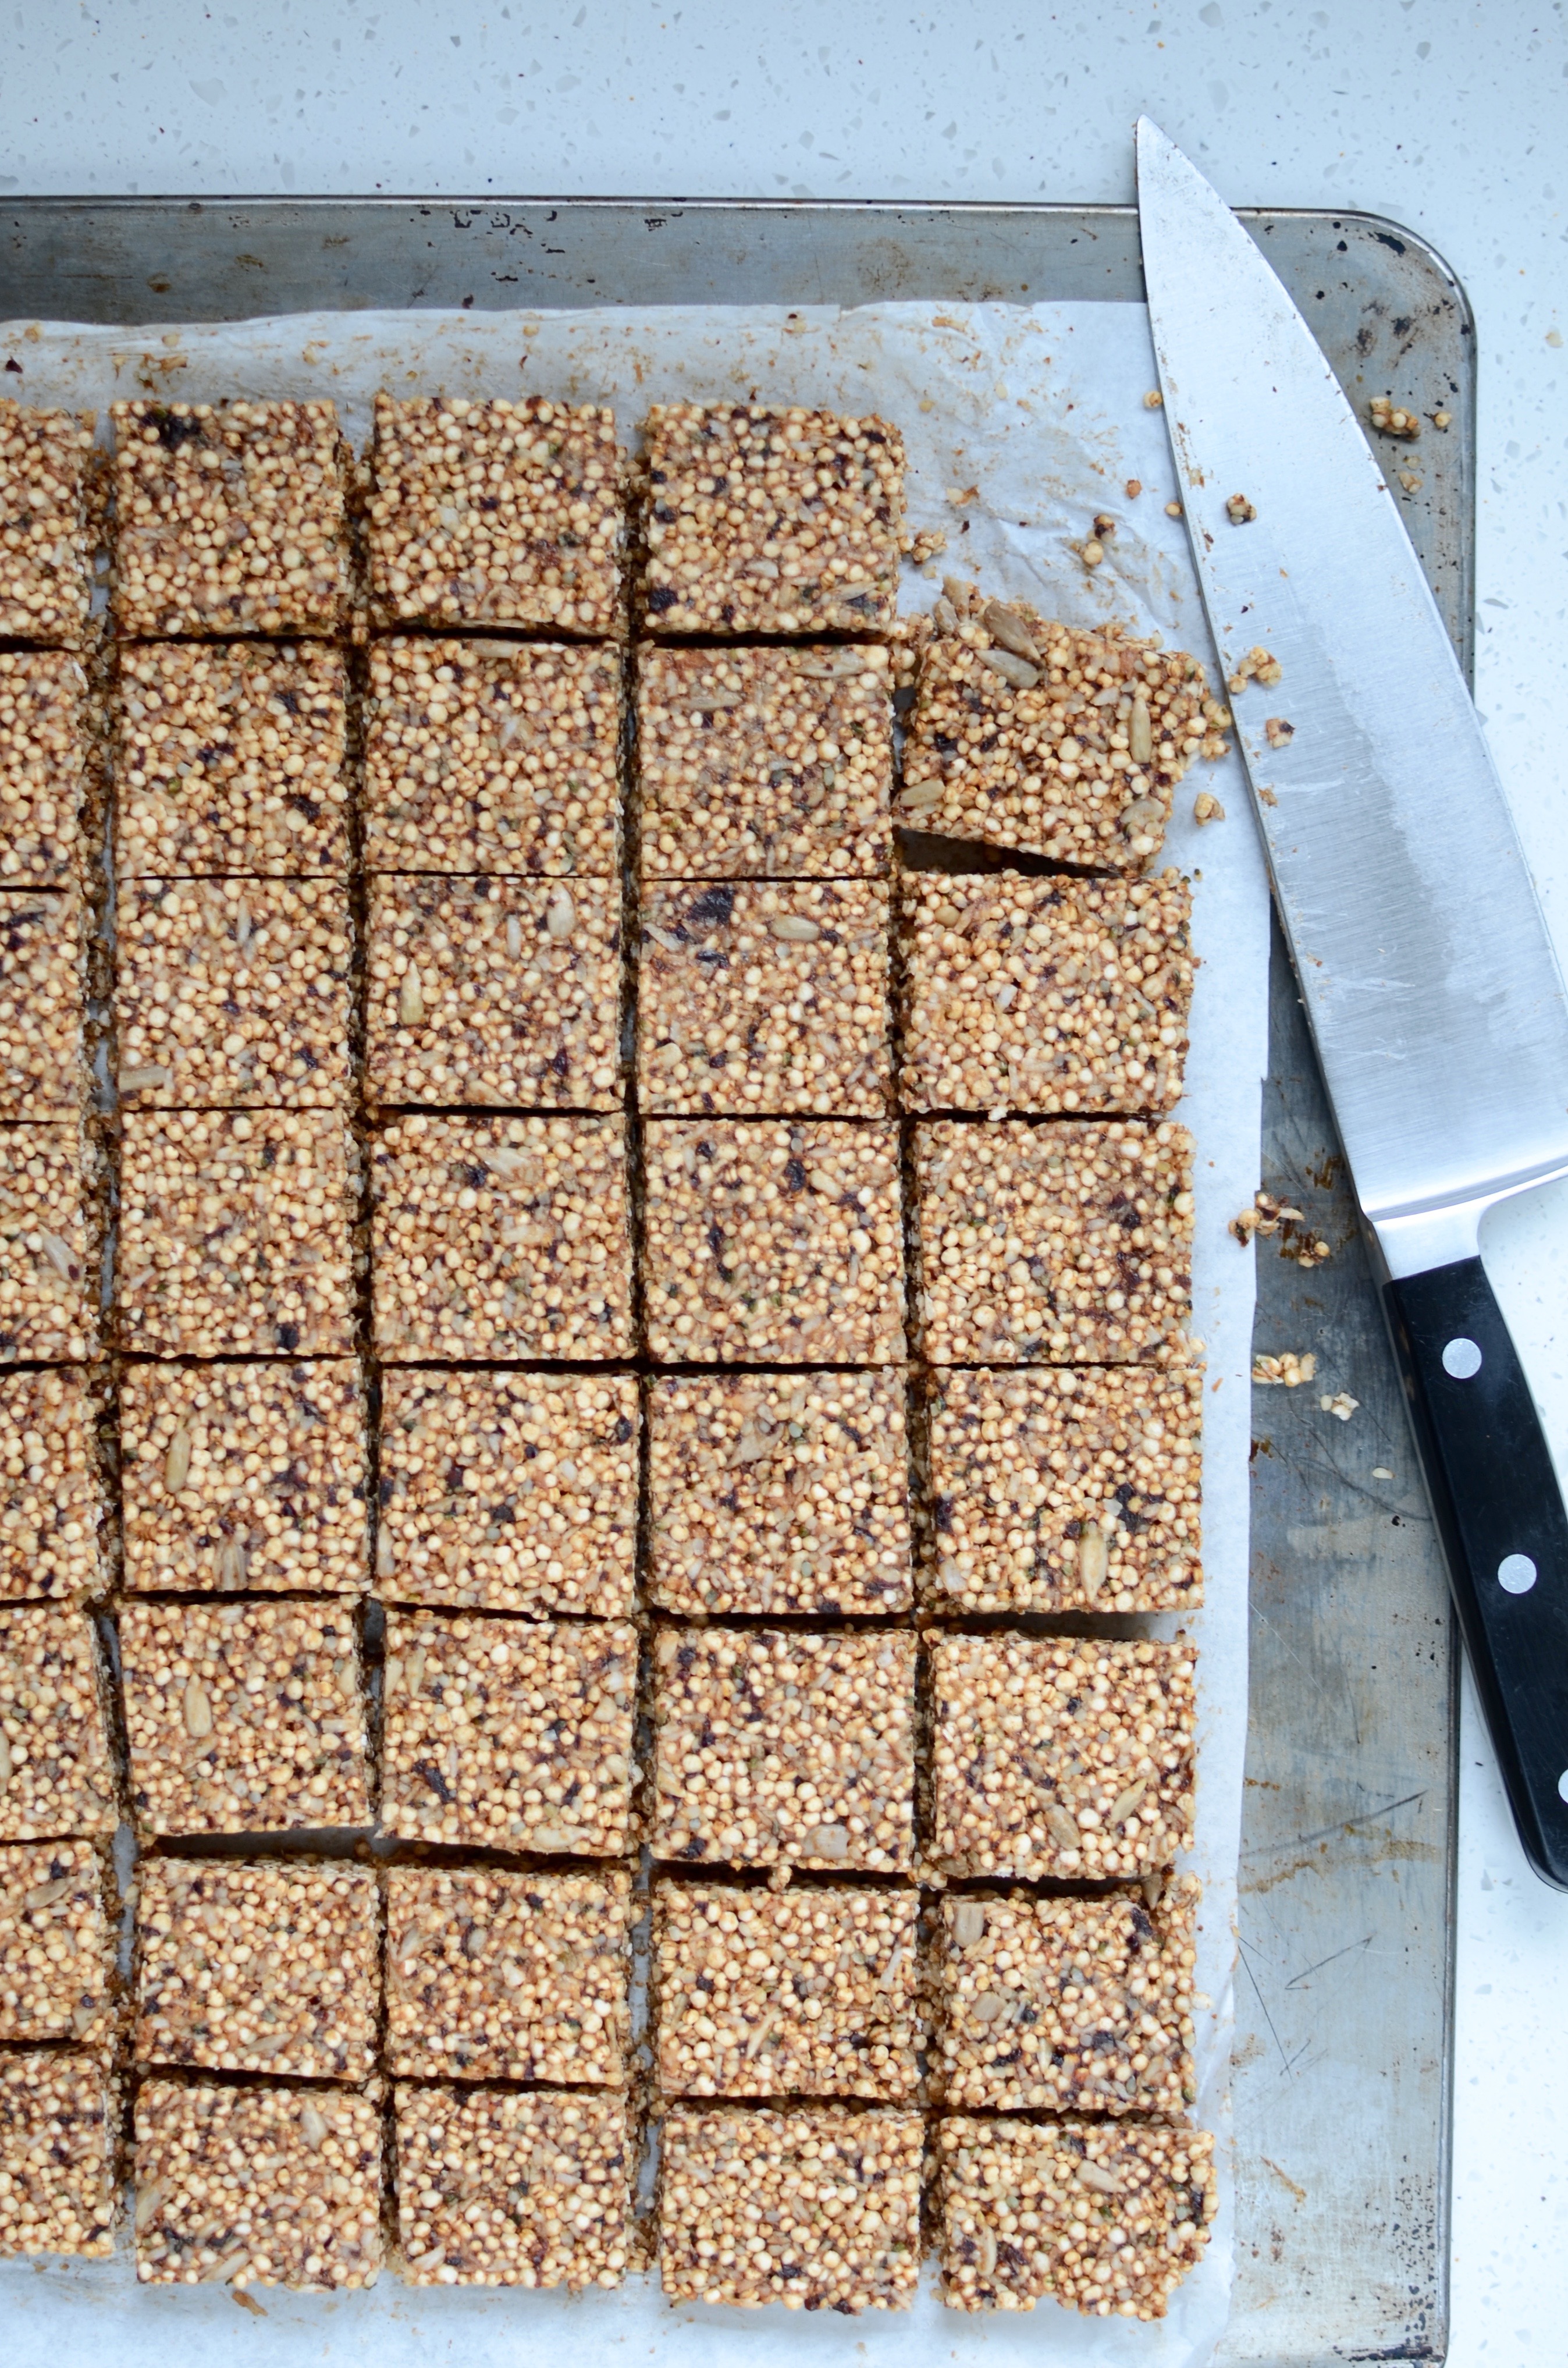
Puffed quinoa squares
A relative unknown a few years ago, South American-born Quinoa has since crept into our hearts and is unlikely to disappear anytime soon. This little pseudo-grain is very nutritious, rich in protein and gluten-free to boot, making it an ideal addition to any meal. It is most often cooked and prepared in the same way as rice, but I love grinding and making a delicious breakfast porridge with it. You can also make puffed quinoa as if you were making popcorn. Heat a large heavy bottomed pot (cast iron ones work best) and add about half a cup of quinoa. Keep shaking the pot until most of the seeds have popped. If your pot is deep enough, you won’t need a lid to keep the little nippers at bay. Tip them out onto a baking sheet to cool and use in muesli, as a topping on yoghurt or in recipes such as these squares below.

Puffed quinoa squares
The squares make an excellent after-school snack, as they are a mini version of a complete meal.
Makes about 40
Ingredients
200g (1 1/2 loosely packed cups) soft, dried prunes
125ml coconut water, at room temperature and preferably raw (i.e. unpasteurised)
150ml (125g or 1/2 cup plus 2 tablespoons) liquid coconut oil
125ml (1/2 cup) raw honey
Pinch of sea salt
5 cups puffed quinoa (home-made or store-bought)
90g (1 cup) toasted desiccated coconut
70g (1/2 cup) shelled hemp seeds
70g (1/2 cup) shelled sunflower seeds
Method
- Soak the prunes in the coconut water whilst you get your other ingredients together.
- In a powerful blender, blend the prunes, coconut water and enough of the coconut oil to give you a smooth paste. Scrape into a bowl.
- Add the rest of the oil, honey, salt, quinoa, desiccated coconut and seeds, and stir until well combined. Your mixture needs to be sticky and hold together when pressed.
- Line a 34cm x 26cm (9” x 13”) tin or oven dish with greaseproof paper, then press the mixture into the tin and refrigerate until set (at least a couple of hours).
- Turn out onto a chopping board and cut into squares. They will keep a week or so in the fridge, and freeze really well.
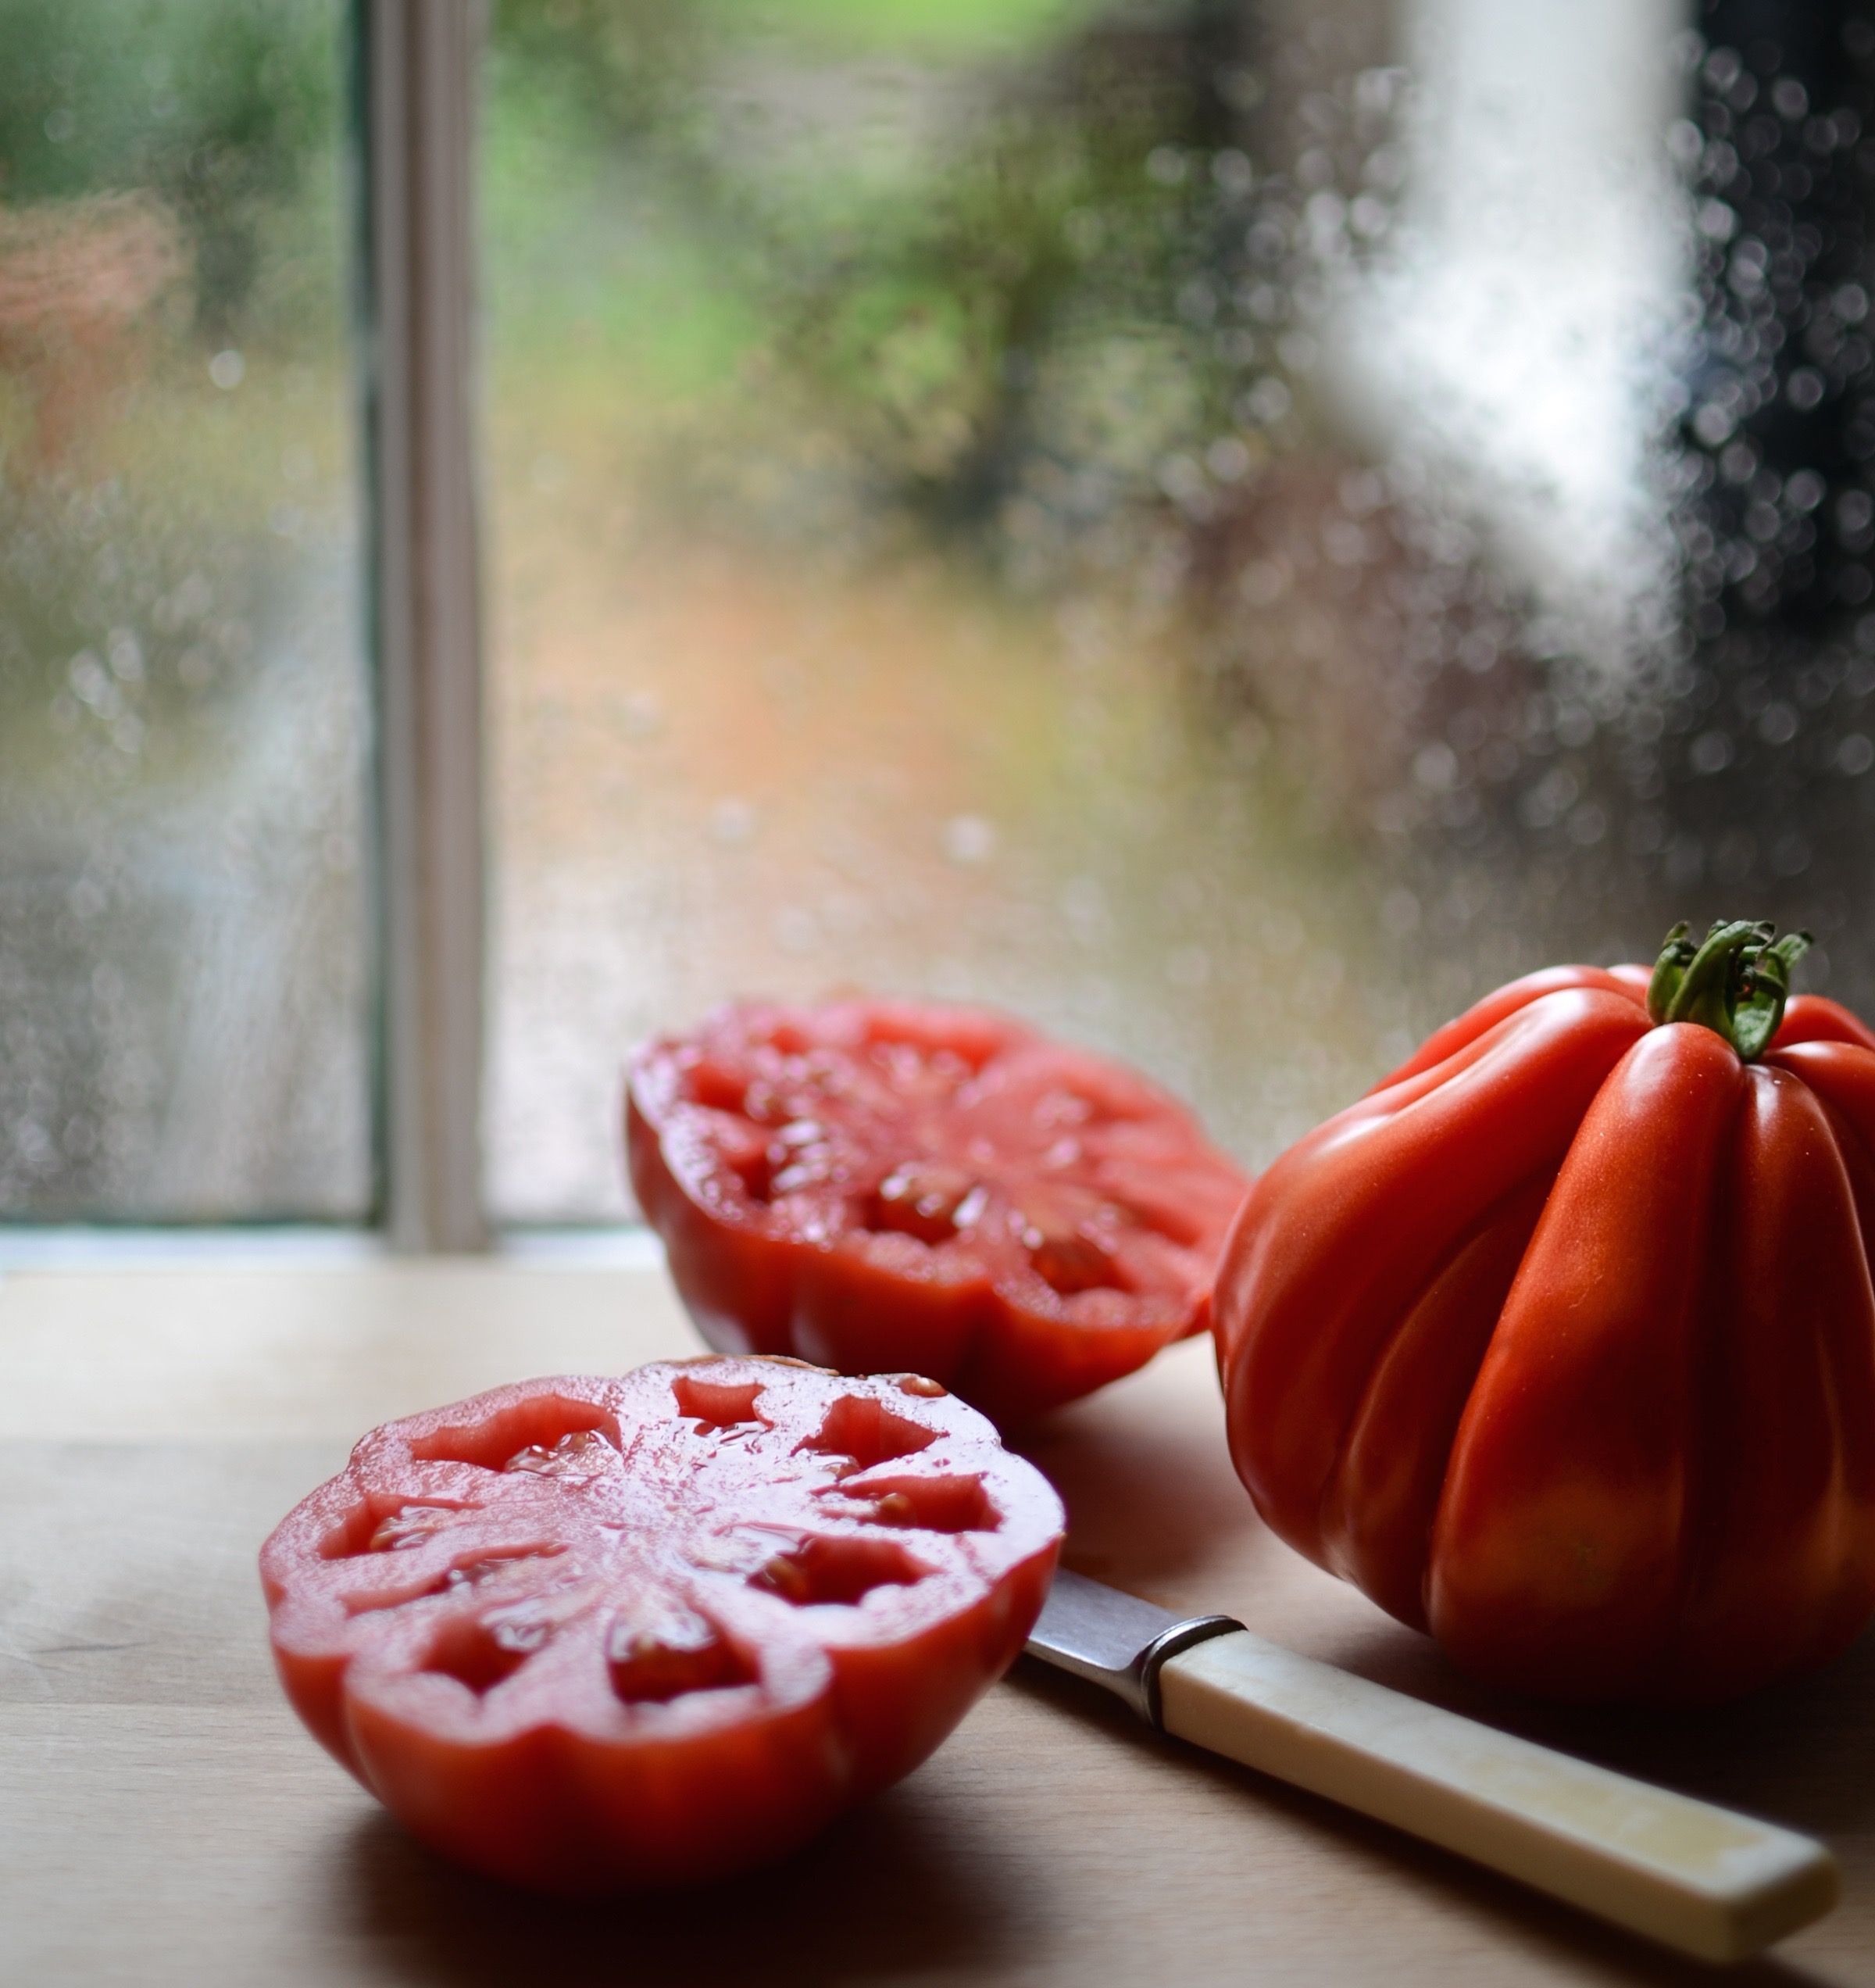
Stuffed heirloom tomatoes
Do you often have a bite of a tomato and wonder why you even bother buying them? Although beautifully uniform and bright red, commercial tomato varieties often lack taste.
One of the reasons for this was the move by tomato growers in the 1930’s towards tomato mutations with a “uniform ripening” gene, which ensured the fruits would ripen evenly from stem to tip, without leaving a harder, green part around the stem, deemed undesirable by consumers at the time. Unfortunately this mutation has a side-effect: by disabling the gene that creates the darker green colour around the stem, the chlorophyll (or chloroplasts), which converts sunlight into sugars for the plant, is removed, leading to a less sweet and tasty fruit. Thankfully some families and growers have passed the seeds from older varieties down from generation to generation because of their valued characteristics and taste. These heirloom varieties – now available at most markets – are usually much more tasty, albeit a little more expensive.
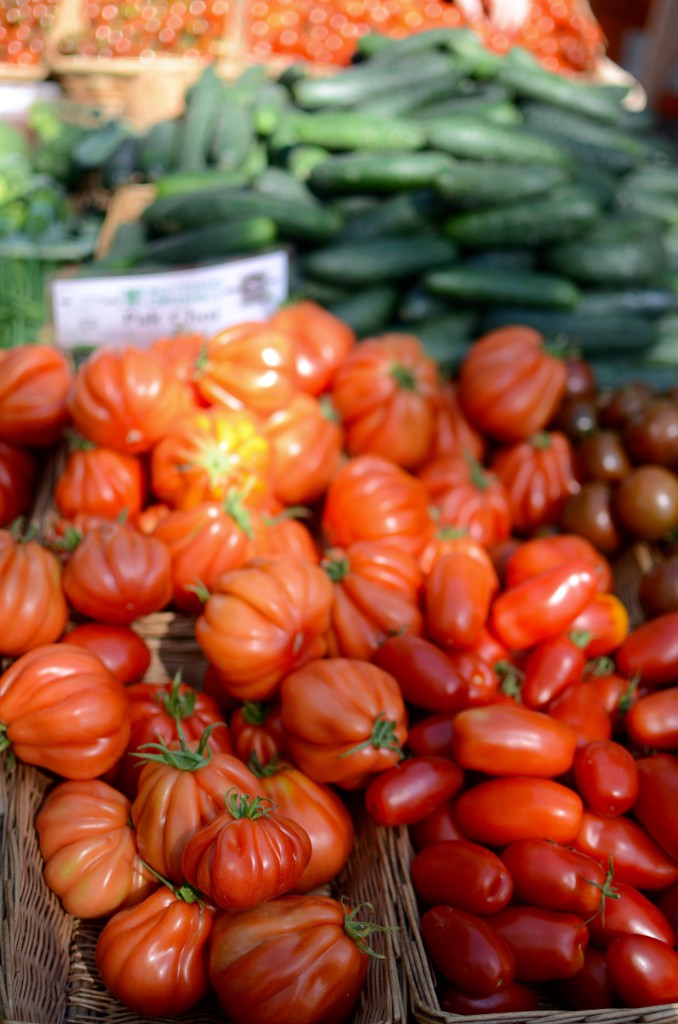 We’ve had a few very wet days lately, which meant the wonderful summer produce I bought at the market over the weekend had to find a rather more wintry purpose. I’ve always loved roasted tomatoes, but stuffing these beauties elevates them to the most perfect light meal imaginable.

 If you cannot find heirloom tomatoes for this recipe, use 4 large regular tomatoes. For the oven-roasted cherry tomatoes, cut 2 punnets of cherry tomatoes in half, toss in red wine vinegar and olive oil, season with salt and pepper, then roast cut sides up in a medium hot oven until caramelised (about 1 – 2 hours). I usually have a jar of these in my fridge, but you could also replace them with 60g of finely sliced marinated sun-dried tomatoes and increase the amount of rice slightly. Use the scooped out tomato flesh in your next batch of tomato soup or sauce, or blend with a pinch of salt and strain through a muslin cloth to make the most delicious tomato broth.
Serves 4
Ingredients
2 heirloom beef tomatoes (about 800g), cut in half horizontally and flesh scooped out carefully
Ingredients for the filling
extra virgin olive oil
1/2 large red onion, finely diced (about 1/2 cup)
1 stalk celery, finely diced
1 teaspoon sea salt
1 teaspoon mixed dried herbs (parsley, basil, tarragon, oregano etc.)
125g oven-roasted cherry tomatoes (about 1/2 cup firmly packed)
85g (1/2 cup) cooked brown long-grain rice
1 – 2 teaspoons lemon juice
100g tin sardines in brine or olive oil, drained and broken up slightly with a fork
3 tablespoons finely chopped parsley and dill
150g fresh ricotta cheese, preferably made with unpasteurised milk from grass-fed animals
Method
- Pre-heat the oven to 180°C/360°F.
- Heat a glug of olive oil in a saucepan over a medium heat. Add the onion, celery, salt and dried herbs, and cook until softened (about 5 to 10 minutes).
- Now mix together all the ingredients for the filling, except the ricotta, and allow to cool.
- Fold the ricotta into the filling briefly, leaving it in tact as much as possible.
- Spoon the filling into the tomato halves, place into an ovenproof dish that fits them snugly and bake at 180°C/360°F for about 30 to 40 minutes (or until the tomatoes are very tender). If the filling is starting to get too brown after about 20 minutes, cover with foil.
- Serve with a crisp green salad and green beans, or on toasted sourdough.

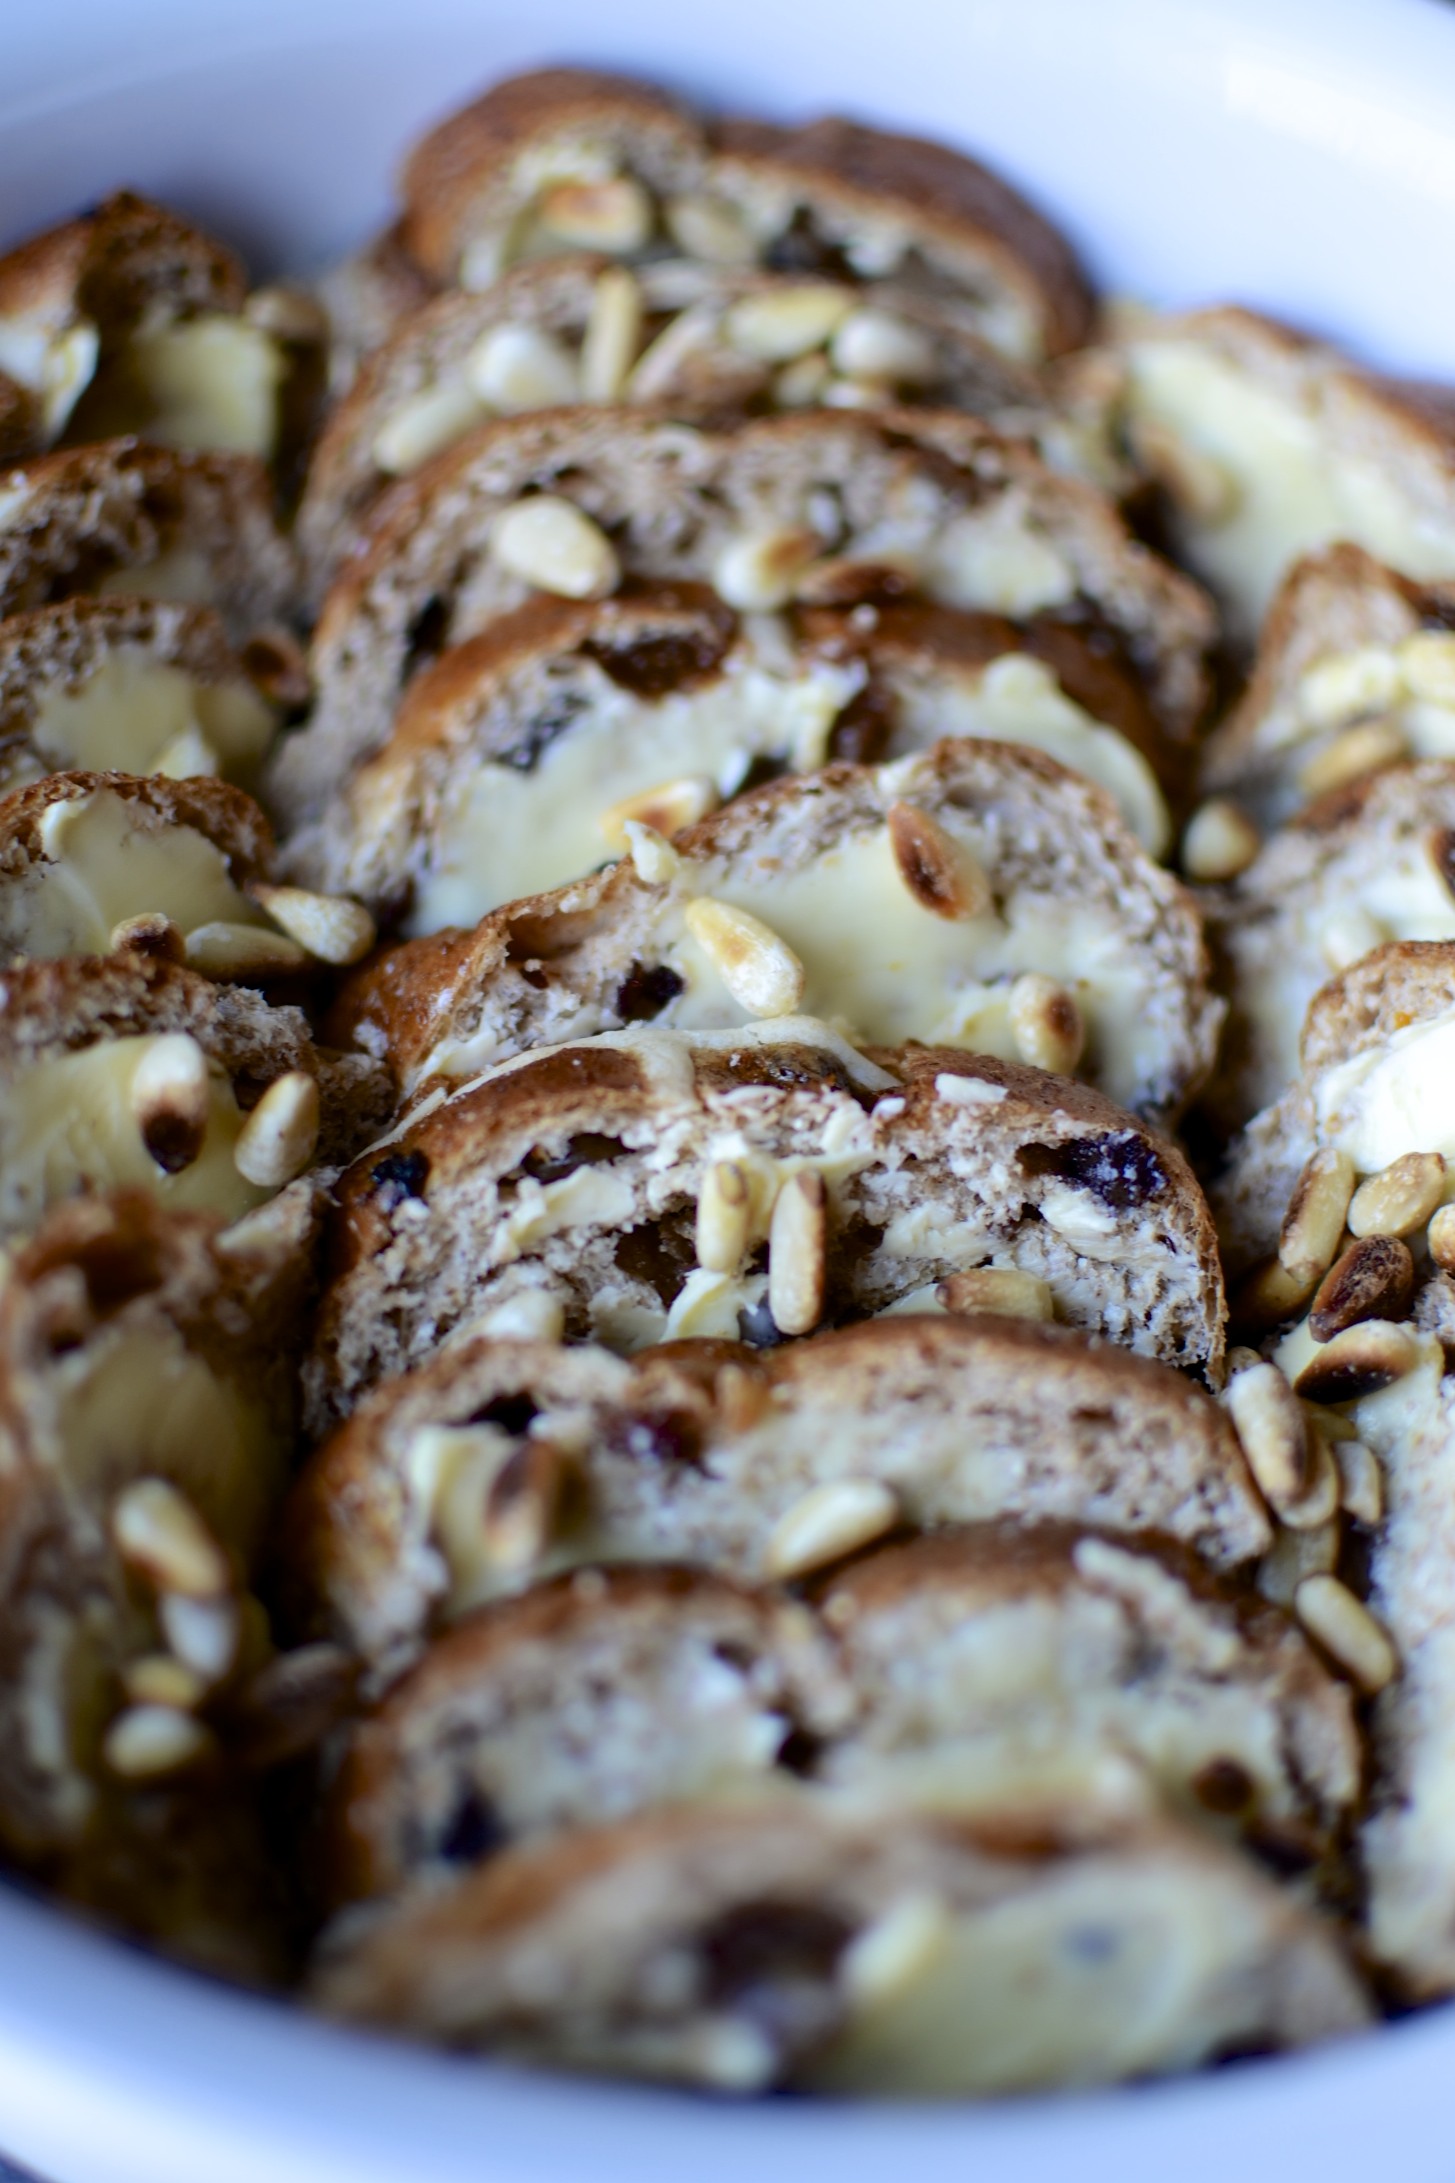
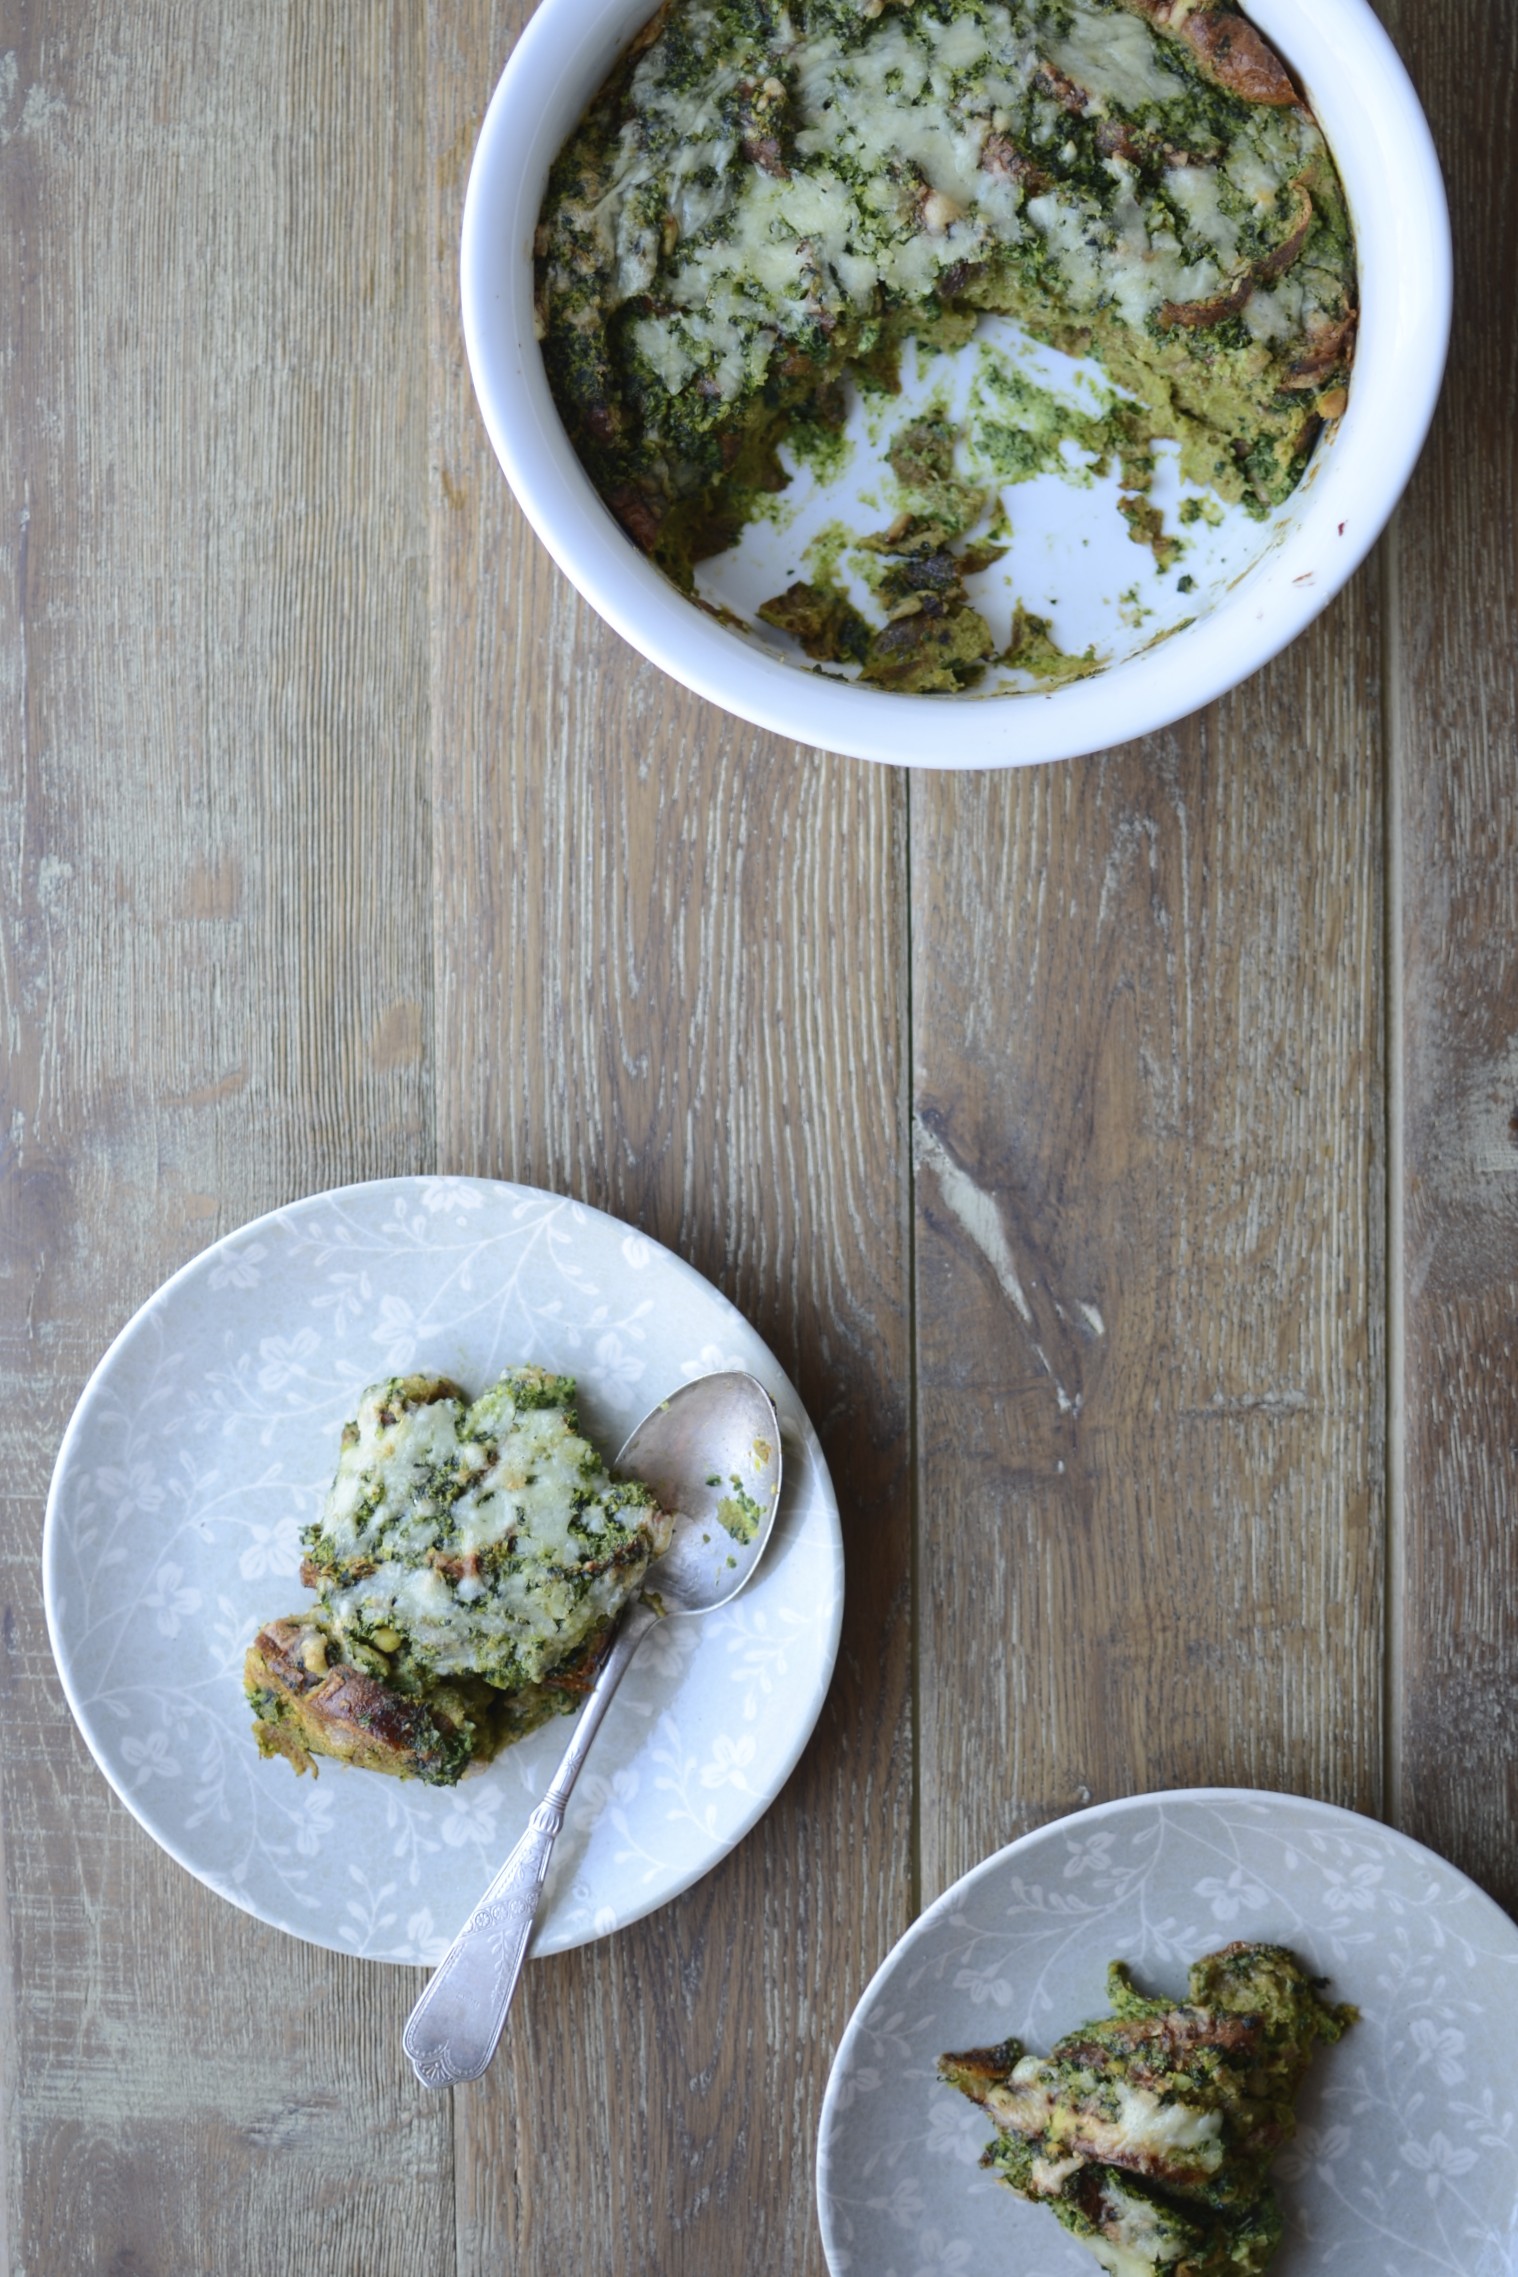
Hot cross breakfast bake
I have an issue with Christmas decorations appearing in September. And hot cross buns being for sale all year long. They are such a treat precisely because they are usually only available during Easter – and, like fragrant strawberries in summer and nutty-sweet Jerusalem artichokes in winter, I so look forward to indulging in them for a brief period every year. Here is a recipe idea for a savoury dish making use of these little spiced buns and one of my favourite greens – cavolo nero.
Wishing you all a blessed Easter!

Hot cross breakfast bake
Serves 4
Ingredients
1 large onion, finely chopped
large knob of organic butter
50g (small handful) Tuscan kale / cavolo nero, leaves stripped from stems and roughly chopped
4 wholewheat, preferably organic, hot cross buns, sliced into 5 slices each (they can be a few days old)
3 pastured organic eggs
200ml (1/2 plus 1/3 cup) milk of your choice
small handful (about 20g) pine nuts, toasted in a heavy based pan until golden
large handful (about 40g) grated strong cheddar cheese
Method
- Preheat the oven to 180°C/350°F.
- Heat the butter, add the onion and cook over a medium heat until soft and translucent. Now turn up the heat and cook for another 20 minutes, stirring regularly to avoid the edges catching.
- While the onion is caramelising, “steam” the kale briefly in a little water until bright green and wilted. Refresh under cold running water and squeeze out any excess liquid.
- As soon as the onions are golden and sweet, set aside to cool slightly.
- Butter each of the hot cross bun slices with butter and stack in an ovenproof dish. Scatter over the toasted pine nuts.
- Now place the onion, kale, eggs and milk in a blender and blend briefly until the kale is finely chopped (but not completely liquidised). Carefully pour this mixture over the hot cross buns and leave to stand for at least 20 minutes.
- Sprinkle over the grated cheese and bake for 30 to 35 minutes or until golden and set.
- Remove from the oven and allow to cool slightly before serving.