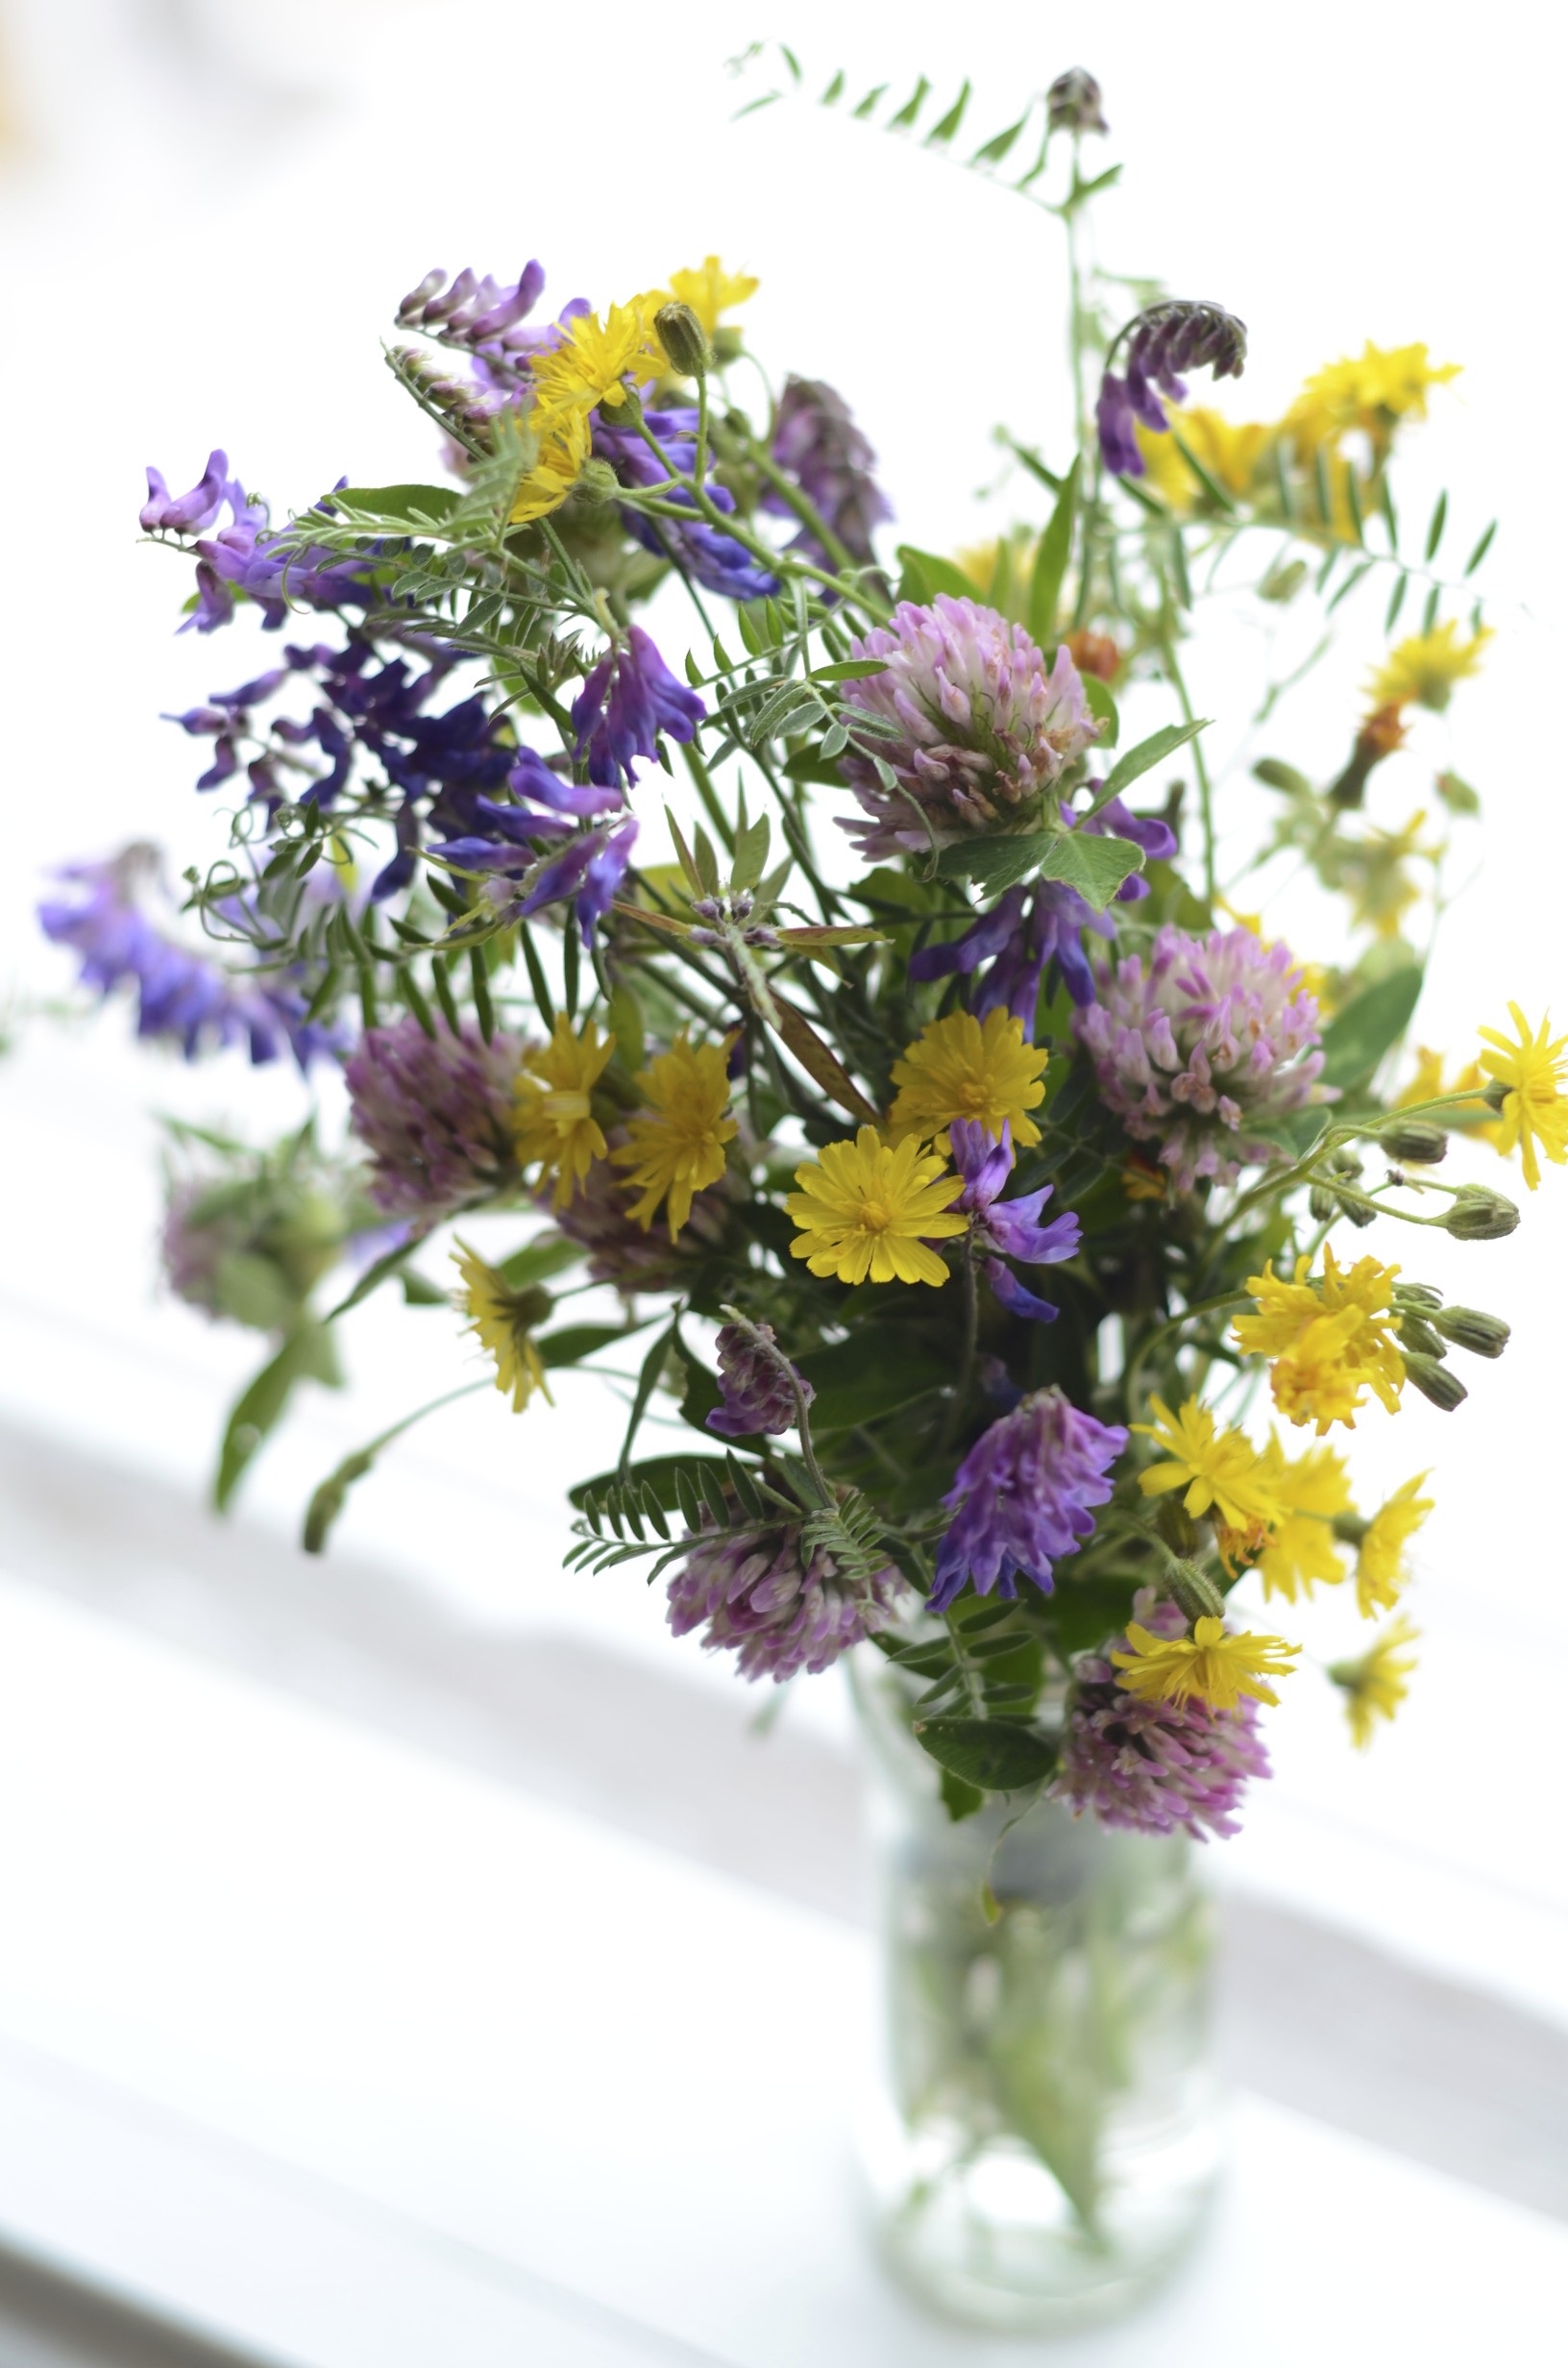
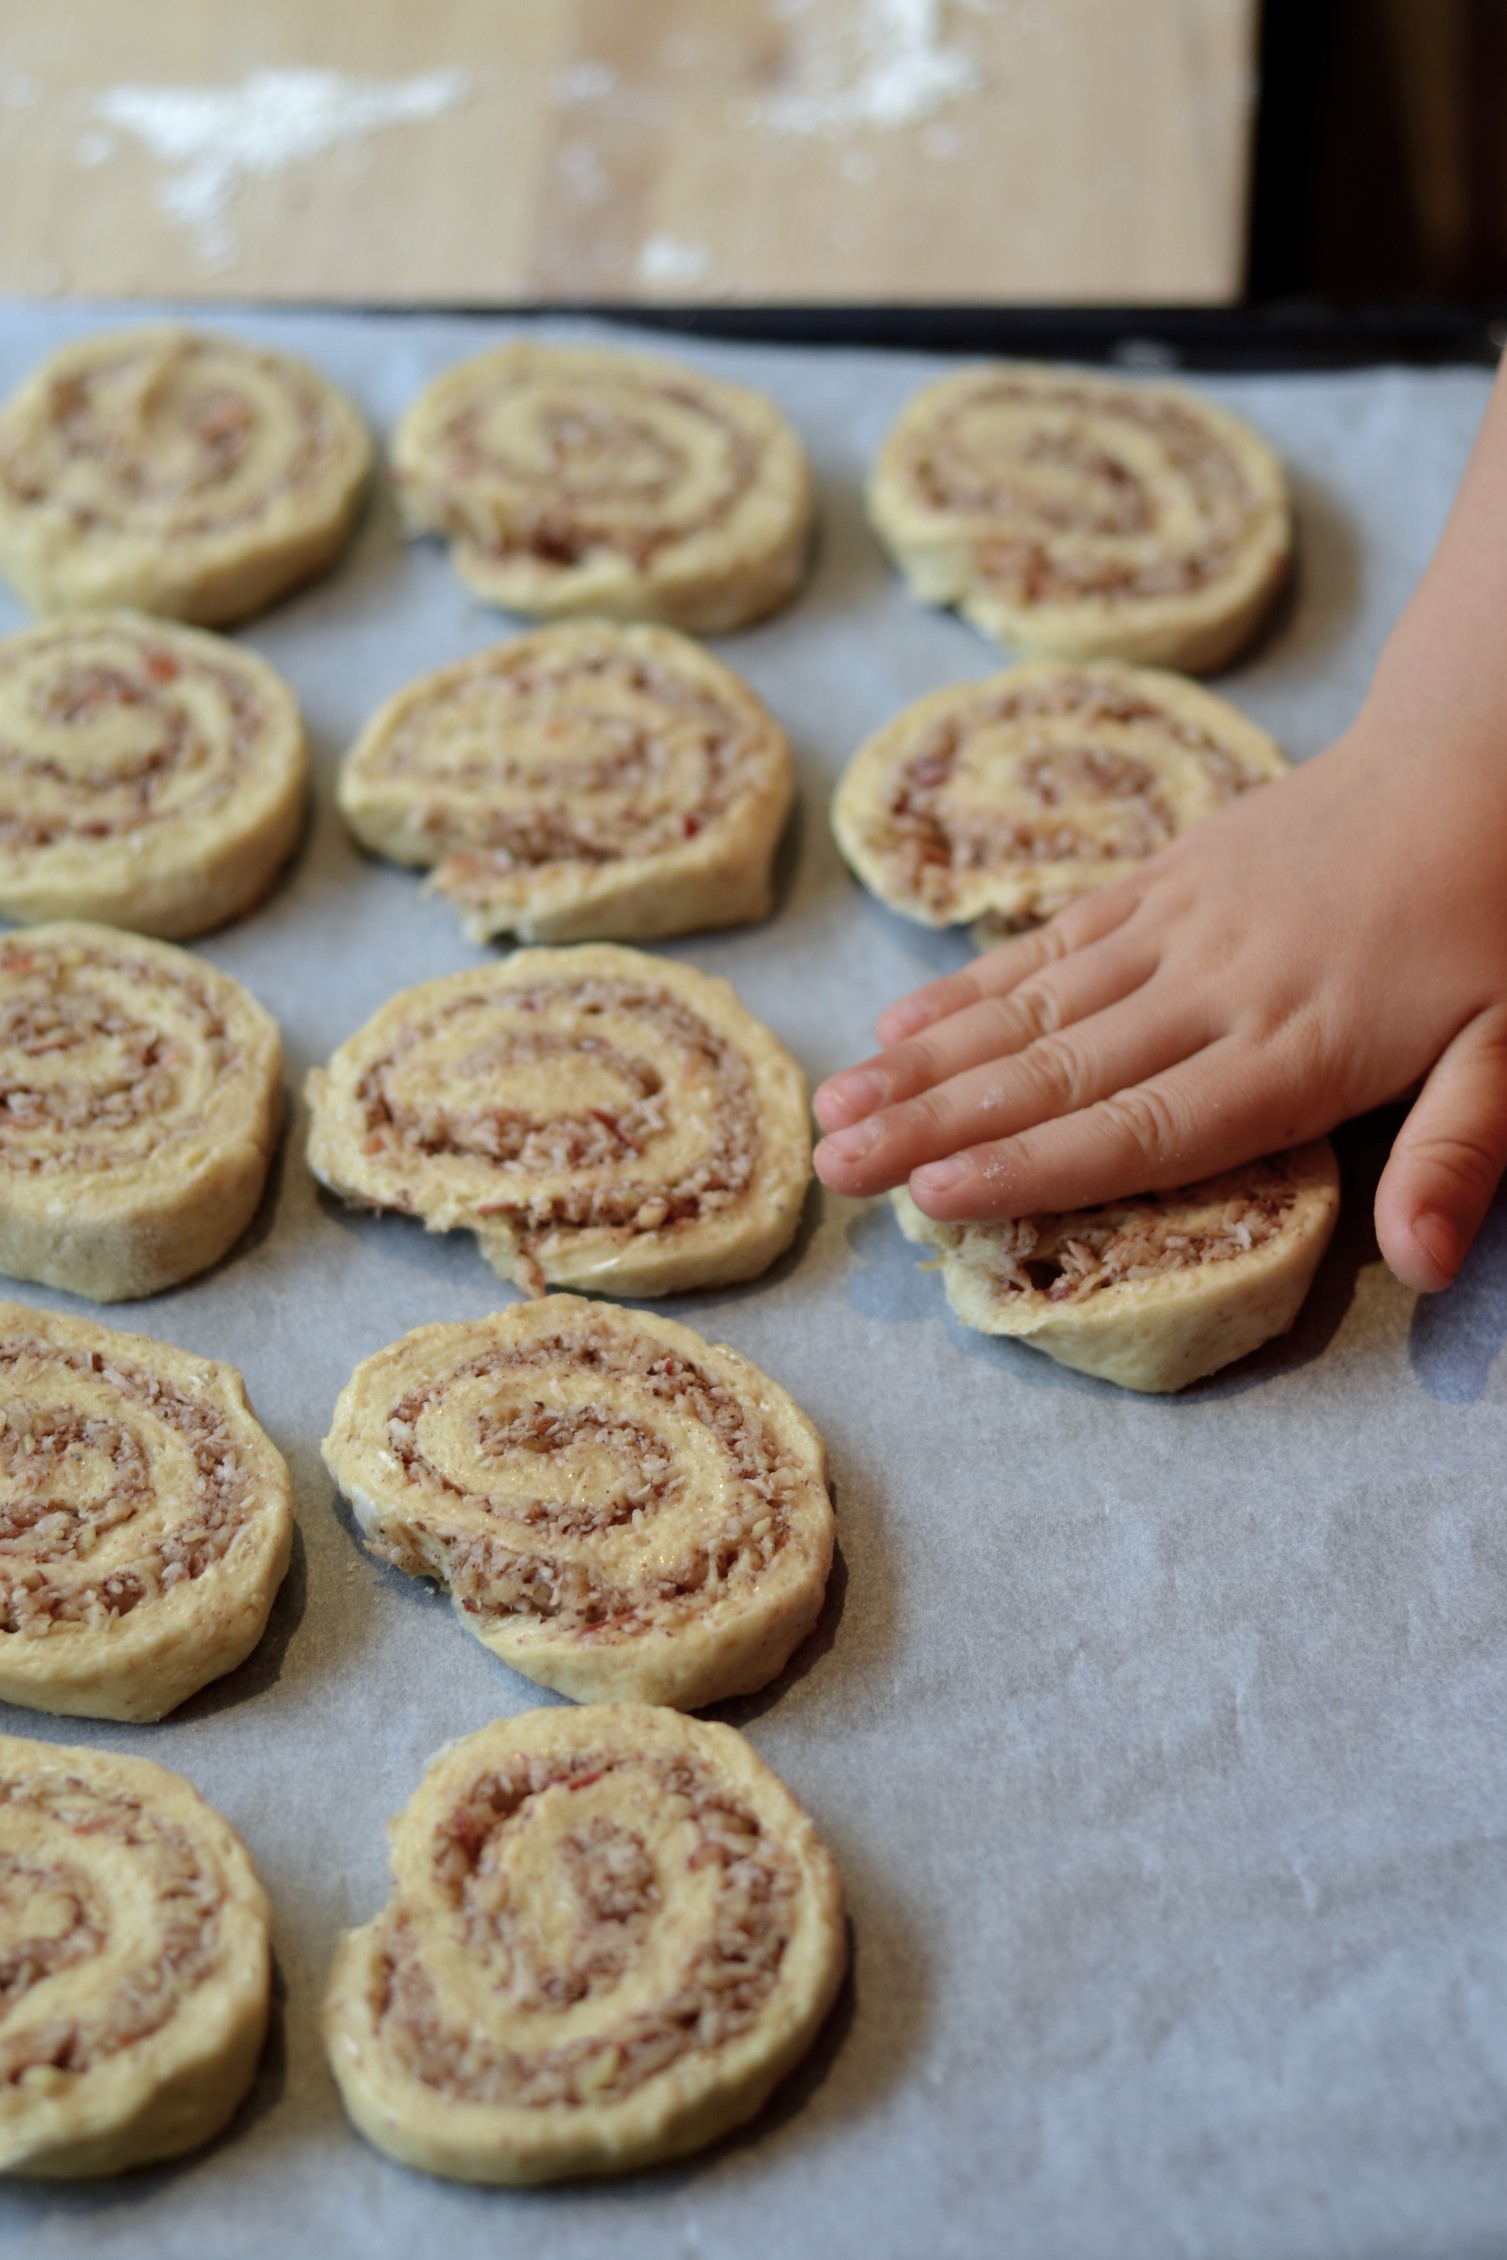
Cacao and matcha pinwheels
We all know that regularly enjoying a cup of green tea is beneficial to our health. Matcha powder is a concentrated powdered green tea that can be stirred into hot water to make a cuppa, but also be added to a variety of dishes, such as smoothies, porridge, lattes, chocolate truffles and cakes. The nutritional value and antioxidant content of matcha tea exceeds that of regular green tea tenfold, because the whole leaf, not just the brewed water, is ingested. Amongst its many benefits, matcha is packed with antioxidants, boosts metabolism and burns calories, detoxifies, calms, aids in concentration, contains vitamin C, selenium, chromium, zinc and magnesium, fights against viruses and bacteria, is rich in fibre, and lowers cholesterol and blood sugar. Well worth incorporating into your diet, it seems.
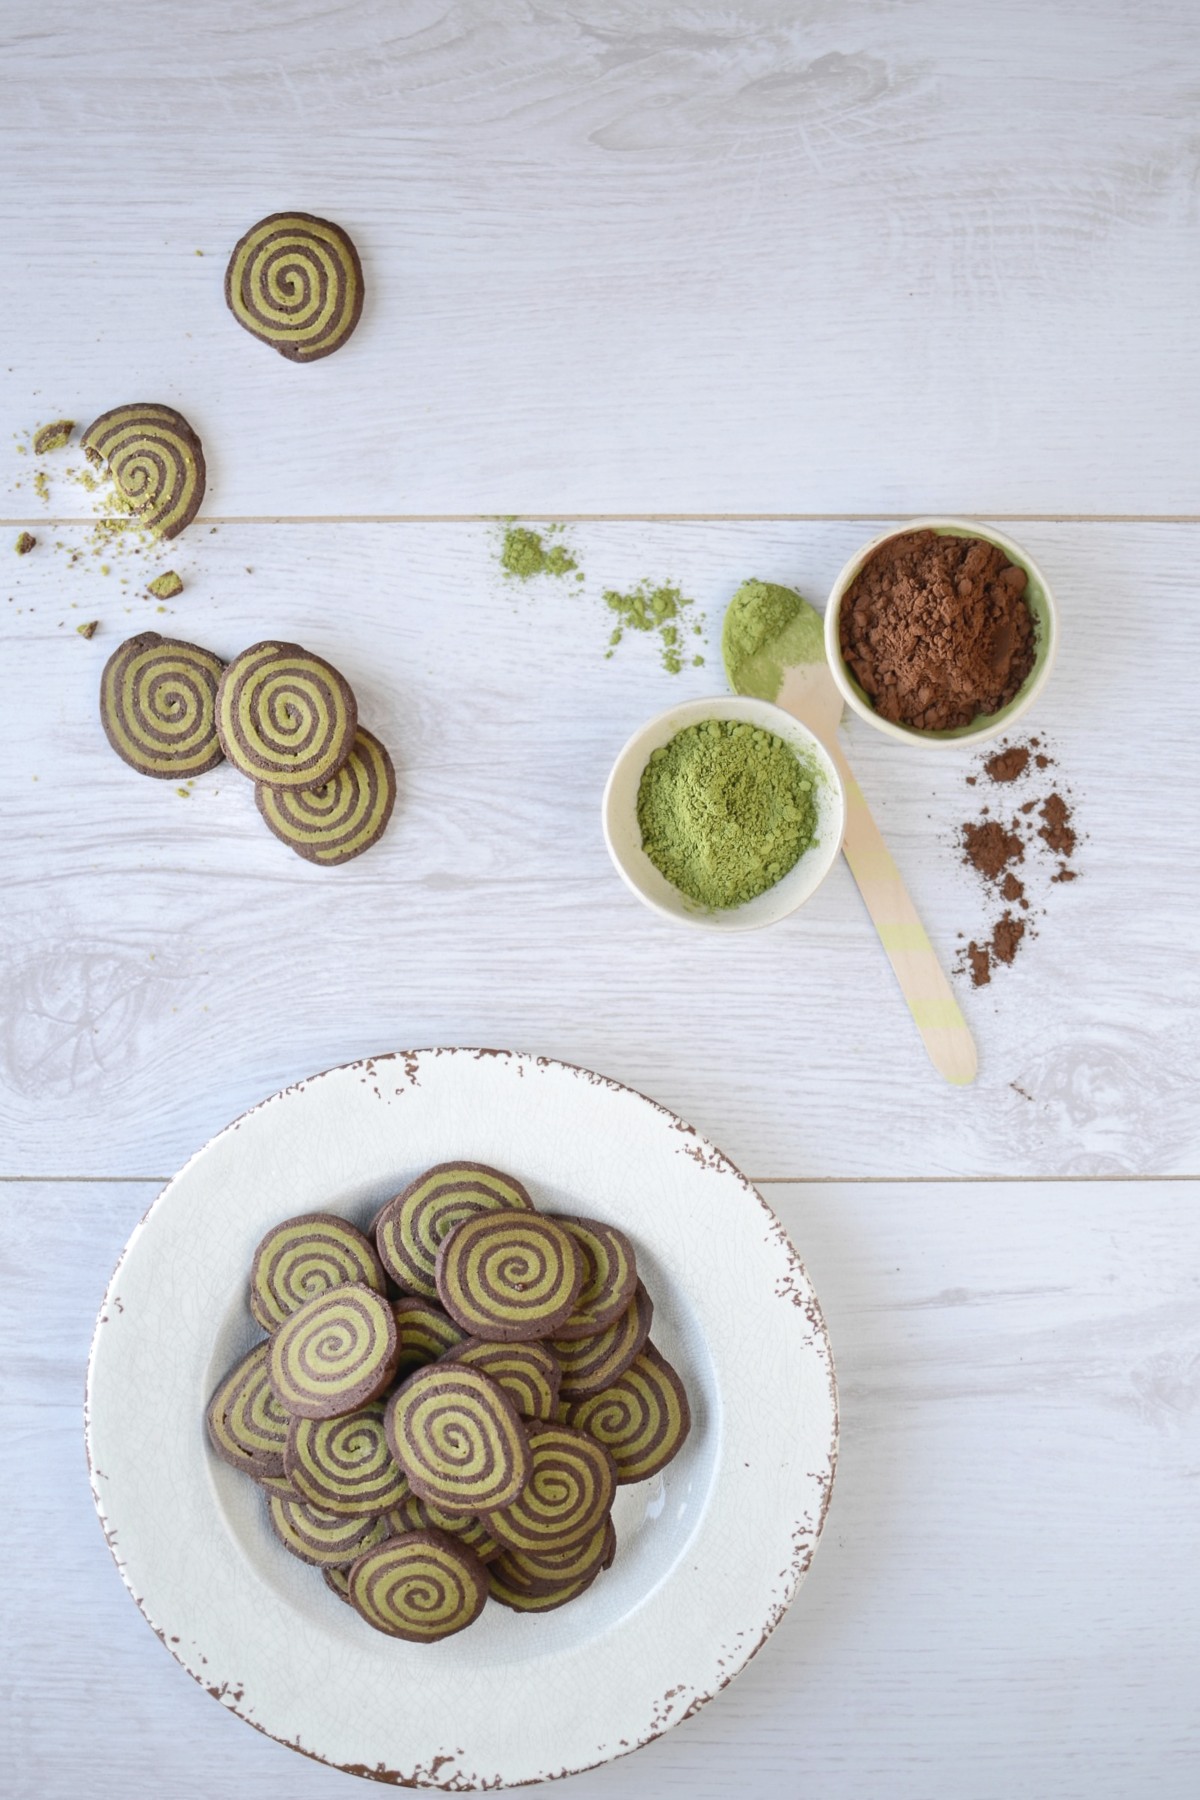
Gluten-free cacao and matcha pinwheel cookies
Makes 50 – 60 cookies, depending on thickness
Ingredients
110g butter, preferably organic and pastured
130 – 140g coconut sugar (you could also use unrefined brown sugar)
1 egg
250g gluten-free flour (try using one that contains no xanthan gum) or wholegrain spelt flour
1 teaspoon baking powder
pinch of salt
15g (2 tablespoons) unsweetened cacao powder
7g (1 tablespoon) matcha green tea powder
Method
- Preheat the oven to 180°C/350°F and line a large baking sheet with parchment paper.
- Cream together the butter and sugar until light and fluffy. Add the egg and mix until well incorporated.
- Combine the flour, baking powder and salt, then fold into the butter mixture.
- Now divide the mixture in half, add the cacao powder to one half and the matcha powder to the other. Use your hands to work the cacao and the matcha into the two balls of dough. The dough will be quite sticky, but should be workable. The matcha half may need a tiny bit more flour.
- Now flatten the cacao dough ball onto a large piece of parchment paper in a rectangular shape. Place another piece of baking parchment on top and roll out until you have a very thin large rectangle. Place in the fridge on a chopping board or tray.
- Repeat the process for the matcha dough half. Remove the cacao rectangle from the fridge, peel off the top piece of paper, and flip over onto the matcha rectangle. Cut off any overhang to patch any gaps.
- Sprinkle the piece of paper that you peeled off the cacao rectangle with flour, then flip the now stuck-together rectangles onto that.
- Carefully start rolling up the dough on the long side until you have a very long and tight sausage. Place this in the fridge for at least 30 minutes before moving on to the next step.
- When completely firm, cut the sausage in half, leave one half in the fridge and slice the other half into thin rounds. Place on the lined baking sheet and bake for 10 to 12 minutes, rotating the sheet once. Repeat for the other half of the sausage.
- Place on a wire rack to cool completely before storing in an airtight container.
Two ways with roasted cauliflower
For Mother’s Day last year, my eldest son completed the sentence “I love my mummy because…” in the communal class card with “she makes me roasted cauliflower – my favourite!” – a statement that was endearing and cringe-worthy in equal measure. I could just imagine other parents rolling their eyes and wanting to gag, but the truth of the matter is that roasted cauliflower really IS his favourite food, and I am happy to indulge his love often. Here are two easy ways to enjoy this delicious brassica: with pickles or with pasta.

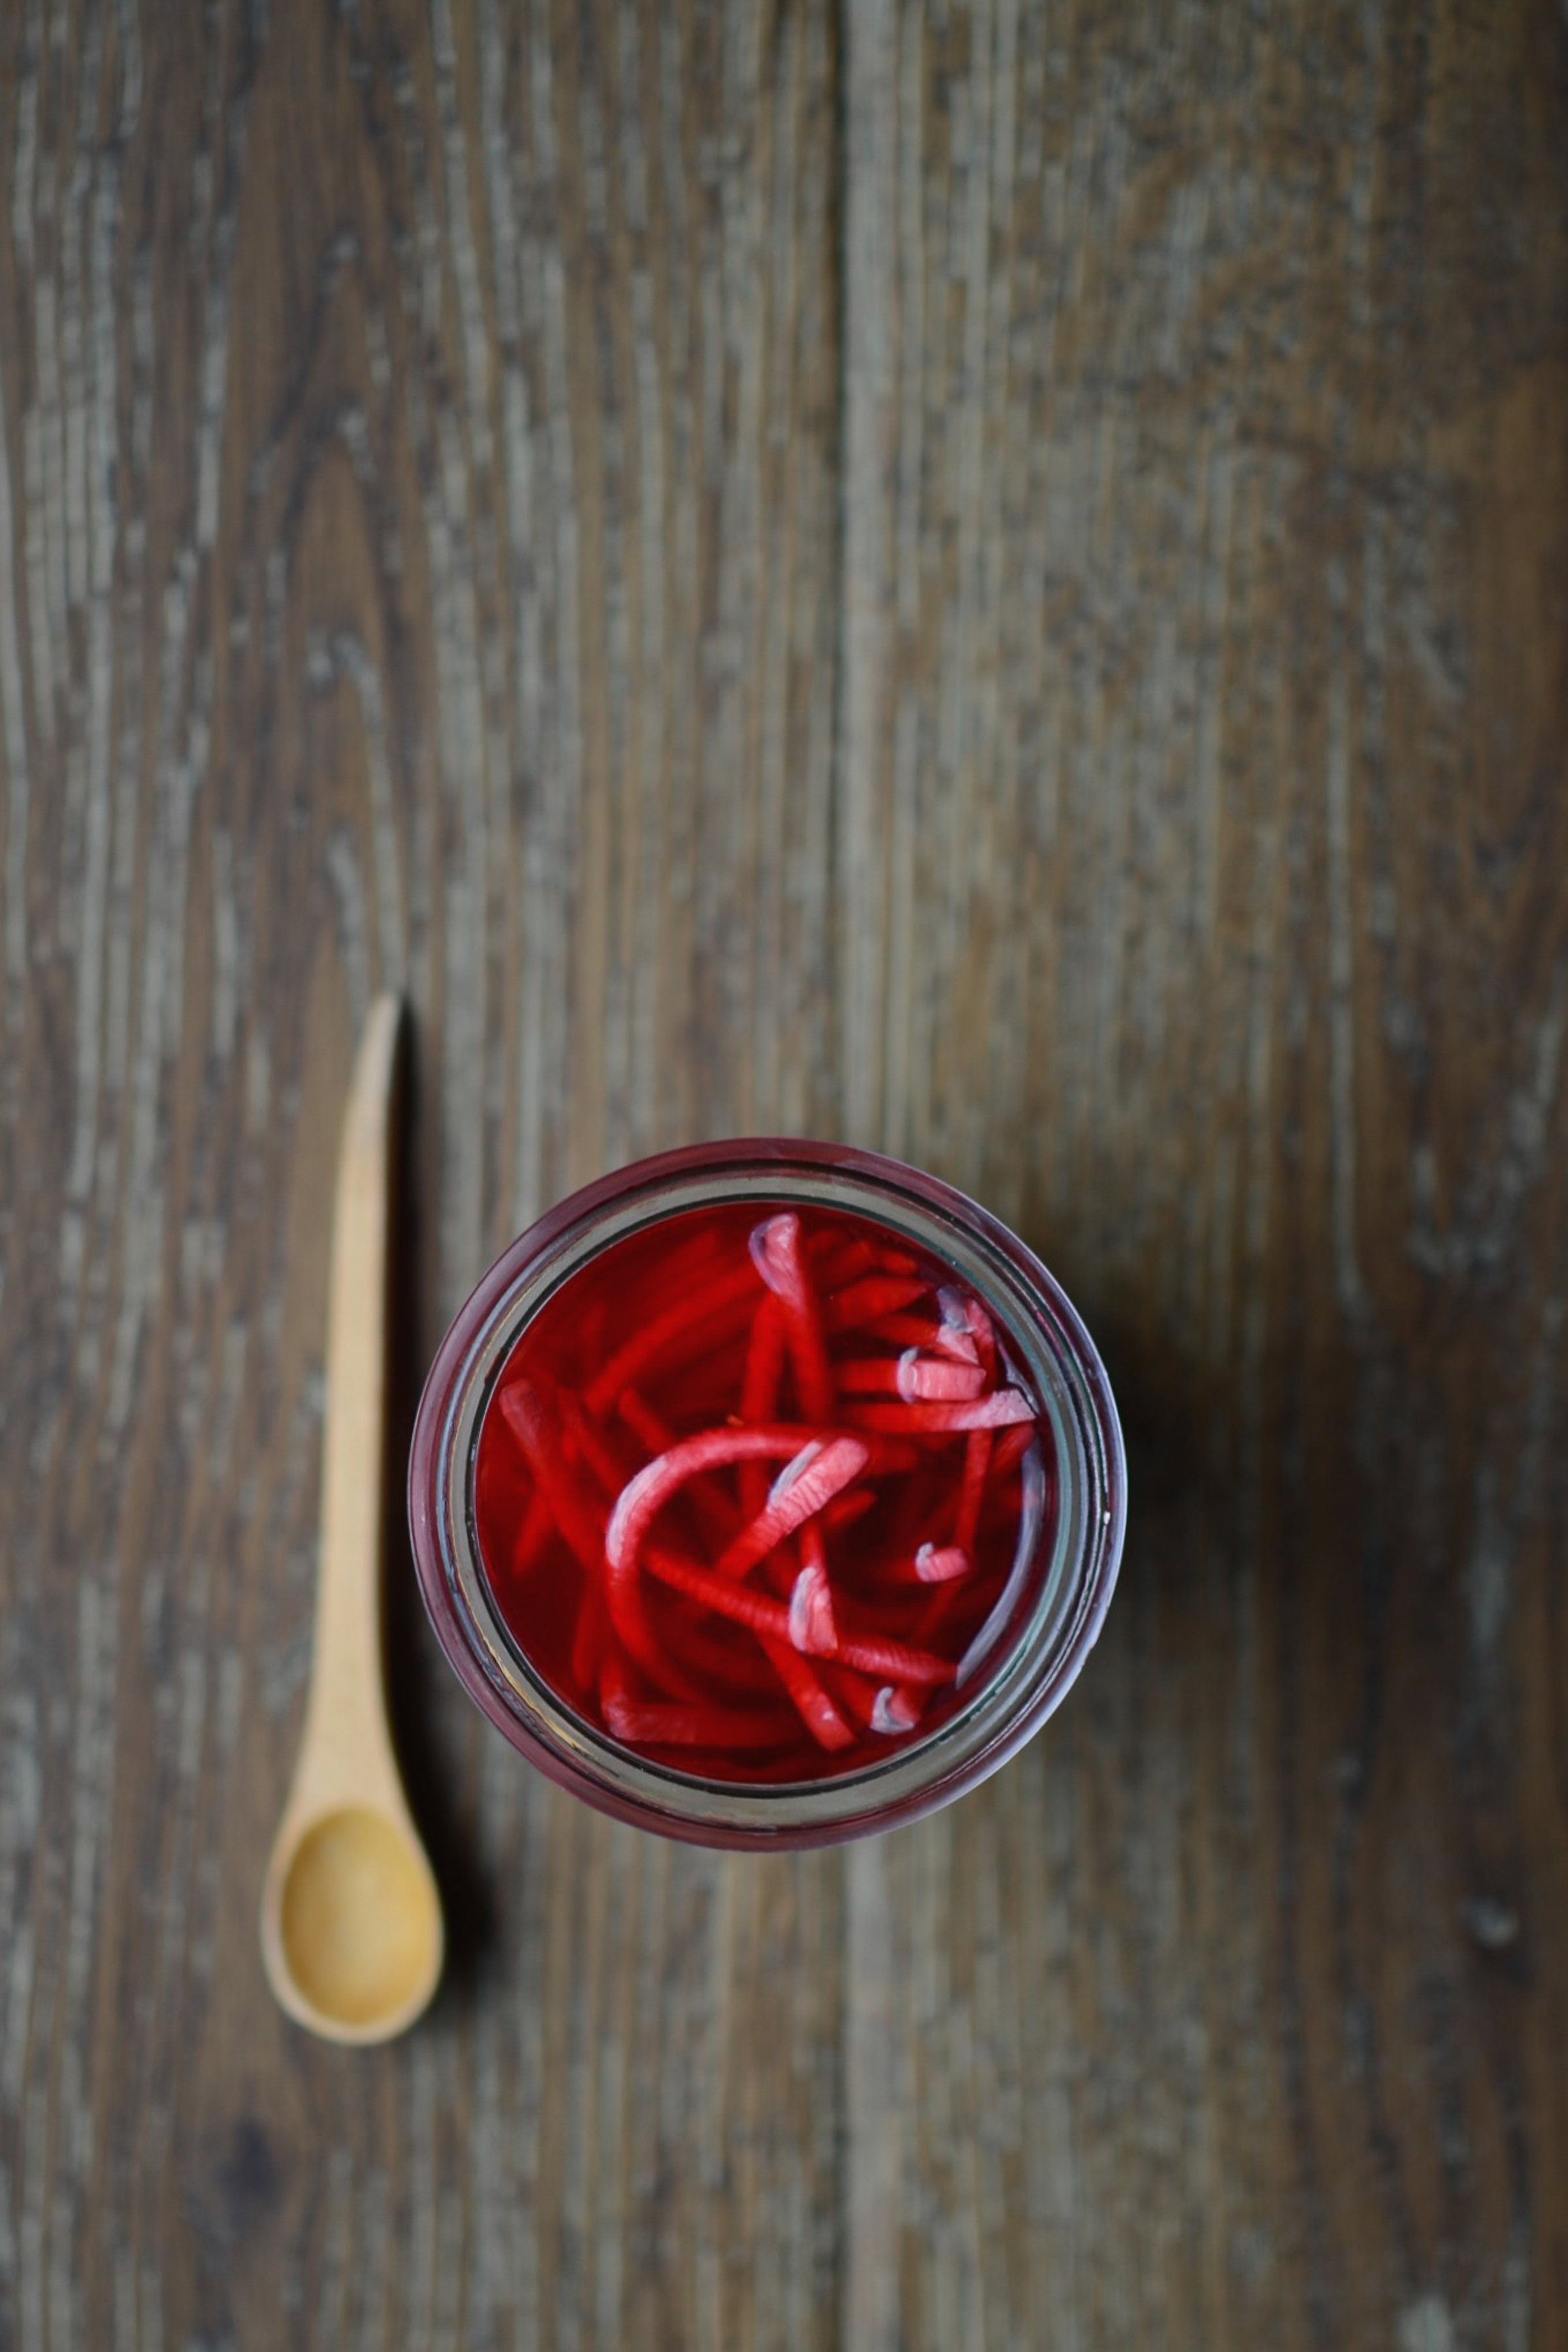
Raw pickled watermelon radishes
Ingredients
2 medium watermelon (also known as roseheart or red meat) radishes, scrubbed and sliced into thin discs or matchsticks
125ml (1/2 cup) water, preferably filtered
125ml (1/2 cup) apple cider vinegar, preferably unpasteurised such as this one or this one
30ml (2 tablespoons) honey, preferably raw
1 heaped teaspoon sea salt
large pinch of red chilli flakes
1/2 teaspoon black peppercorns
Method
- Pack the radish slices or matchsticks into a medium canning jar or glass container with lid, that you have either washed in the dishwasher or rinsed with boiling water.
- Whisk together the rest of the ingredients until honey and salt are dissolved, and pour over the radishes. Seal with the lid and place in a cool place or the fridge for at least 24 hours before tasting.
- They will remain crunchy for only a few days, but keep well for several weeks in the fridge.
- Serve with roasted cauliflower or mixed into salads, on sandwiches and with cheese.
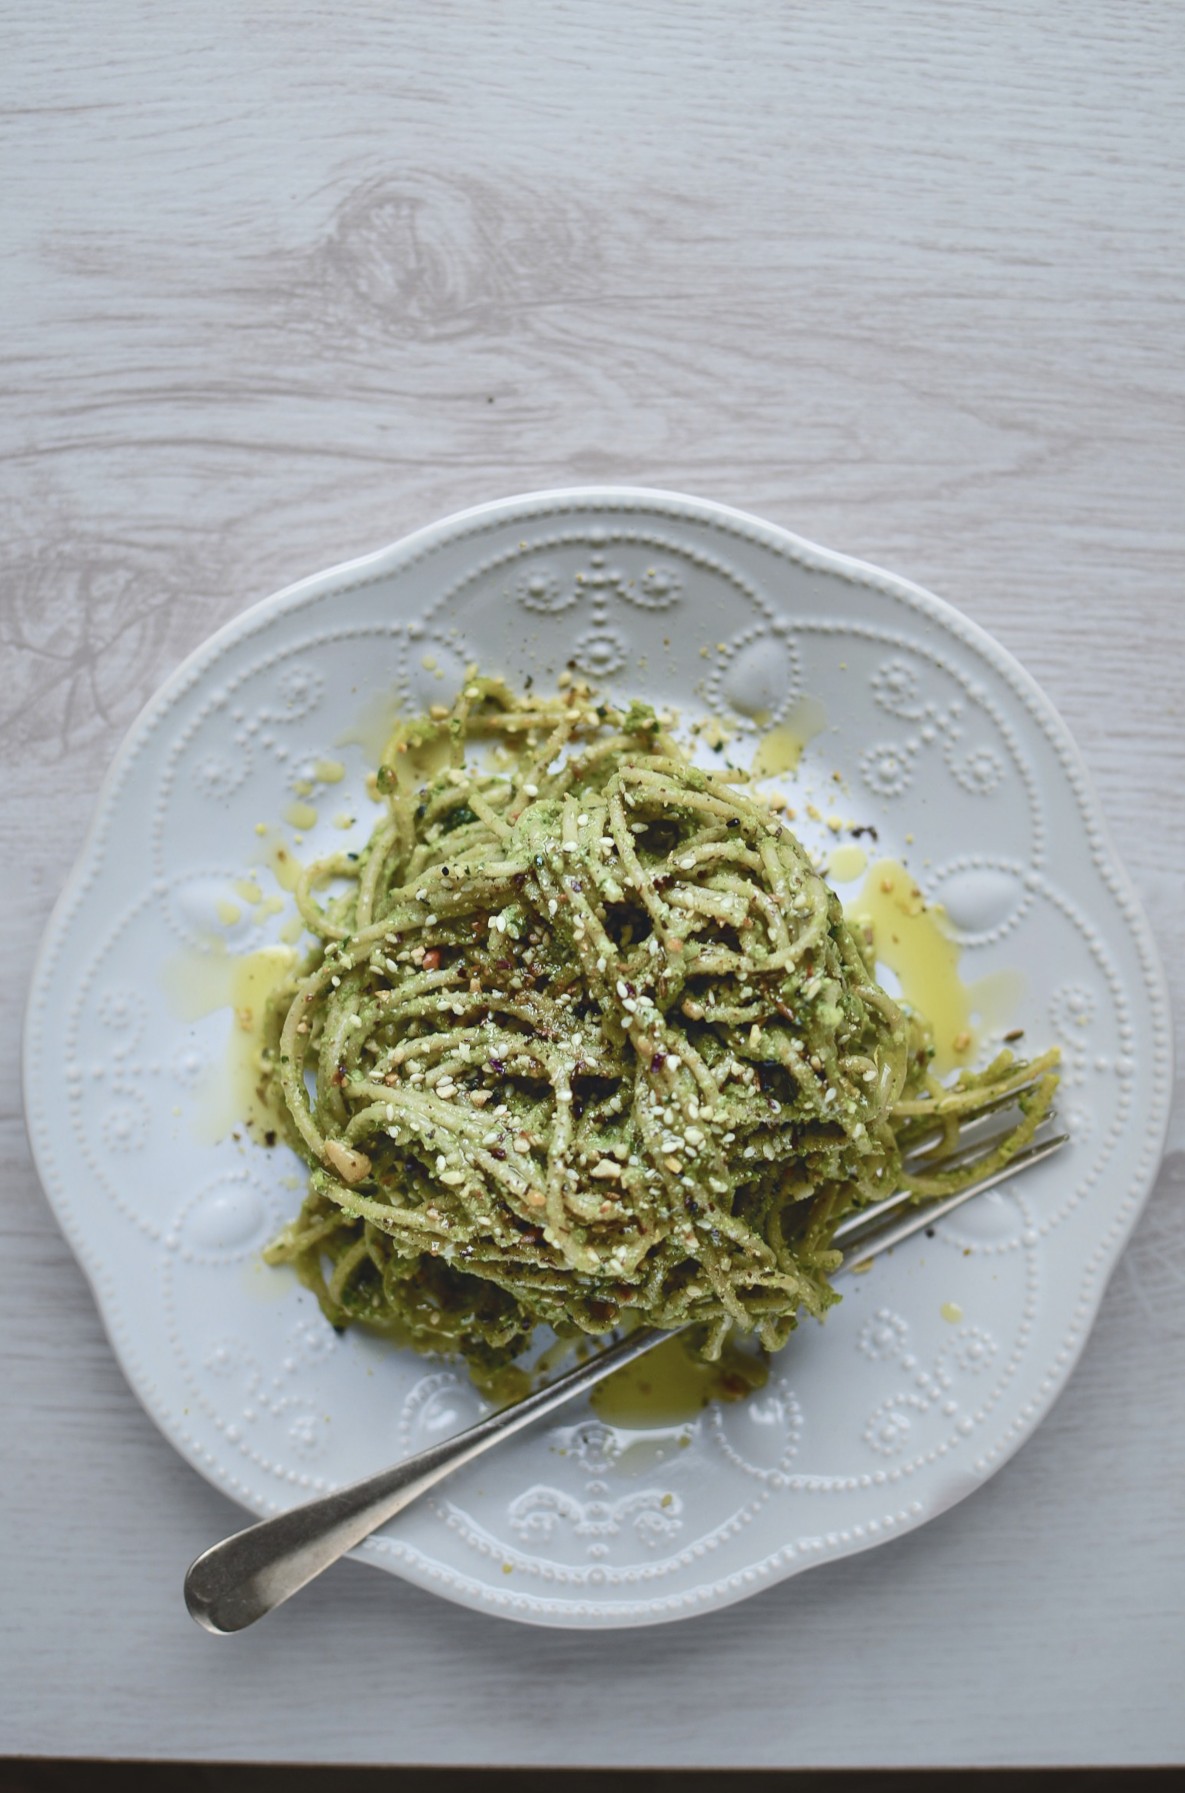
Roasted cauliflower and chard pasta
Serves 6
Ingredients
1 small head cauliflower, trimmed and separated into florets
1 medium onion, chopped
200g Swiss chard, trimmed, stalks finely chopped and leaves roughly chopped
2 cloves garlic, chopped
2 – 3 preserved lemons (depending on their size), flesh discarded and finely chopped
linguini or spaghetti for 6 people (I like wholemeal spelt or gluten-free quinoa pasta)
sea salt
black pepper
1 tablespoon hazelnut and chickpea dukkha per person to serve
extra virgin olive oil
Method
- Preheat the oven to 160°C/320°F. Toss the cauliflower florets with some salt and coconut or olive oil, and roast until golden and tender (about 50 minutes to an hour), turning at least once.
- While the cauliflower is roasting, bring a large pot of water to boil and add the pasta. Cook at a gentle simmer until just tender (al dente). Drain, reserving some of the cooking liquid for the sauce, and toss with sea salt and olive. Set aside.
- While the pasta is cooking, sweat the onion and the chard stalks with a large pinch of salt in some olive oil over a gentle heat. Once softened, add the garlic and a few minutes later the chard leaves. As soon as they have wilted, remove from heat and set aside.
- When the cauliflower is cooked, pour some of the pasta cooking liquid into a blender or food processor, then add the roasted cauliflower, chard mix and preserved lemon peels. Blend until smooth, adding a little more liquid as necessary. Adjust seasoning and stir into the cooked pasta with most of the dukkha. Add a generous glug of olive oil and divide between 6 pasta bowls. Sprinkle over the rest of the dukkha and serve hot.
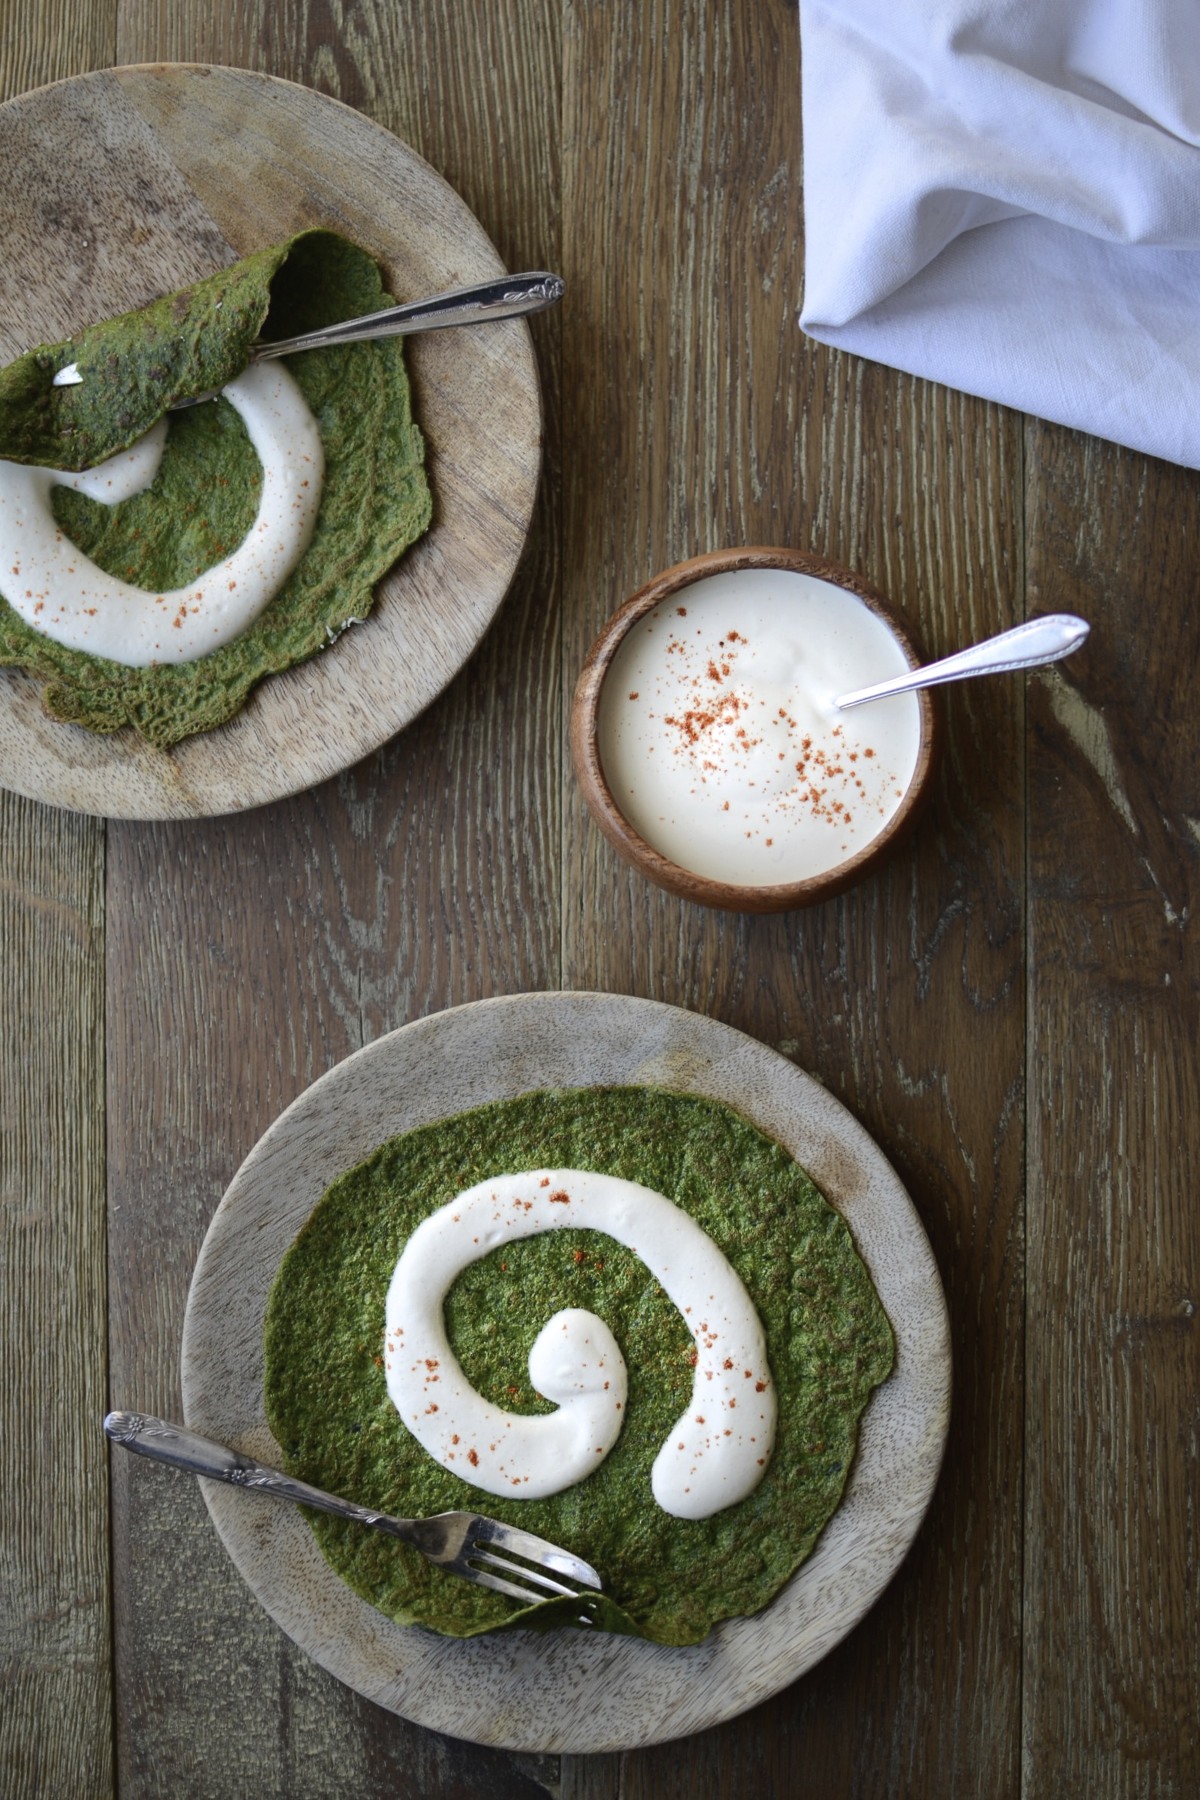
Green crêpes with cayenne cashew cream
We love pancakes in any shape and size. And it is one of the easiest way to serve vegetables to your family – either mixed straight into the batter or as a filling. These Tuscan kale crêpes, a.k.a. dragon slayer pancakes, are delicious with a savoury cashew cream, but you could also serve them with grated (preferably unpasteurised) cheddar cheese or goat milk feta. And I usually reserve some of the batter to make a few plain ones to have with honey and lemon as a special Pancake Day dessert.
Ingredients for the crêpe batter
5 medium eggs
240g (2 cups) wholemeal spelt flour
500ml (2 cups) water
large pinch of sea salt
200g Tuscan kale (also known as cavolo nero, dinosaur or lacinato kale), thick cores discarded, roughly chopped
Method
- Steam (or briefly blanch) the kale until wilted, then refresh under ice cold running water.
- Put all the ingredients in a blender and blend until well mixed.
- Set aside for at least 1 hour.
- To make the crêpes, heat a little ghee or coconut oil in crêpe pan until hot, but not smoking. Pour a ladleful of the batter into the pan, turning it while you pour to ensure you cover the base.
- As soon as the edges have browned (after a few minutes), carefully slide a spatula under the crêpe and flip it over for another couple of minutes. Repeat until all the batter has been used up.
Ingredients for the cashew cream
125g (about 1 cup) cashew nuts, soaked for 2 – 4 hours in fresh cold water
100 – 125ml (about 1/2 cup) water
large pinch of sea salt
1 teaspoon nutritional yeast flakes
generous squeeze of lemon
large pinch of cayenne pepper
Method
- Rinse the soaked cashews thoroughly, then place in a blender with just under half a cup of water (about 100ml), salt, nutritional yeast, lemon juice and cayenne, and blend until creamy.
- If you don’t have access to a high speed blender, the resultant cream will have a coarser texture.
- Adjust seasoning and spoon onto a green crêpe before rolling up.
Picnic à deux
Ok, full disclosure: I don’t really celebrate Valentine’s Day.
I used to, but that was before I married another Capricorn at the end of January. By the time Christmas, New Year’s Eve, our respective birthdays and our wedding anniversary have been duly celebrated, we are usually ready for a break.
I am a HUGE fan of romantic dates, however. Any time, any place. And if Valentine’s Day happens to be the next available opportunity to spoil your sweetheart, then make the most of it with this easy peasy, super sexy stay-at-home picnic for two. Open fires and games of scrabble optional.

The Ruby Noir
Makes 2 cocktails
Ingredients
60ml (1/4 cup) 100% pomegranate juice, chilled
30ml (2 tablespoons) damson, plum, blackberry or sloe vodka
1 teaspoon sweetened lime juice (squeeze out half a lime and stir in 1 teaspoon honey)
Champagne or sparkling wine, chilled
1 teaspoon pomegranate seeds
2 small and fine rosemary twigs (optional)
Method
- Mix the pomegranate juice, vodka and lime juice, then divide between two champagne flutes, pouring through a funnel if you want to keep it extra neat.
- Top up with Champagne, by carefully pouring the bubbly into the glass over the back of a metal spoon to “float” it on top of the pomegranate mix.
- Carefully float a few pomegranate seeds on top and finish with a rosemary twig, if you like.
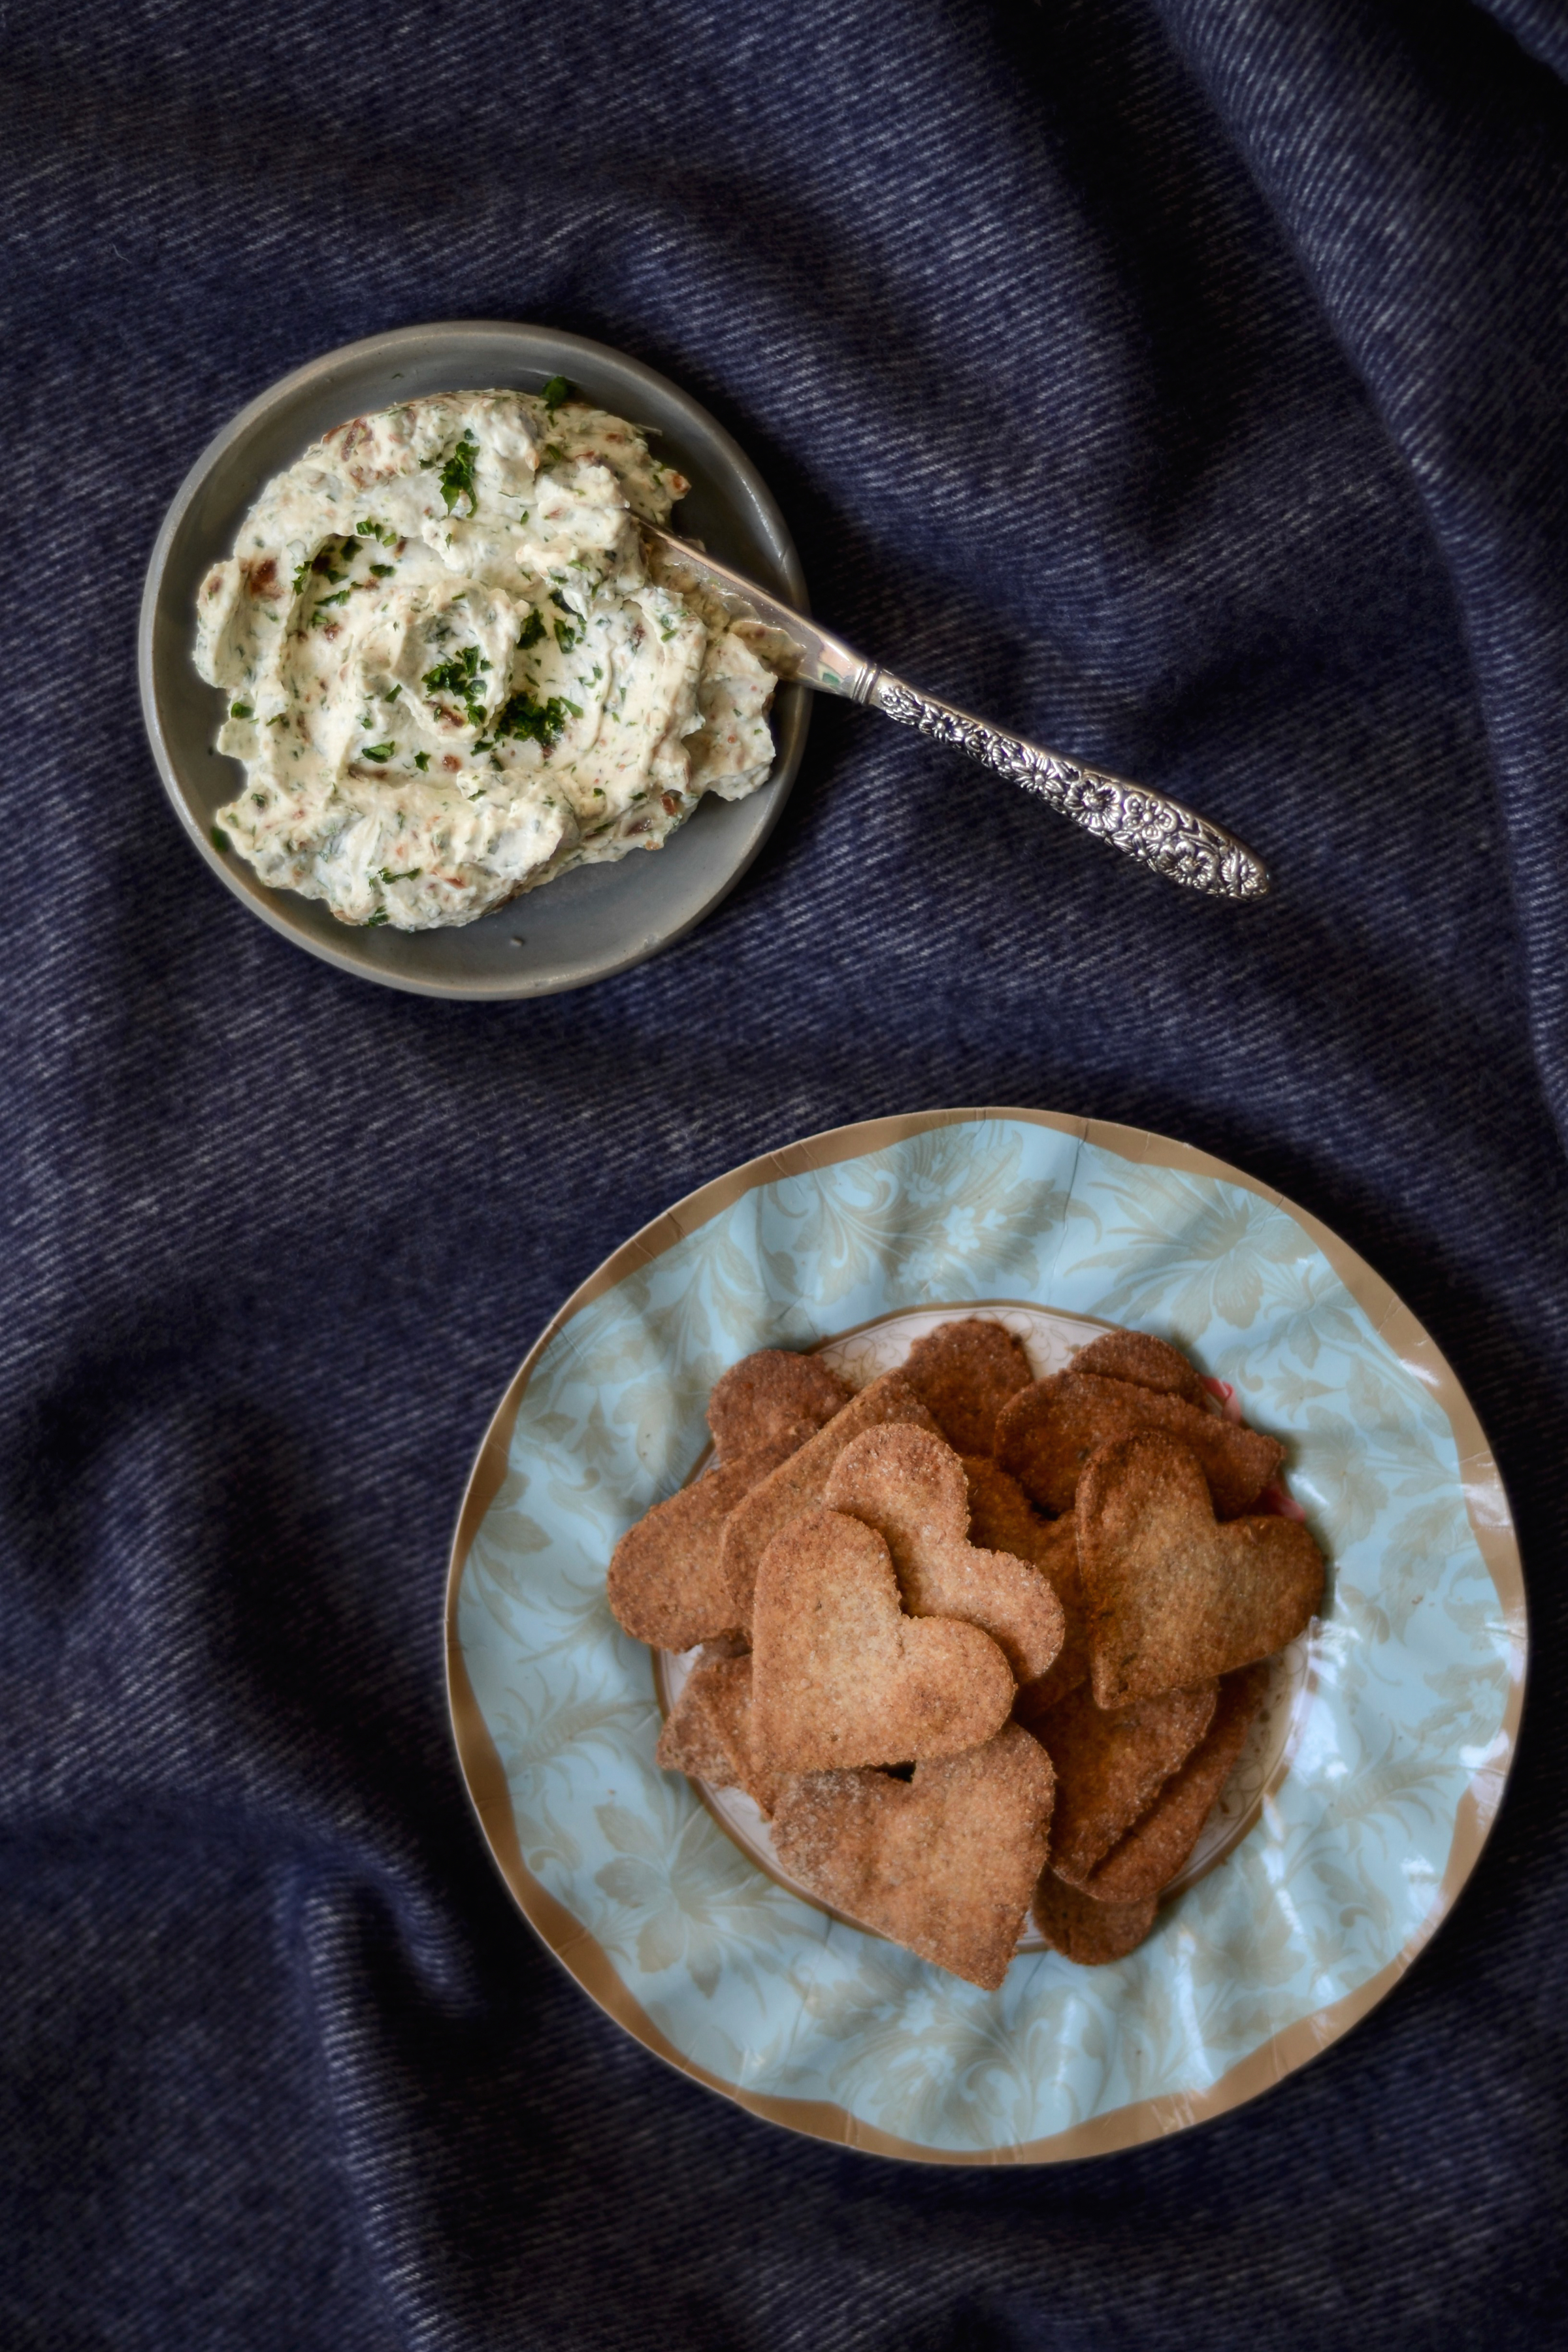
Spiced rye crackers with figgy goat’s cheese
Ingredients for the crackers
Makes about 18 small crackers, but feel free to double or triple the recipe – they keep well
50g (1/3 cup) stoneground rye flour
pinch of salt
pinch each of caraway seed, aniseed and cumin
10g (about 2 teaspoons) cold butter, cut into small cubes
15ml (1 tablespoon) or thereabouts milk of your choice (I used almond milk)
Ingredients for the figgy goat cheese
Enough for 2 people
70g (1/3 cup) soft goat cheese
1 large soft dried fig, finely chopped
1 teaspoon finely chopped parsley, leaves only
sea salt and freshly ground black pepper
aged Balsamic vinegar to serve (optional)
Method
- For the crackers: preheat the oven to 220°C / 420°F. Line a small baking sheet with parchment paper.
- Whisk together the flour, spices and salt. Using your finger tips, rub the butter into the flour until it resembles fine bread crumbs.
- Add the milk and knead the dough until it comes together in a soft ball – not too sticky, and not crumbly.
- Roll the dough out thinly and use a cookie cutter to cut out shapes. Place these on the prepared sheet.
- Bake for roughly 10 minutes, or until the edges have turned golden, then remove from the oven and allow to cool on a cooling rack.
- For the goat cheese: while the crackers are baking, mix all the ingredients for the cheese in a bowl, adjust seasoning and set aside.

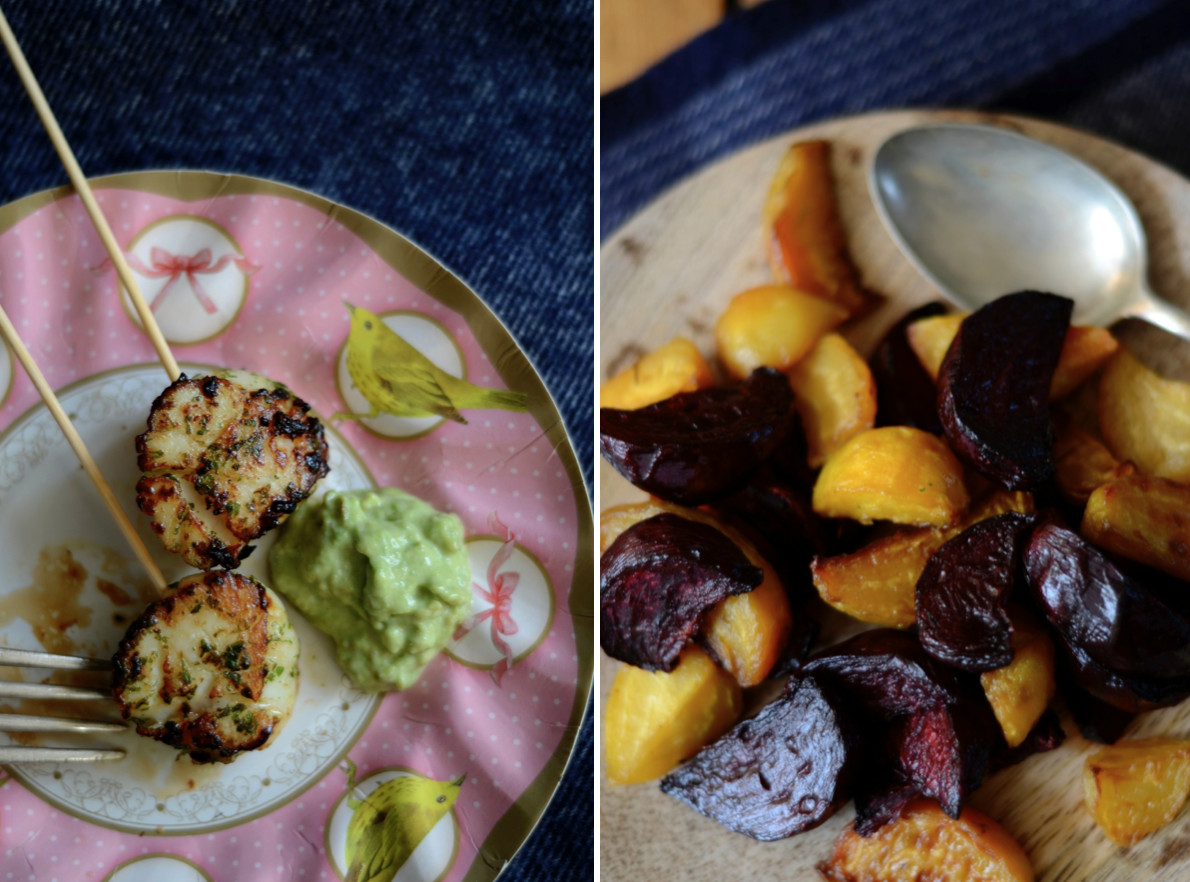
Scallop pops with avocado aïoli
What can be more seductive than nibbling on a sizzling scallop lollipop? These guys are the perfect mess-free picnic food and add just the right amount of spice to wake up the senses. Serve with a plate of gorgeous roasted mixed beets.
Ingredients for the marinade
handful of fresh coriander (cilantro), finely chopped
1 small red chilli, finely chopped (deseeded and membranes removed if you prefer it milder)
1 large garlic clove, thinly sliced
splash of olive oil
For the pops
6 large or 8 small scallops
knob of butter, preferably organic
4 to 6 wooden skewers
Ingredients for the avocado aïoli
1 small ripe avocado, mashed
1 – 2 tablespoons garlic aïoli or mayonnaise, preferably home-made
squeeze of lemon
sea salt
Method
- Mix all the ingredients for the marinade and rub it into the scallops. Set aside for at least half an hour.
- While the scallops are marinating, mix together the ingredients for the avocado aïoli and refrigerate.
- When you are ready to fry the scallops, pick out the garlic slices, as they burn too easily, and heat the butter in a heavy bottomed skillet or pan over a medium heat.
- Fry the scallops for a minute or two on each side – do not overcook them! – then slide one to two onto each skewer. Season with sea salt and serve with the avocado aïoli.
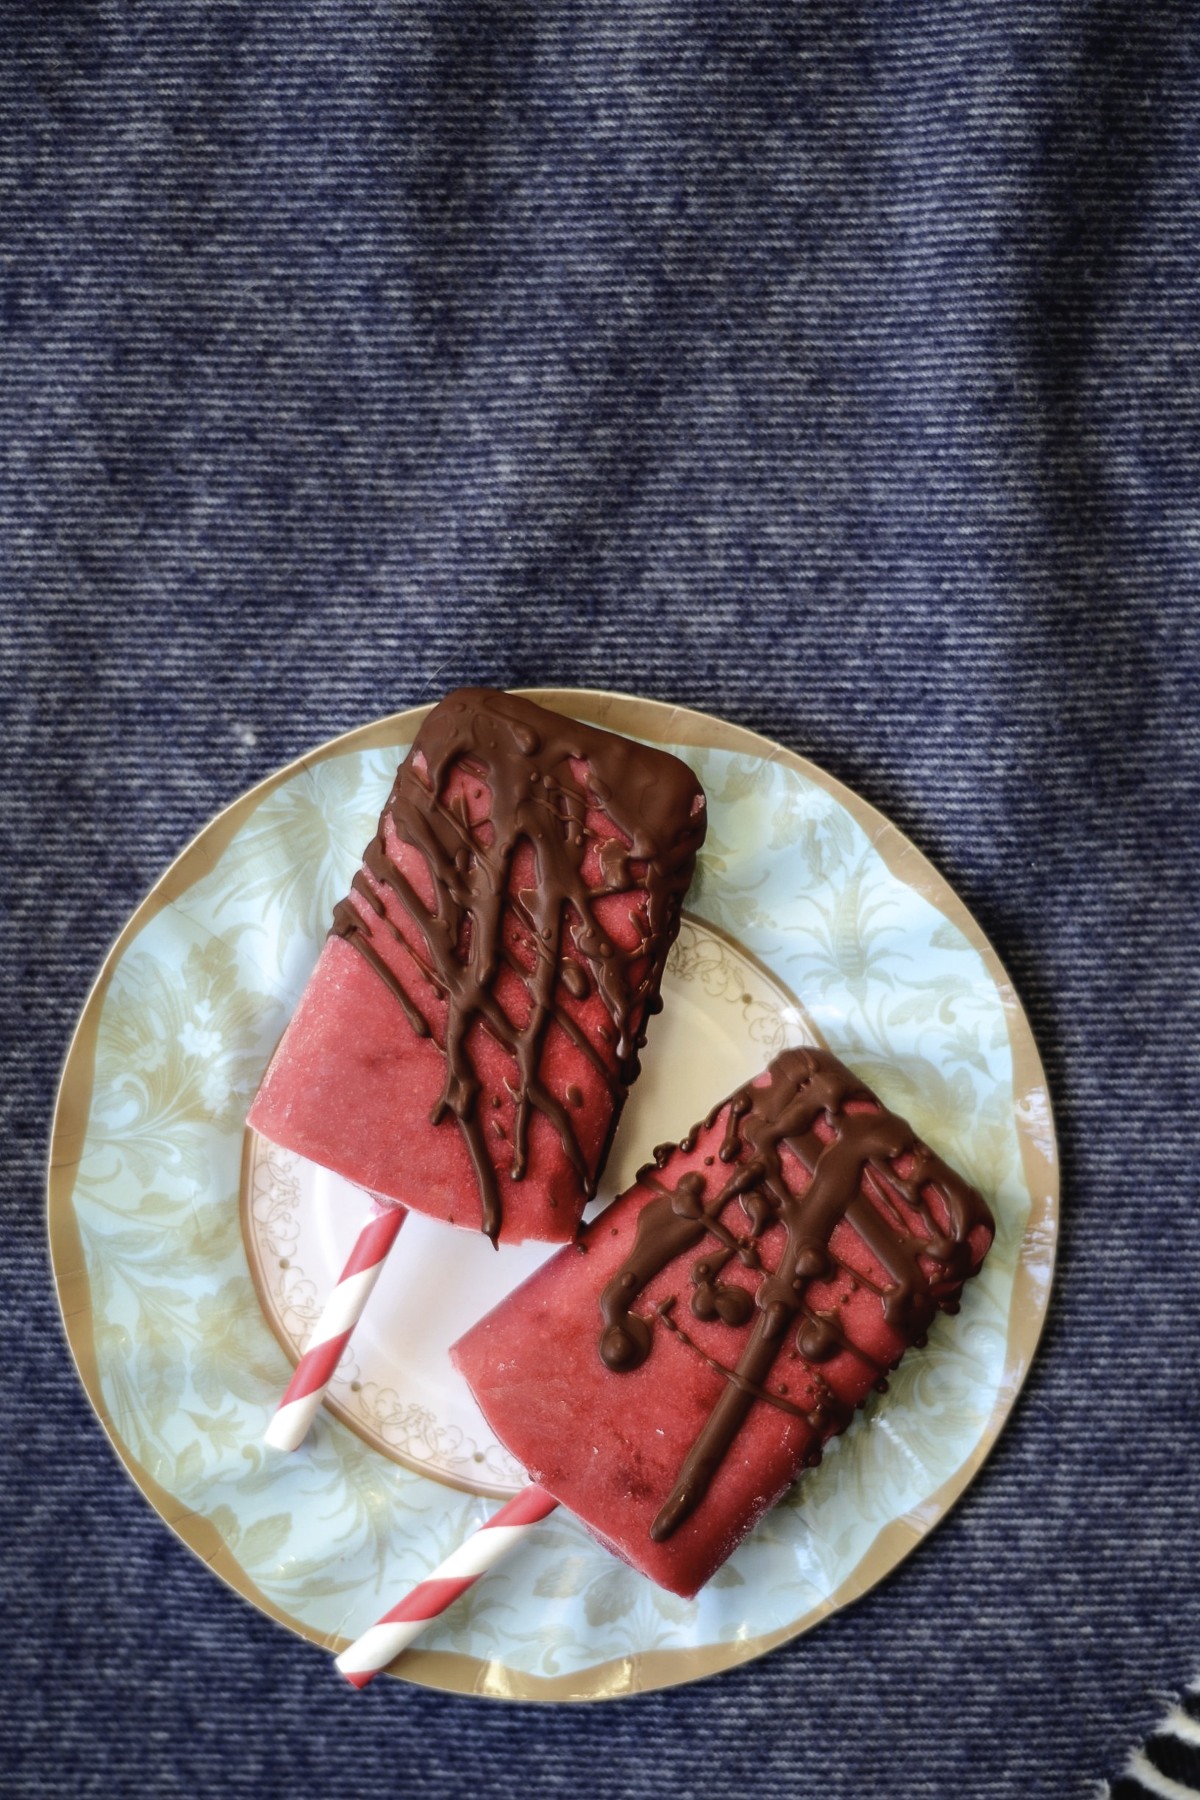
Chocolate-drizzled pear and raspberry lollies
For me, a romantic dinner has to be delicious, yes, but definitely not too filling. Who wants to feel stuffed and uncomfortable on a date? These refreshing, yet luscious lollies will hit the spot.
Makes 4 small or 2 large lollies
Ingredients for the lollies
teaspoon of coconut oil
2 pears, peeled, cored and quartered
1 teaspoon molasses sugar or dark brown muscovado sugar
80g (1/2 cup) frozen or fresh raspberries, plus a few extra
60ml (1/4 cup) milk of your choice (I used almond milk)
Ingredients for the chocolate drizzle
10g / 10ml (2 teaspoons) coconut oil
20g (about 6 squares) dark chocolate, broken into small pieces
Method
- For the lollies: heat the coconut oil in a heavy based saucepan until hot, then lay the pear quarters down, sprinkle over the sugar and do not turn until they’ve developed a lovely golden colour and the sugar has melted (about 5 to 10 minutes).
- Turn over and fry on the other side for another 5 minutes.
- Now blend the pears, raspberries and milk until smooth. Stir in the remaining raspberries (crush them if they are frozen) and fill the ice lolly moulds.
- Freeze for at least 4 to 5 hours.
- For the chocolate drizzle: put them coconut oil in a small saucepan and heat over a low heat until melted.
- Add the bits of chocolate and continue to warm over a medium heat until melted.
- Give it a quick whisk, then set aside to cool slightly.
- Run hot water over the moulds to remove the lollies. Using a spoon, drizzle some chocolate sauce over each and give it half a minute or so to set.
Four persimmons and a pumpkin pie
The autumn colours, sights and sounds stir a certain longing in most cooks to bake. For many North Americans this means pumpkin pie – a dish almost synonymous with the autumnal Thanksgiving celebrations. In South Africa, we grew up eating pumpkin fritters doused with cinnamon sugar alongside our Sunday roast, so a sweet dish with pumpkin as its star is no stranger to me. In my pie recipe, however, the pumpkin (or butternut squash) shares centre stage with some gorgeous persimmons.
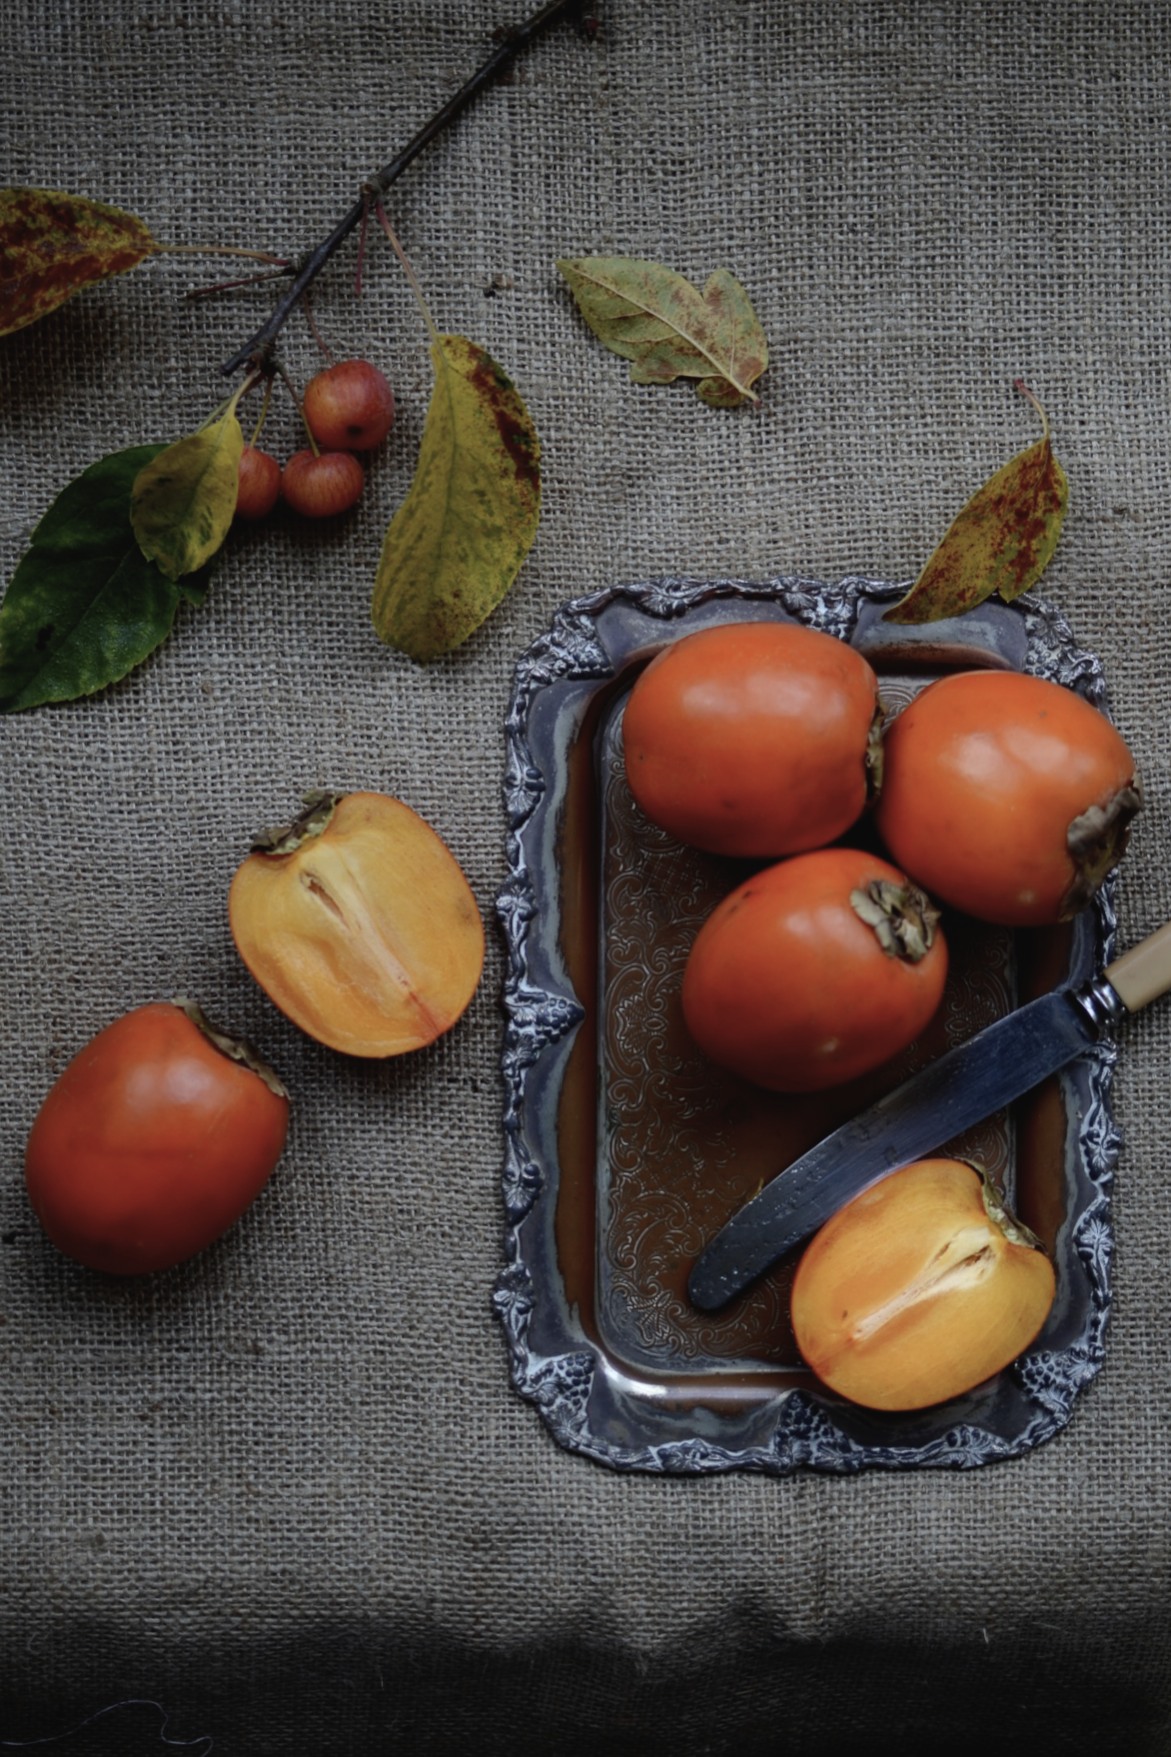
Persimmons vary in colour from golden yellow to burnt orange and red, and can be round or oval. Persimmon trees carry either astringent fruit (whilst unripe) or non-astringent fruits. The astringent cultivars (such as Eureka, Hachiya, Saijo, Tamopan, Tanenashi, Triumph, etc.), are high in tannins and must be allowed to ripen fully until the flesh attains a consistency akin to jelly. The non-astringent kinds (Fuyu, Gosho/Giant Fuyu/O’Gosho, Imoto, Izu, Jiro, Maekawajiro, Okugosho, Suruga, etc.) contain less tannins and can be eaten when still crispy.
Persimmon fruit, originally from East Asia, has a sweet, succulent flesh that holds several health promoting benefits. Persimmons contain flavonoid poly-phenolic anti-oxidants such as catechins and gallocatechins in addition to an important anti-tumour compound, betulinic acid. Catechins are known to have anti-infective, anti-inflammatory and anti-hemorrhagic properties. Fresh persimmons also contain other anti-oxidant compounds like vitamin A, vitamin B, vitamin C, beta-carotene, lycopene, lutein, zea-xanthin and cryptoxanthin. Together, these compounds functions as protective scavengers against oxygen-derived free radicals and reactive oxygen species that play a role in ageing and various disease processes. Fresh persimmons also contain minerals like potassium, manganese, copper, and phosphorus.
Pumpkin and persimmon pie
Makes one 28cm pie

Ingredients for crust
115g (about 1 cup) wholemeal spelt flour
60g (about ½ cup) stoneground rye flour
25g (2 tablespoons) date sugar or unrefined brown sugar
large pinch of sea salt
110g cold butter, cut into pea-sized pieces
15 – 30ml (1 – 2 tablespoons) ice cold water
Ingredients for filling
850g peeled and cubed butternut squash (about 1 medium butternut), roasted (should yield 360g or 1 ½ cups mashed roasted flesh)
flesh of 4 ripe persimmons (cut in half horizontally and scoop out with a spoon)
100g (about ½ cup) date sugar or unrefined brown sugar
60g (1/3 cup) unrefined brown sugar
2 teaspoons ground cinnamon
1 heaping teaspoon ground ginger
generous grating of nutmeg (about 1/2 a nut)
¼ teaspoon allspice
pinch of salt
125ml (½ cup) milk of your choice
125ml (½ cup) organic double (heavy) cream
3 large eggs
Method
- Grease a 28cm (or 11 inch) loose-bottomed tart form.
- For the pastry: put the flours, date sugar, salt and cold butter in the bowl of a food processor and blitz until it looks like coarse sand. This step can also be done by hand by rubbing the butter into the flour with your finger tips.
- With the motor running, add 1 to 2 tablespoons ice cold water or until the dough starts coming together. Or if you are doing it by hand, just keep sprinkling cold water on the dough until it starts to come together.
- Tip the pastry out into a bowl and knead very briefly until you have a smooth (not crumbly or sticky) ball of dough.
- Roll out thinly between two pieces of greaseproof paper, then fold it over your rolling pin and lay it across your greased tart form. Press the pastry into the edges and up along the sides, trimming where necessary. Refrigerate for at least half an hour.
- Preheat oven to 180°C / 360°F.
- When the pastry is completely firm, remove from fridge and place on a baking sheet. Partially blind bake in the hot oven for 10 minutes.
- To make the filling: in a food processor, puree the roasted squash, persimmon flesh, date and brown sugars, and spices until very smooth. Scrape the filling into a little pot and, stirring continuously, cook over medium heat until the mixture starts to bubble (about 5 – 7 minutes). Set aside.
- Whisk together the milk, cream and eggs, then whisk the pumpkin mixture into the egg mixture.
- Carefully pour the filling into the pastry shell and bake for 30 minutes or until filling is lightly cracked around edges and still a tiny bit wobbly in the centre. Allow to cool completely before slicing.
- Serve with Greek yoghurt, soured cream or crème fraîche.
Oat and buckwheat crispie fridge bars
The moment you start changing your eating habits by steering clear of processed foods, refined sugar and white flour, your taste buds begin to transform. Suddenly, overly salty or super sweet food does not do it for you anymore, and you automatically adjust the way you cook, like adding less sugar to cake batters because you know it will still be sweet enough… Anyone who has discovered the joy of dark chocolate will know what I mean. Milk chocolate will never again be your first choice.
Every now and then, however, even I can appreciate the pleasure of a toe-curlingly sweet treat. After a long park run on a cold morning, or with a gorgeous cup of tea and your favourite book. It is for moments such as these that I usually keep a few of the buckwheat crispie bars in the freezer. They are crunchy and syrupy, and a honey bee’s dream.

Ingredients
80ml (⅓ cup) liquid coconut oil
125ml (½ cup) organic smooth peanut butter
125ml (½ cup) runny honey, preferably raw
large pinch fine grain sea salt
2 teaspoons cinnamon
1 1/2 teaspoon ground ginger
zest of 2 medium organic oranges
200g (about 2 cups) rolled oats
140g (about 1 cup) sprouted buckwheat groats* (dehydrated or dried in low temp oven)
100g walnuts, chopped (yields about 1 cup)
160g dried organic apricots, chopped into small chunks (yields about 1 cup) dried sour cherries for a less sweet bar
60 – 80g (about ½ cup) mixed seeds (chia, sunflower, pumpkin, sesame, hemp)
30g melted dark chocolate to garnish (optional)
Method
- Ensure all the ingredients are at room temperature.
- Whisk together the peanut butter, honey, coconut oil, salt, cinnamon, ginger and orange zest until well mixed.
- In a large bowl combine the oats, buckwheat, walnuts, apricots or cherries, and seeds. Ensure the apricot pieces are separated and coated in oats. buckwheat and / or seeds – use your fingers to do this.
- Pour the dry ingredients into the peanut butter mixture and stir well.
- Line a Swiss roll pan with greaseproof paper, allowing for an overhang on the long side of the tin.
- Spoon the mixture into the pan, pressing down firmly with the back of the spoon or your fingers until it is very tightly packed all the way into the corners.
- Now refrigerate the tray for at least 2 to 3 hours or place in the freezer for roughly 1 hour.
- When firm, lift the granola mixture out of the tin and onto a chopping board by grabbing hold of the greaseproof paper.
- Cut the slab into small bars or squares. If you are using chocolate, place the sheet with the bars back in the Swiss roll tin.
- Spoon the melted, slightly cooled, chocolate into a small sandwich bag. Twist the top and then snip off one tiny corner. Use like a piping bag to drizzle chocolate over the bars.
- Return the bars to the fridge until the chocolate has set, then store in an airtight container, preferably in the fridge or freezer.
Note: *To sprout raw, un-roasted buckwheat (not kasha), soak 2 cups of groats in three times the amount of fresh water for 12 to 18 hours, changing the slimy water once during this time. Then drain, rinse off any sliminess, and leave in a sprouting jar, mesh bag or sieve, loosely covered with a kitchen towel or cloth for a day or two, rinsing well twice a day. Once most of the grains have started sprouting (you will see a little tail forming), spread them all out on a tray or baking sheet and dry in a dehydrator or at a very low temperature (about 65°C) in the oven until crisp (usually this takes 12 to 24 hours). This low temperature is essential to preserve the enzymes in the sprouts, but if you are pressed for time, you could increase the temperature, thereby reducing the baking time.
Buckwheat and baked bananas for breakfast
Henry VIII, Elvis, Mufasa and Kong. All kings in their own right. Just like breakfast. I know, I know… You’ve heard this message a thousand times before, but it really is the most important meal of the day.
Eating a breakfast rich in complex carbohydrates, protein and healthy fats, wakes up your sluggish metabolism, restores glycogen levels, improves your mood and ability to concentrate, and sets you up for a day of healthy food choices.
There are as many variations on the morning meal theme, as there are countries, cultures and climates. Our family loves whole grain porridges, egg dishes and supercharged smoothies. Here is an easy recipe for a buckwheat and groats porridge, with sticky baked bananas.
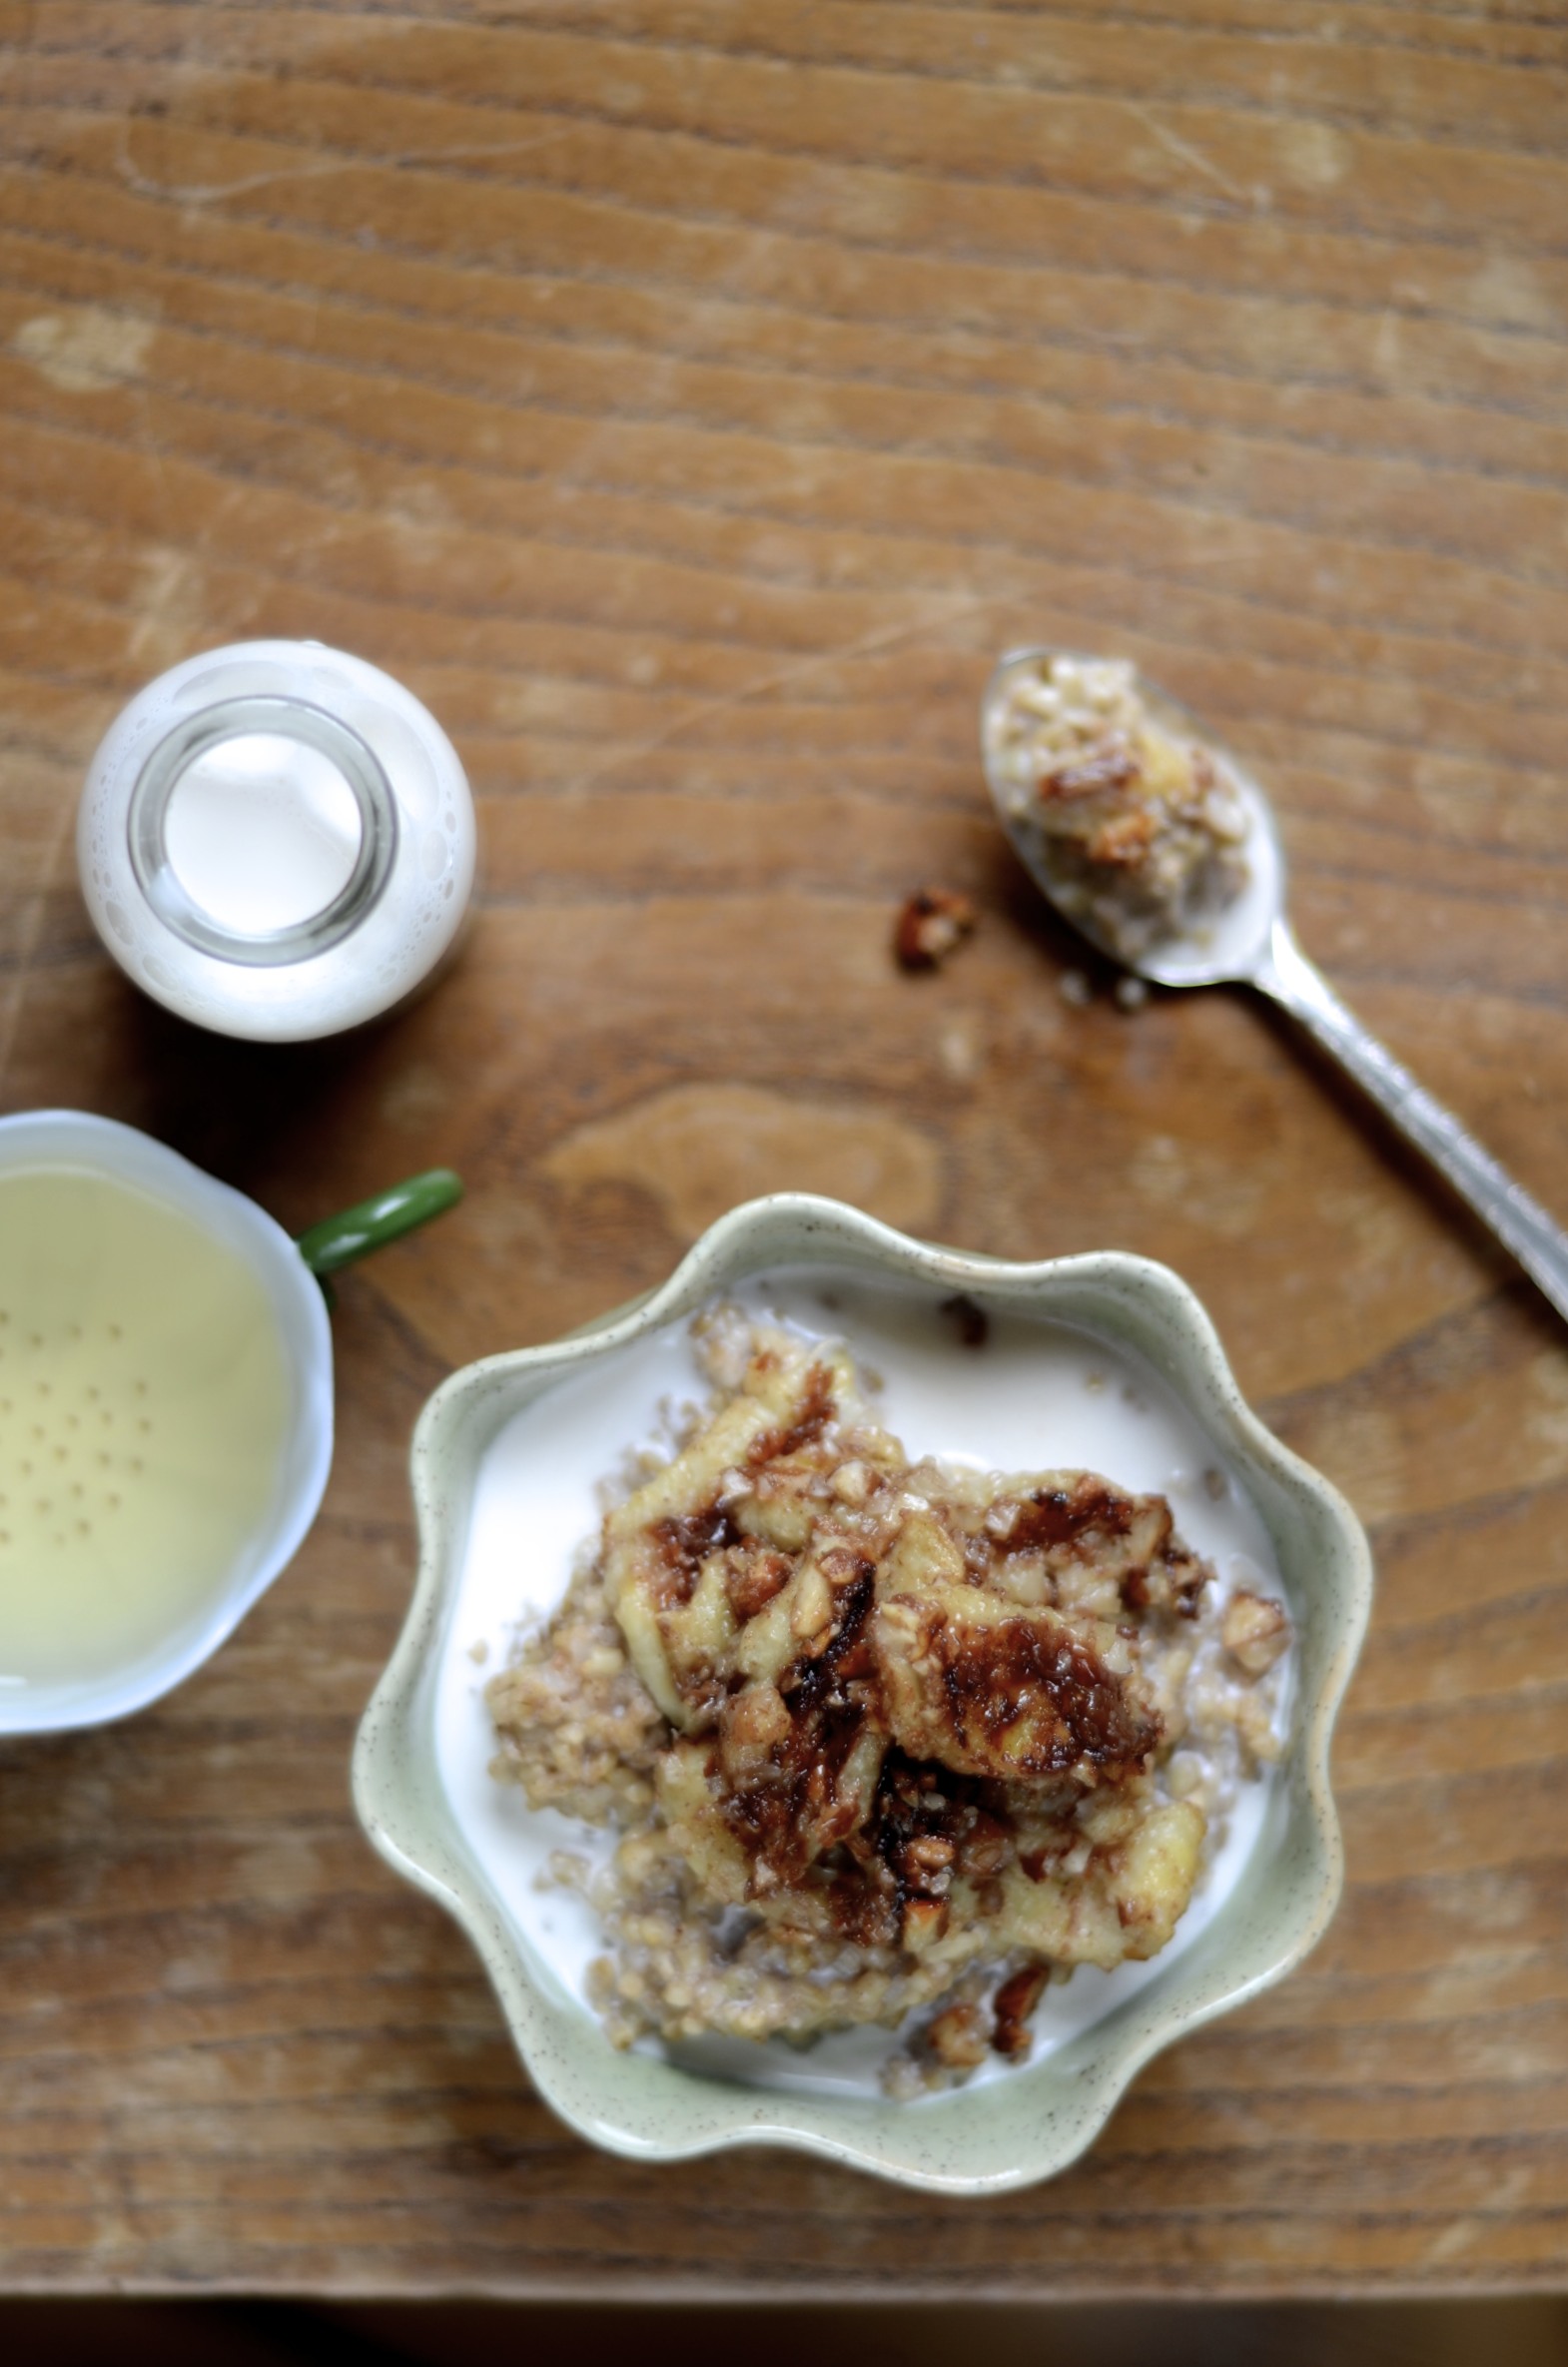
Ingredients
Equal parts oat groats and raw buckwheat kernels
Sea salt
3 bananas (ripe, but not too soft)
1 tablespoon lemon juice (about half a lemon)
1/4 heaping teaspoon ground cinnamon
2 teaspoons liquid coconut oil
30 – 40g / 1/4 cup almonds, finely chopped
Method
- To improve the overall digestibility and health benefits of the grains, soak both for at least 12 (but up to 24) hours in warm acidulated water (lemon juice or raw apple cider vinegar works well), then rinse. If you would like to take it to another level altogether, allow to sprout in a sprouting jar or covered colander. They are ready to cook as soon as the little tail of germination becomes visible – usually after a day or two. Do not let it grow much longer, as it will not turn into a creamy porridge.
- Transfer the grains to a heavy-based saucepan, add just under double the amount of water and a very large pinch of salt. Bring to boil, stirring constantly, then reduce heat and simmer for 30 minutes. Stir occasionally.
- While the porridge is cooking, pre-heat the oven to 180°C / 350°F. Slice the bananas into thick (half centimetre) slices and toss gently with the lemon juice, cinnamon, coconut oil and chopped nuts. Spread on an oiled baking tray and bake for 20 to 25 minutes.
- With a spatula, carefully scrape the bananas off the tray. The caramelised undersides are what we’re after.
- Serve on top of your porridge with delicious nut milks or raw dairy
Note: I usually mix lots of ground nuts and seeds, as well as coconut oil or unpasteurised butter into our porridge to ensure it isn’t a carbohydrate-heavy start to the day.
Danish summer bliss
The brunsviger (a yeasted cake topped with butter and brown sugar) and kanelsnegle (cinnamon snails) we were treated to these past few days are not technically on my “nutritious treats” list, but all the more delicious for being baked by my lovely friend Ida Marie during our visit with her family in the Danish countryside. She did make a wonderful variation on the original by spreading grated apple, desiccated coconut and coconut oil on one batch of snails, which ended up not being at all sweet, but rather like a fun little spiced bread roll.

Brunsviger Cake
Ingredients for the cake
200ml milk or milk substitute such as almond milk or oat milk
25g fresh yeast
2 eggs
350g spelt flour
150g wholemeal spelt flour
100g fine oat flakes
100g butter, softened
1 1/2 teaspoons ground cardamom
2 teaspoons ground cinnamon
2 tablespoons honey
1 teaspoon fine sea salt
Ingredients for the topping
400g soft, dark sugar (muscovado works well)
400g butter, softened
Method
1. Whisk the milk, yeast and eggs, then add the rest of the ingredients and stir until combined.
2. Knead the dough until soft and smooth, then place in a bowl, cover and allow to rise in a warm place until it has doubled in size (about 30 minutes to 1 hour).
3. Mix the brown sugar and butter well for the topping.
4. Press into a large cake tin (30cm by 40cm) or into two smaller tins, and allow to rise a second time for 30 minutes. You could also make individual portions by pressing the dough into muffin tins.
5. Press holes into the dough with your fingers, then spread the topping over the dough, filling each little hole as you smooth it out.
6. Bake at 200°C for at least 10, but up to 20 minutes, until the sugar has caramelised and the dough has turned golden brown.
Note: It is up to you how thinly to spread the dough (if you prefer something more akin to cake, leave it roughly 2cm thick), but it will have an impact on your baking time. Also, adding a pinch of freshly ground black pepper to the topping gives it a very grown up twist.