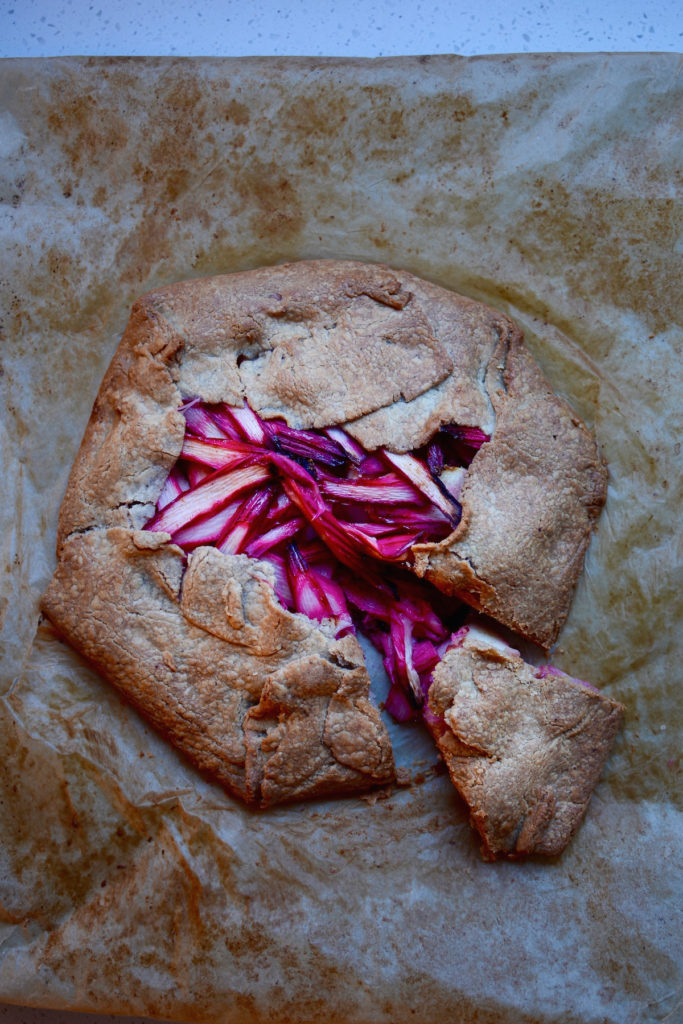
Rhubarb galette with gingerbread spices
This rhubarb galette with gingerbread spices is delicious, straight from the oven, served with vanilla ice cream or slightly sweetened whipped cream. It is easy to make and you can replace the rhubarb with any fruit in season, but remember to take into account how quickly the fruit cooks when deciding on how large to slice or chop it. Slice apples or ripe pears very thinly, pile berries on top, or try chopped pineapple – they all work fantastically well.
Ingredients for the pastry
225g wholemeal spelt flour (I used buckwheat, which works too, but makes the pastry slightly more fragile)
pinch of sea salt
1/2 teaspoon vanilla powder (usually made by grinding the whole dried vanilla pod) or the seeds from one pod
100g cold unsalted butter, cut into small cubes
40 – 60ml (2 1/2 – 4) tablespoons ice cold water
Ingredients for the fruit topping
5 cups chopped or sliced rhubarb (or other fruit of your choice)
1 cup light muscovado sugar or coconut sugar
1/2 teaspoon ground ginger
1/2 teaspoon ground cinnamon
1/4 teaspoon ground cloves
1/4 teaspoon ground nutmeg
a few tablespoons ground almonds
Method
- In a food processor, pulse the flour, salt, vanilla and butter until it resembles wet sand. You can also do this by hand, by rubbing the butter into the dough with your finger tips.
- Now add the cold water little by little until the dough just comes together into a ball.
- Remove the dough from the food processor and knead briefly until smooth. It shouldn’t be sticky or crumbly – of too sticky, add more flour, if too dry, add a few more drops of ice water. Shape it into a flat disc.
- Roll the dough out between two sheets of baking parchment – you are aiming for a thin sheet about 3mm thick, either round or square’ish, and refrigerate on a baking sheet until firm (about half an hour).
- Remove the firm dough from the fridge and place on a large baking sheet (still on the parchment paper). Allow to come to room temperature. Preheat the oven to 180°C / 350°F.
- Mix together the fruit and spices and as soon as the pastry has reached room temperature. Scatter the ground almonds in a circle in the centre (this will prevent the juices that escape during cooking from making the pastry soggy), and spoon the fruit on top.
- Fold over the edges, pinching the pastry here and there to keep it in place, and bake for 30 – 35 minutes or until the pastry is golden and crunchy, and the fruit tender. Allow to cool sightly before serving.
Watercress, blood orange and beetroot salad with green dressing
After the winter storm that hit most of the UK last week, it finally feels like spring is trying to make an appearance. Along with my appetite for large, colourful salads. Hahaha. Who am I trying to kid… I would eat salads with blizzards howling around me 😉 Whether it is still snowy where you are, or you have secretly started unpacking your summer wardrobe, here is some inspiration for those of you in need of something fresh and refreshing – a watercress, blood orange and beetroot salad with a moorish green dressing.
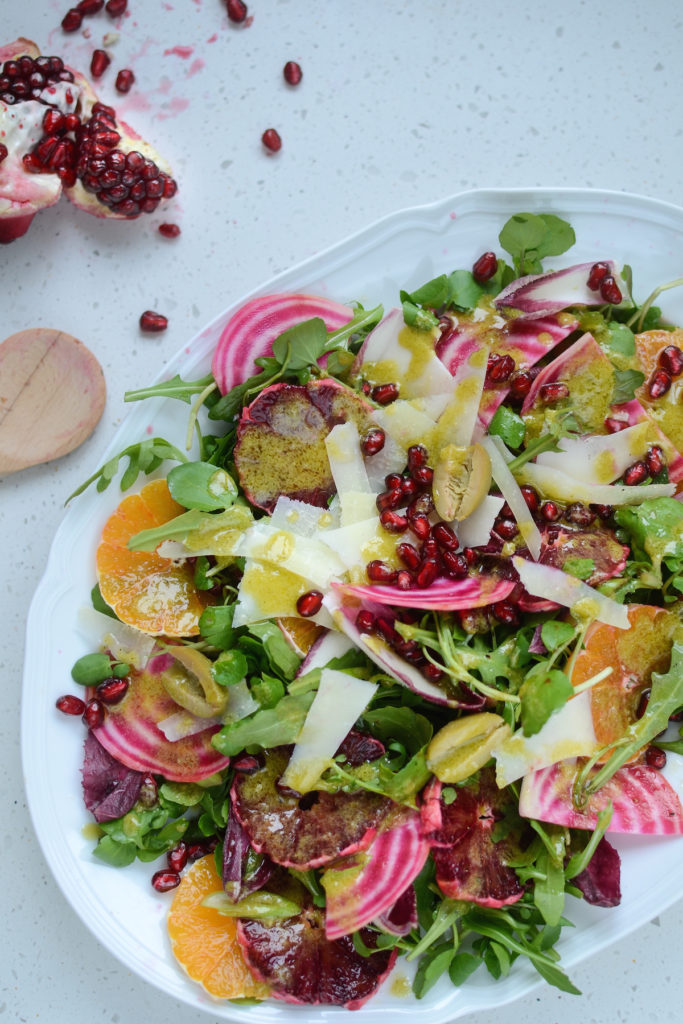
The salad ingredients are really up to you. Here I’ve combined blood oranges, rocket, watercress, spring onions, pomegranate seeds, beetroot, green olives, red chicory and very salty Pecorino cheese. Keep it vegan by omitting the cheese or replacing it with a vegan alternative. Blood orange season is now almost over, but you can use regular oranges, tangerines, minneolas or mandarins too. And any beetroot will do, although this candy (or chioggia) beetroot is particularly beautiful and great raw in salads, as it loses its candy stripes once cooked. I also really love the addition of the chicory here, as it adds a tad of bitterness.
Ingredients for the green dressing
90ml (1/4 cup plus 2 tablespoons) extra virgin olive oil
60ml (1/4 cup) lemon juice
large handful mint leaves
small bunch coriander, leaves and stalks
large pinch of good quality salt
freshly ground black pepper
small knob of ginger
1 garlic clove
maple syrup to taste
Method
- Pour the oil and lemon juice in a blender, then add the other ingredients on top.
- Blend until smooth and velvety. Pour over the salad, or store in a glass jar in the fridge for up to a few weeks. Shake well before use.
Note: to spice things up, you could also add a green chilli to the dressing. For other winter salad inspiration, click here.
Chocolate bark with macadamia nuts, dried banana and sea salt
Another delicious topping for chocolate bark is a combination of toasted macadamia nuts, dried bananas and flaked sea salt. Drizzle everything with melted milk chocolate and ta-dah!
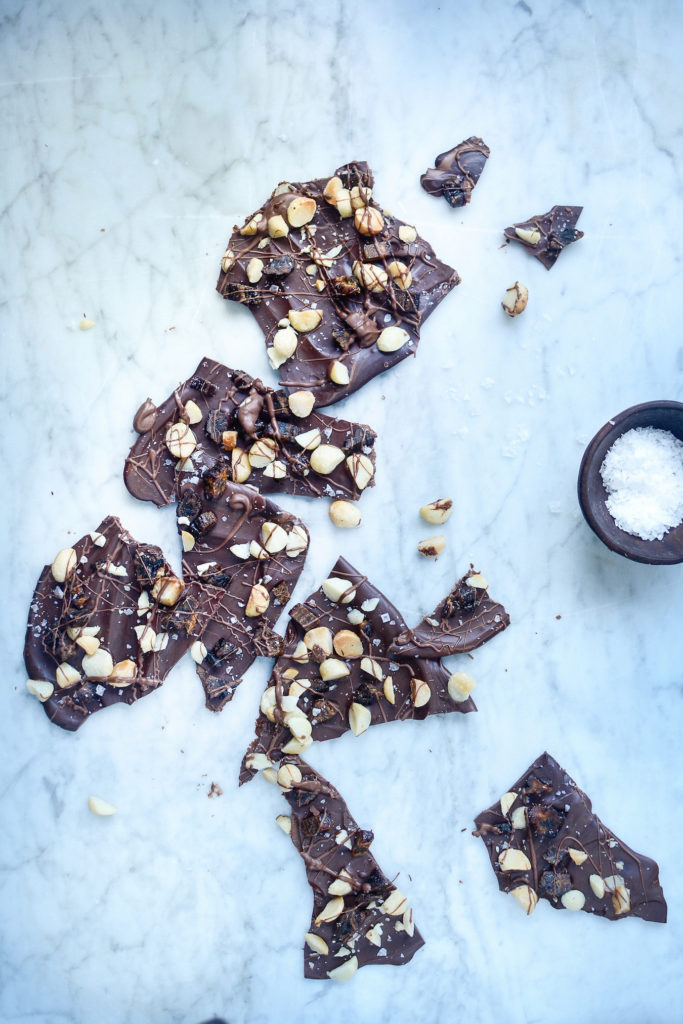
Chocolate bark with macadamia nuts, dried banana and sea salt
Makes enough for 2 – 4 little bags
Ingredients
150g dark chocolate (minimum 60% cocoa solids)
large pinch of sea salt flakes
30g (1/4 cup) macadamia nuts, toasted for 5 minutes at 180˚C pre-heated
30g dried bananas, finely chopped
5g popped quinoa, optional
20g milk chocolate
Method
- Melt 2/3 of the dark chocolate in a double boiler until just melted, stirring continuously. As soon as it has melted, stir in the rest of the chocolate until all has melted. You could also melt the chocolate in a microwave in 15 second bursts, stirring after each, until just melted. Do not let the chocolate get warm.
- Pour the melted chocolate onto a large piece of greaseproof paper and quickly spread out to about 1/4” thickness with a spatula.
- Quickly scatter over all the toppings evenly.
- While the bark is cooling, melt the milk chocolate in the same way as the dark chocolate. Either drizzle this over the bark with a spoon or use a small sandwich bag (or piping bag) to pipe the melted chocolate onto the bark. Set aside to cool completely.
- Peel away the paper and snap into pieces.
Chocolate bark with strawberries, raspberries and cherries
This is so much fun to make and gift! If you’ve never worked with chocolate before, it may seem intimidating, but even if something goes wrong during the tempering stage, the chocolate bark will still taste delicious, even without that desirable snap.
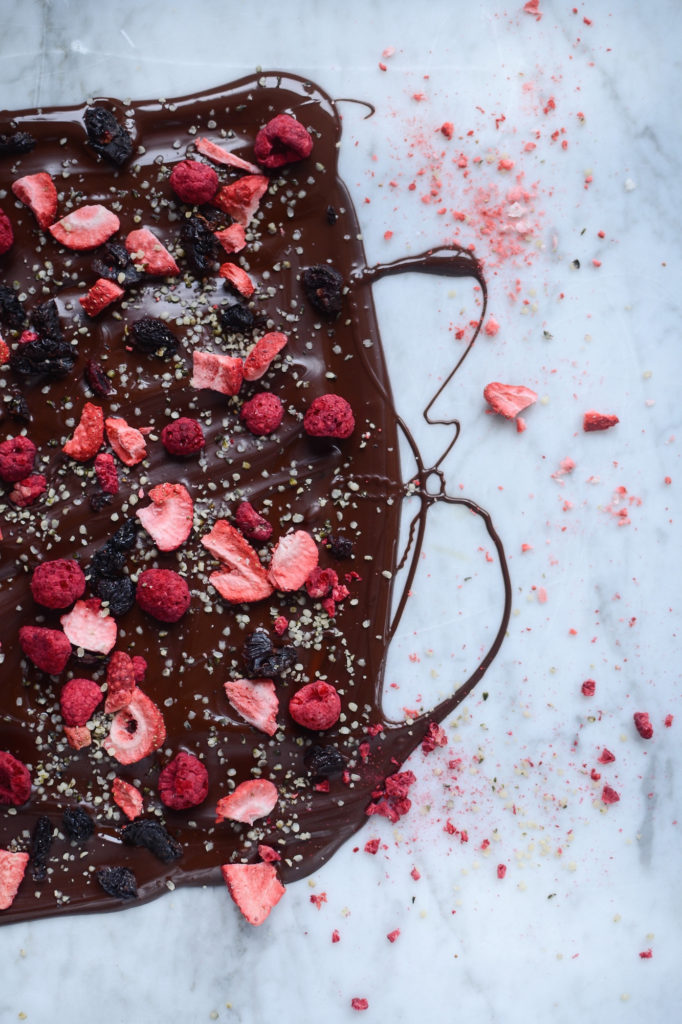
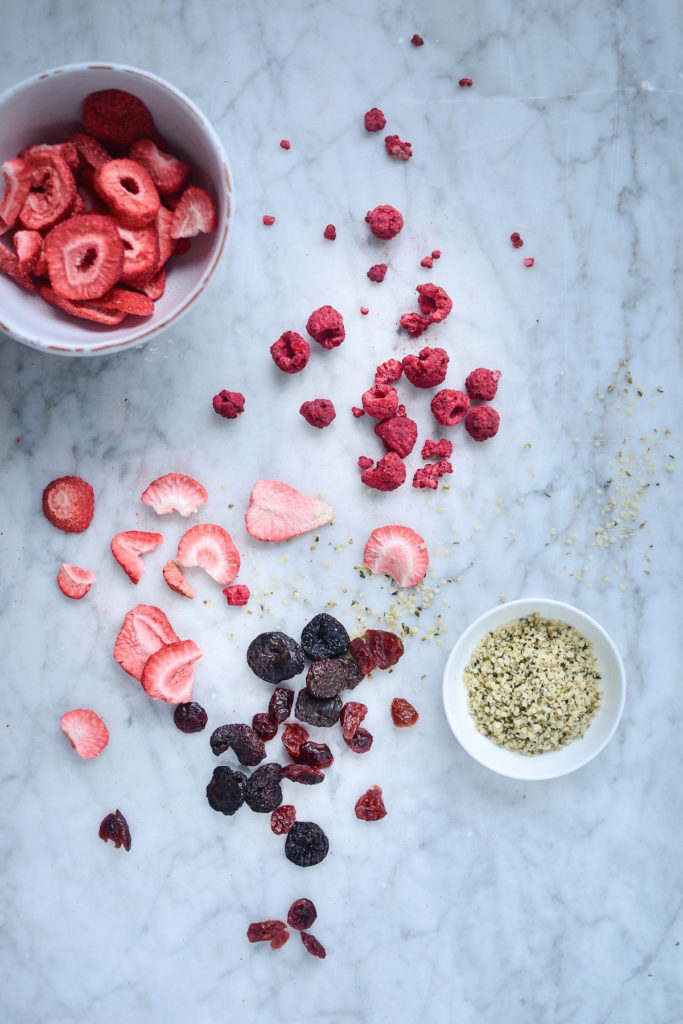
You can use any dark chocolate you like, as long as it melts beautifully. And any toppings, really. This combination of freeze-dried strawberries and raspberries, dried sweet cherries and hemp hearts is quite grown up, and not very sweet at all. Play around with your favourite ingredients – perhaps pistachios, dried apricots and raisins, or bits of gingerbread cookie with candied ginger (this is a personal favourite!), or chocolate covered coffee beans, roasted almonds and lemon zest. Or go bananas with these. But whatever you do – give it a go!
Dark chocolate bark with strawberries, raspberries & cherries
Makes enough for 2 – 4 small bags
Ingredients
150g dark chocolate (minimum 60% cocoa solids), very finely chopped
5g (1/4 cup) freeze-dried raspberries
5g (1/4 cup) freeze-dried strawberries
1 teaspoon shelled hemp seeds, optional
40g (1/4 cup) dried sweet cherries, roughly chopped
Method
- Melt 2/3 of the chocolate in a double boiler until just melted, stirring continuously. As soon as it has melted, stir in the rest of the chocolate until all has melted. You could also melt the chocolate in a microwave in 15 second bursts, stirring after each, until just melted. Do not let the chocolate get warm.
- Pour the melted chocolate onto a large piece of greaseproof paper and quickly spread out to about 1/4” thickness with a spatula.
- Quickly scatter over all the toppings evenly, then set aside to cool completely.
- Peel away the paper and snap into pieces.
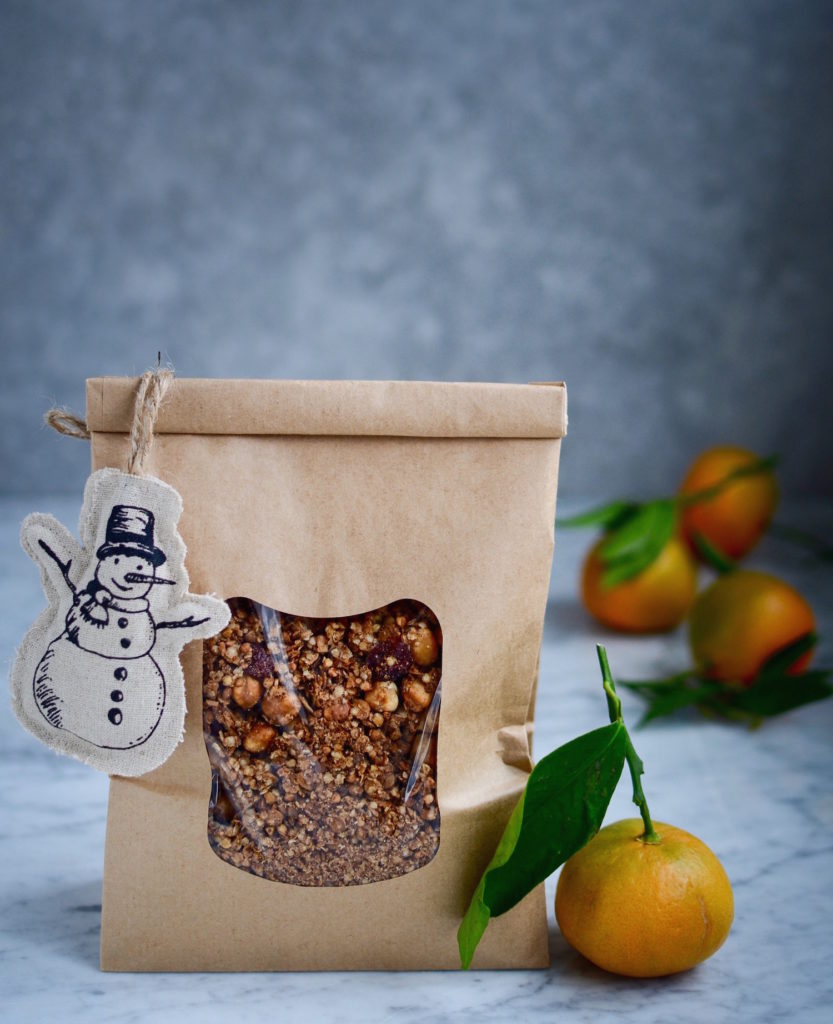
Gluten-free buckwheat and oat granola
Home-made granola is one of the loveliest gifts to give! It doesn’t have to be eaten straight away, you can add many different spices and ingredients to suit the occasion or mood (here I’ve added a gingerbread spice mix and tangerine zest to my gluten-free granola to give it that Christmas vibe), and it can be packaged beautifully.
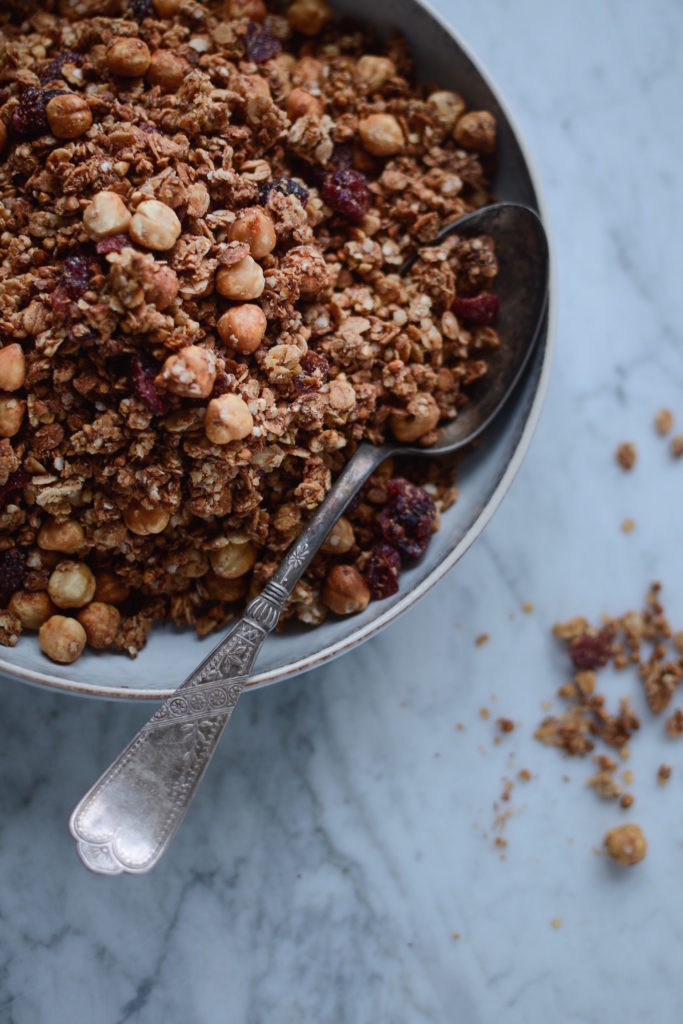
In this recipe for gluten-free buckwheat granola I suggest soaking the buckwheat groats overnight, to increase digestibility. Grains, pulses, legumes, nuts and seeds generally contain phytic acid, which binds to minerals in the gastrointestinal tract and may lead to mineral deficiencies. By soaking in warm water with added Lactobacilli cultures (found in yoghurt, kefir, whey etc) or an acid, the digestive enzyme (phytase) is activated that helps to break down the phytic acid in as little as 12 hours.
Gluten-free buckwheat and oat granola
Makes 6 cups
Ingredients
100g (1 cup) raw buckwheat groats
300g (3 cups) rolled oats
100g (1 cup) quinoa flakes
70g (1/2 cup) blanched hazelnuts
80ml (1/3 cup) melted coconut oil or butter
80ml (1/3 cup) honey or maple syrup
1/4 teaspoon fine grain sea salt
1 teaspoon ground cinnamon
1/2 teaspoon ground cloves
1/2 teaspoon ground ginger
heaped 1/2 teaspoon ground nutmeg
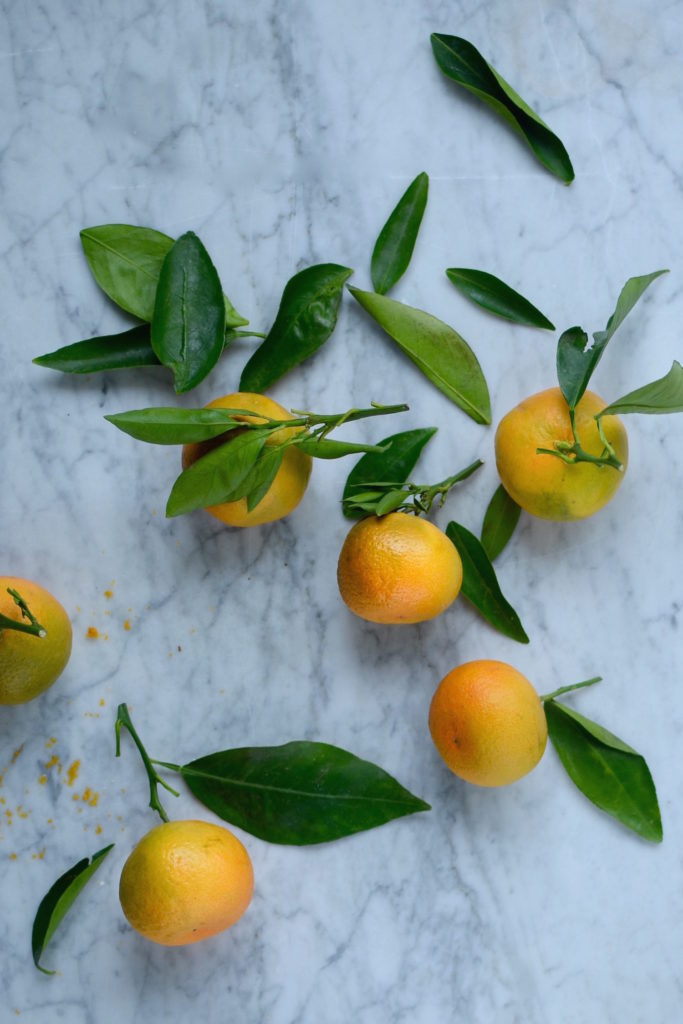
zest from 4 tangerines
70-80g (1/2 cup) dried cranberries
Method
- Rinse the buckwheat groats, then soak overnight in enough water to cover with an inch. Add a tablespoon of apple cider vinegar, yoghurt, kefir or lemon juice, as an acidic solution. The next morning drain the buckwheat and tip into a large mixing bowl.
- Preheat oven to 160°C.
- Add the oats, quinoa and roughly chopped hazelnuts to the bowl with the buckwheat.
- Whisk the melted coconut oil (or butter) with the maple syrup (or honey), salt, spices and citrus zest.
- Pour this over the dry ingredients and mix well to coat.
- Spread the granola mixture out in an even layer on two lined baking sheets. Use a spatula or a large metal spoon to compress the mixture, then bake for 30 to 40 minutes. Carefully flip pieces over half-way through baking time, as the bits on the edges may burn otherwise.
- Allow to cool completely before mixing in the cranberries and storing in an airtight container. Will keep for several weeks.
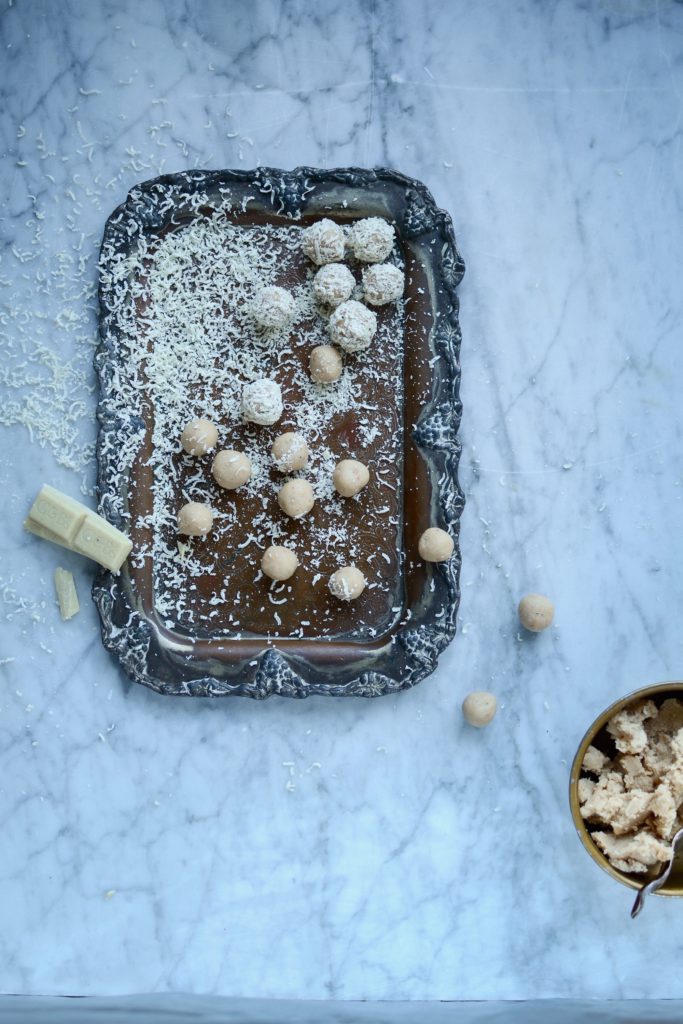
Cashew butter truffles
After a rather busy year (yes, sorry, I know…) the last thing you need is someone suggesting you actually MAKE your Christmas presents from scratch. Except… taking the time to create a gift for someone you love (like these cashew butter truffles or perhaps matcha and cacao pinwheels) is wonderfully festive, therapeutic, and probably also a lot more meaningful than anything store-bought.
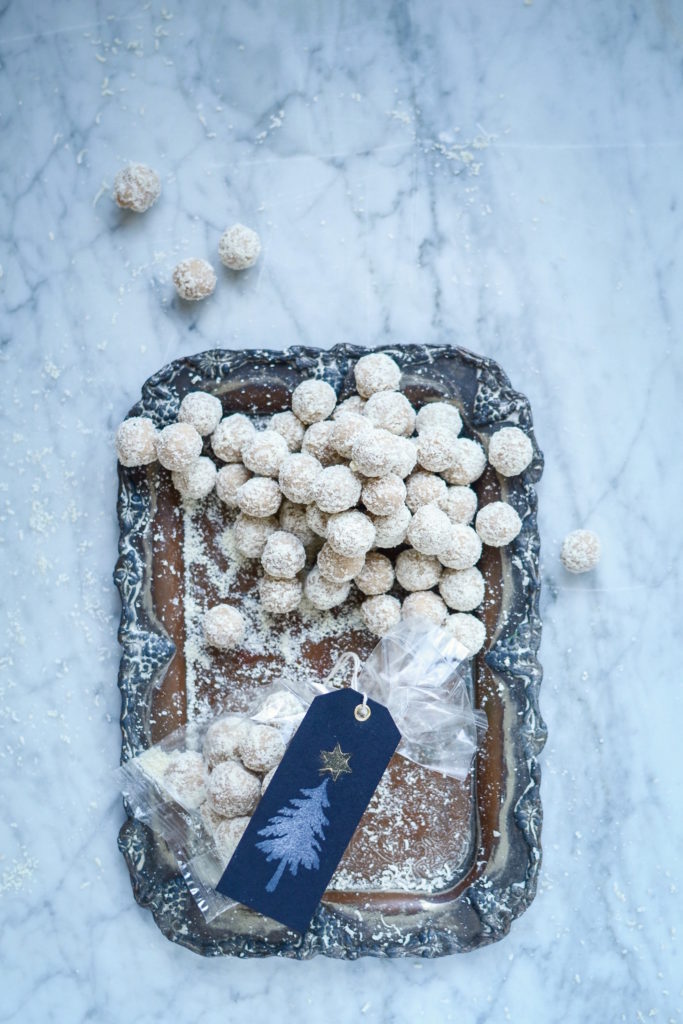
I encourage my children to make their own cards and find ways to bring joy without spending a penny in a shop and they love the challenge of coming up with the perfect gift. They also love making chocolate truffles with me – ha! These are so easy – cashew butter, melted cacao butter, honey and salt – and keep very well for several weeks.
Cacao Butter is the edible fat extracted from the raw cacao bean. It looks like white chocolate in solid form (at room temperature or colder) and turns into a beautiful amber liquid when heated. The higher the cacao butter content in a chocolate, the more luxurious and smooth it will be. You can buy it from most leading supermarkets and specialist confectioners these days. If you want to keep the truffles vegan, use maple syrup instead of honey, and be sure to use a vegan white chocolate or pure cacao powder for coating.
Cashew butter truffles
Makes 80 very small truffles
Ingredients
110g (1/2 cup) raw cacao butter
75g (1/4 cup) raw honey or maple syrup
80g (1/4 cup plus one heaped tablespoon) crunchy cashew nut butter
1/4 teaspoon fine grain rock salt
30g good quality white chocolate, grated for coating
Method
- Melt the cacao butter in a small saucepan over a gentle heat.
- Whisk the melted fat, honey, cashew nut butter and sea salt until well mixed.
- Set aside to firm up at cool room temperature for a few hours, or in the fridge for an hour or so.
- Roll half teaspoons full between your palms until round, then roll in the grated white chocolate. Repeat until you’ve used up all your mixture.
- If you do refrigerate it, it will have to stand at room temperature for a while, before you are able to roll it.
Note: If you can’t find crunchy cashew butter, use smooth and add a handful of chopped roasted cashew nuts.
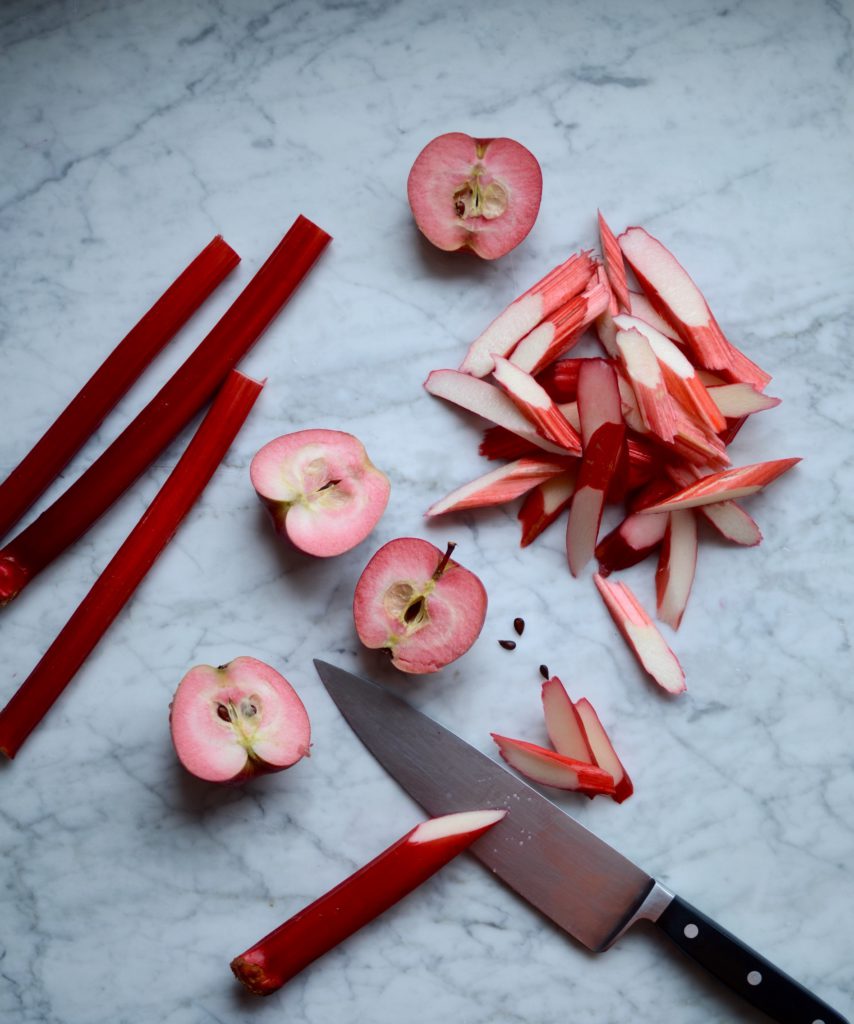
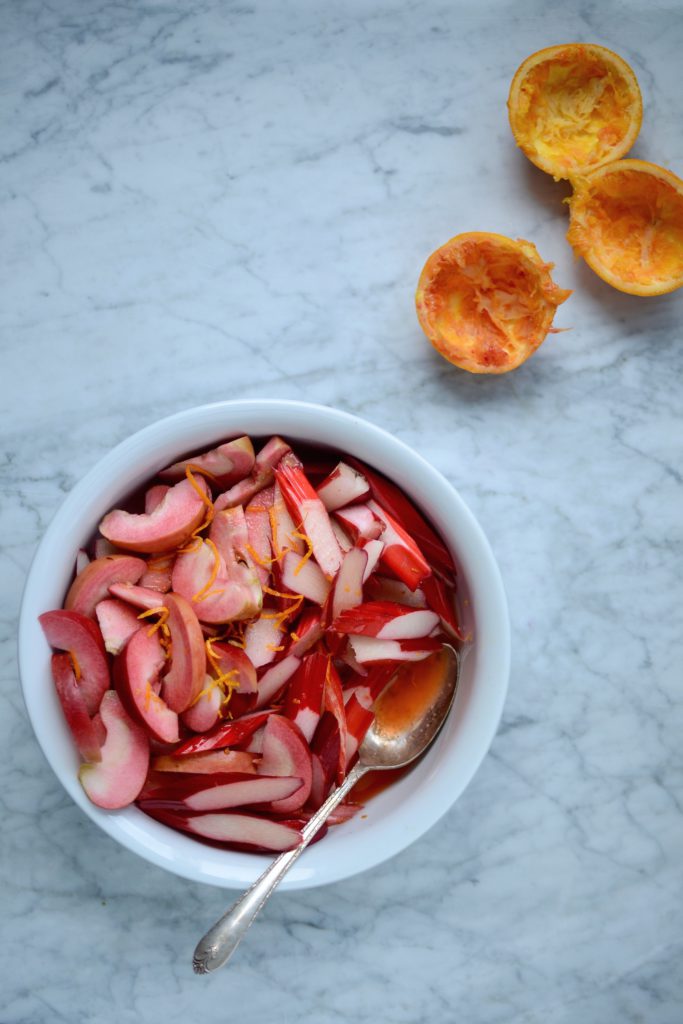
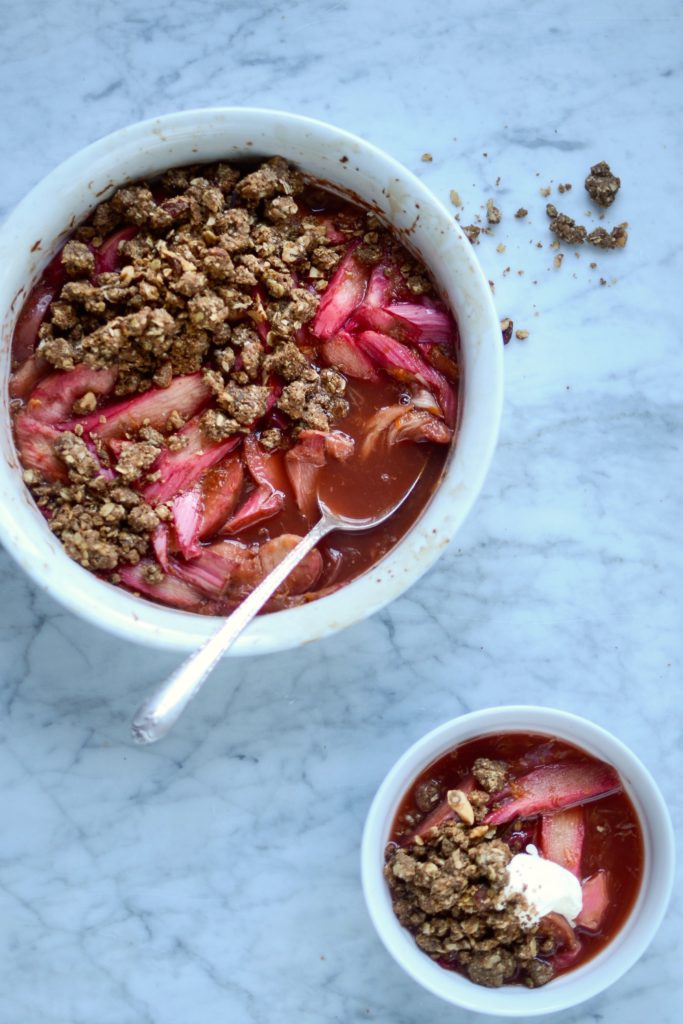
Rhubarb and apple crumble
It’s rhubarb season! The word “forced” used to lead me to believe that this kind of rhubarb is somehow inferior, but I have since come to love this delicious late winter treat. Lifting sections of the rhubarb roots and bringing them under the cover of a greenhouse or other warmer place, shutting out all light, creates stems that grow pale. This means the light-starved plants desperately reach out in search of light and thereby produce smooth, bright crimson stems (rather than green ones created post photosynthesis). The Rhubarb Triangle in West Yorkshire produces some of the world’s finest. Forced rhubarb is less bitter than the traditional, non-forced stalks and needs less sugar to balance the tartness. Pretty in pink and less astringent – perfect!
Rhubarb and apple crumble
Serves 4 – 6
Ingredients for the fruit filling
500g rhubarb, washed and sliced into 1/2 cm pieces
2 apples, cored and thinly sliced
zest of 1 orange
juice of 2 oranges
40g dark muscovado sugar
1 cinnamon stick, broken into 2 or 3 pieces
Ingredients for the topping
85g cold unsalted butter (preferably organic) or ice cold coconut oil, cut into little cubes
50g mixed nuts, roughly chopped (I used a combination of almonds, pecans and walnuts)
30g demerara sugar
70g muesli base (mine is a mix of oat, rye and quinoa flakes, but you can use any combination)
70g wholemeal rye flour (or use wholemeal spelt or you favourite gluten-free mix)
1 teaspoon ground cinnamon
pinch of salt
Method
- Preheat the oven to 180°C (370°F).
- Mix all the ingredients for the filling in a large bowl, then transfer to a medium ovenproof dish and cover with a lid or foil. Bake for 45 minutes (or until the fruit is tender when tested with a sharp knife), stirring carefully half-way through the cooking time.
- In the meantime, place all the topping ingredients apart from the butter in a bowl and mix well. Now add the butter (or coconut oil) and quickly rub into the dry ingredients until it comes together and you are able to form large clumps. Spread the clumps out on a baking sheet and place in the oven with the fruit. The crumble topping should be ready after about 30 minutes, but use a spatula to turn the pieces over gently half way.
- To serve, divide the fruit amongst 4 – 6 bowls, spoon over the delicious juices, scatter the crumble over the fruit and serve with vanilla-sweetened whipped cream or vanilla ice cream of your choice.
Note: If you use coconut oil and gluten-free flour, your crumble will be a much finer texture, but still crunchy and delicious.
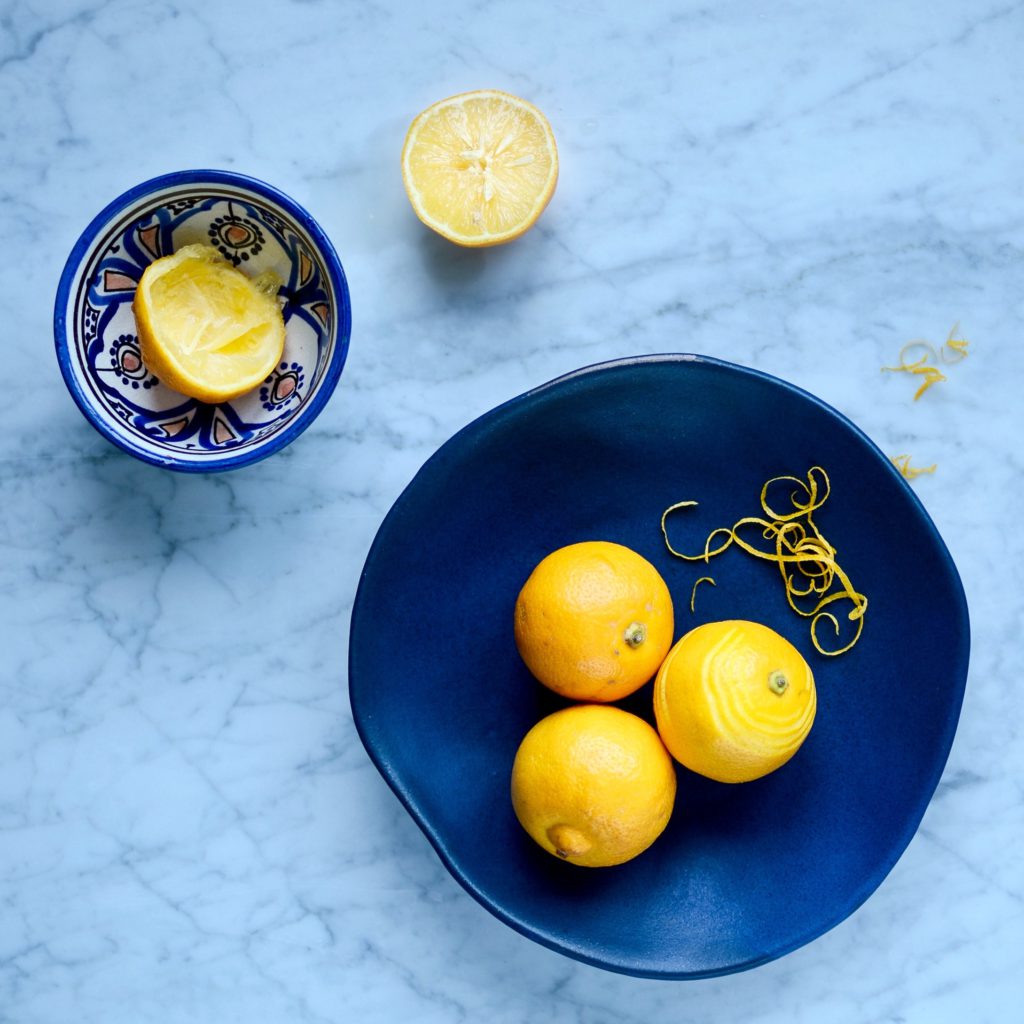
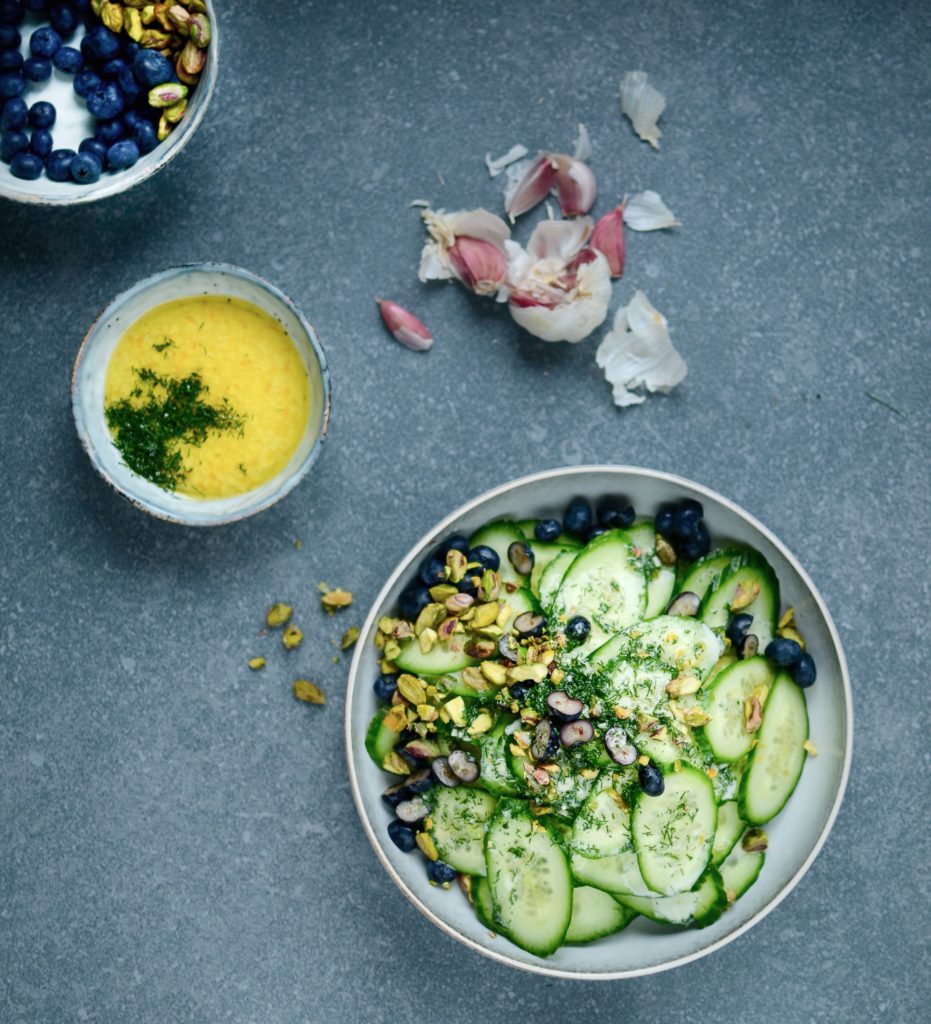
Bergamot and cucumber salad
I only recently discovered my love for Earl Grey tea. Not the regular kind, mind you. It was the combination of Redbush tea from my homeland with the intoxicating aroma from the Bergamot oil that swayed me. The Bergamot orange (sometimes mistakenly referred to as a lemon) was created more than 300 years ago in Southern Italy when a sour orange was crossed with a citron/lemon/lime/Palestine sweet lime. No one is quite sure. The oil is extracted from the rind and used in Earl Grey teas, as well as fragrances, aromatherapy and to flavour dishes. Here I’ve put them to good use in a refreshing salad dressing with cucumber and blueberries. But the options really are endless…
Bergamot lemon cucumber salad
If you cannot find Bergamot oranges (in season from December to February) try a combination of lemon, grapefruit and orange or tangerine, although the distinctive floral, slightly bitter flavour is difficult to replicate.
Serves 4 – 6
Ingredients for the salad
2 English cucumbers, peeled if not organic
1 punnet blueberries (about 125g), washed and halved if you prefer
a large handful of pistachio nuts, roughly chopped
Ingredients for the dressing
zest of 2 Bergamot oranges
juice of 1 Bergamot orange
80ml thick Greek yoghurt (or coconut yoghurt)
45ml (3 tablespoons) extra virgin olive oil
1 garlic clove, crushed
large pinch of unrefined rock or sea salt
1 – 2 teaspoons raw honey (or maple syrup), or to taste
small bunch of dill, leaves only, finely chopped
Method
- Thinly slice the cucumber on the diagonal and gently toss with a pinch of unrefined salt. Place the cucumber slices in a colander over a bowl or in the sink and allow to drain for at least half an hour.
- Put all the ingredients for the dressing in a jar, screw on the lid and give it a good shake until the honey is dissolved.
- Add the rest of the salad ingredients, toss with the dressing and serve immediately.
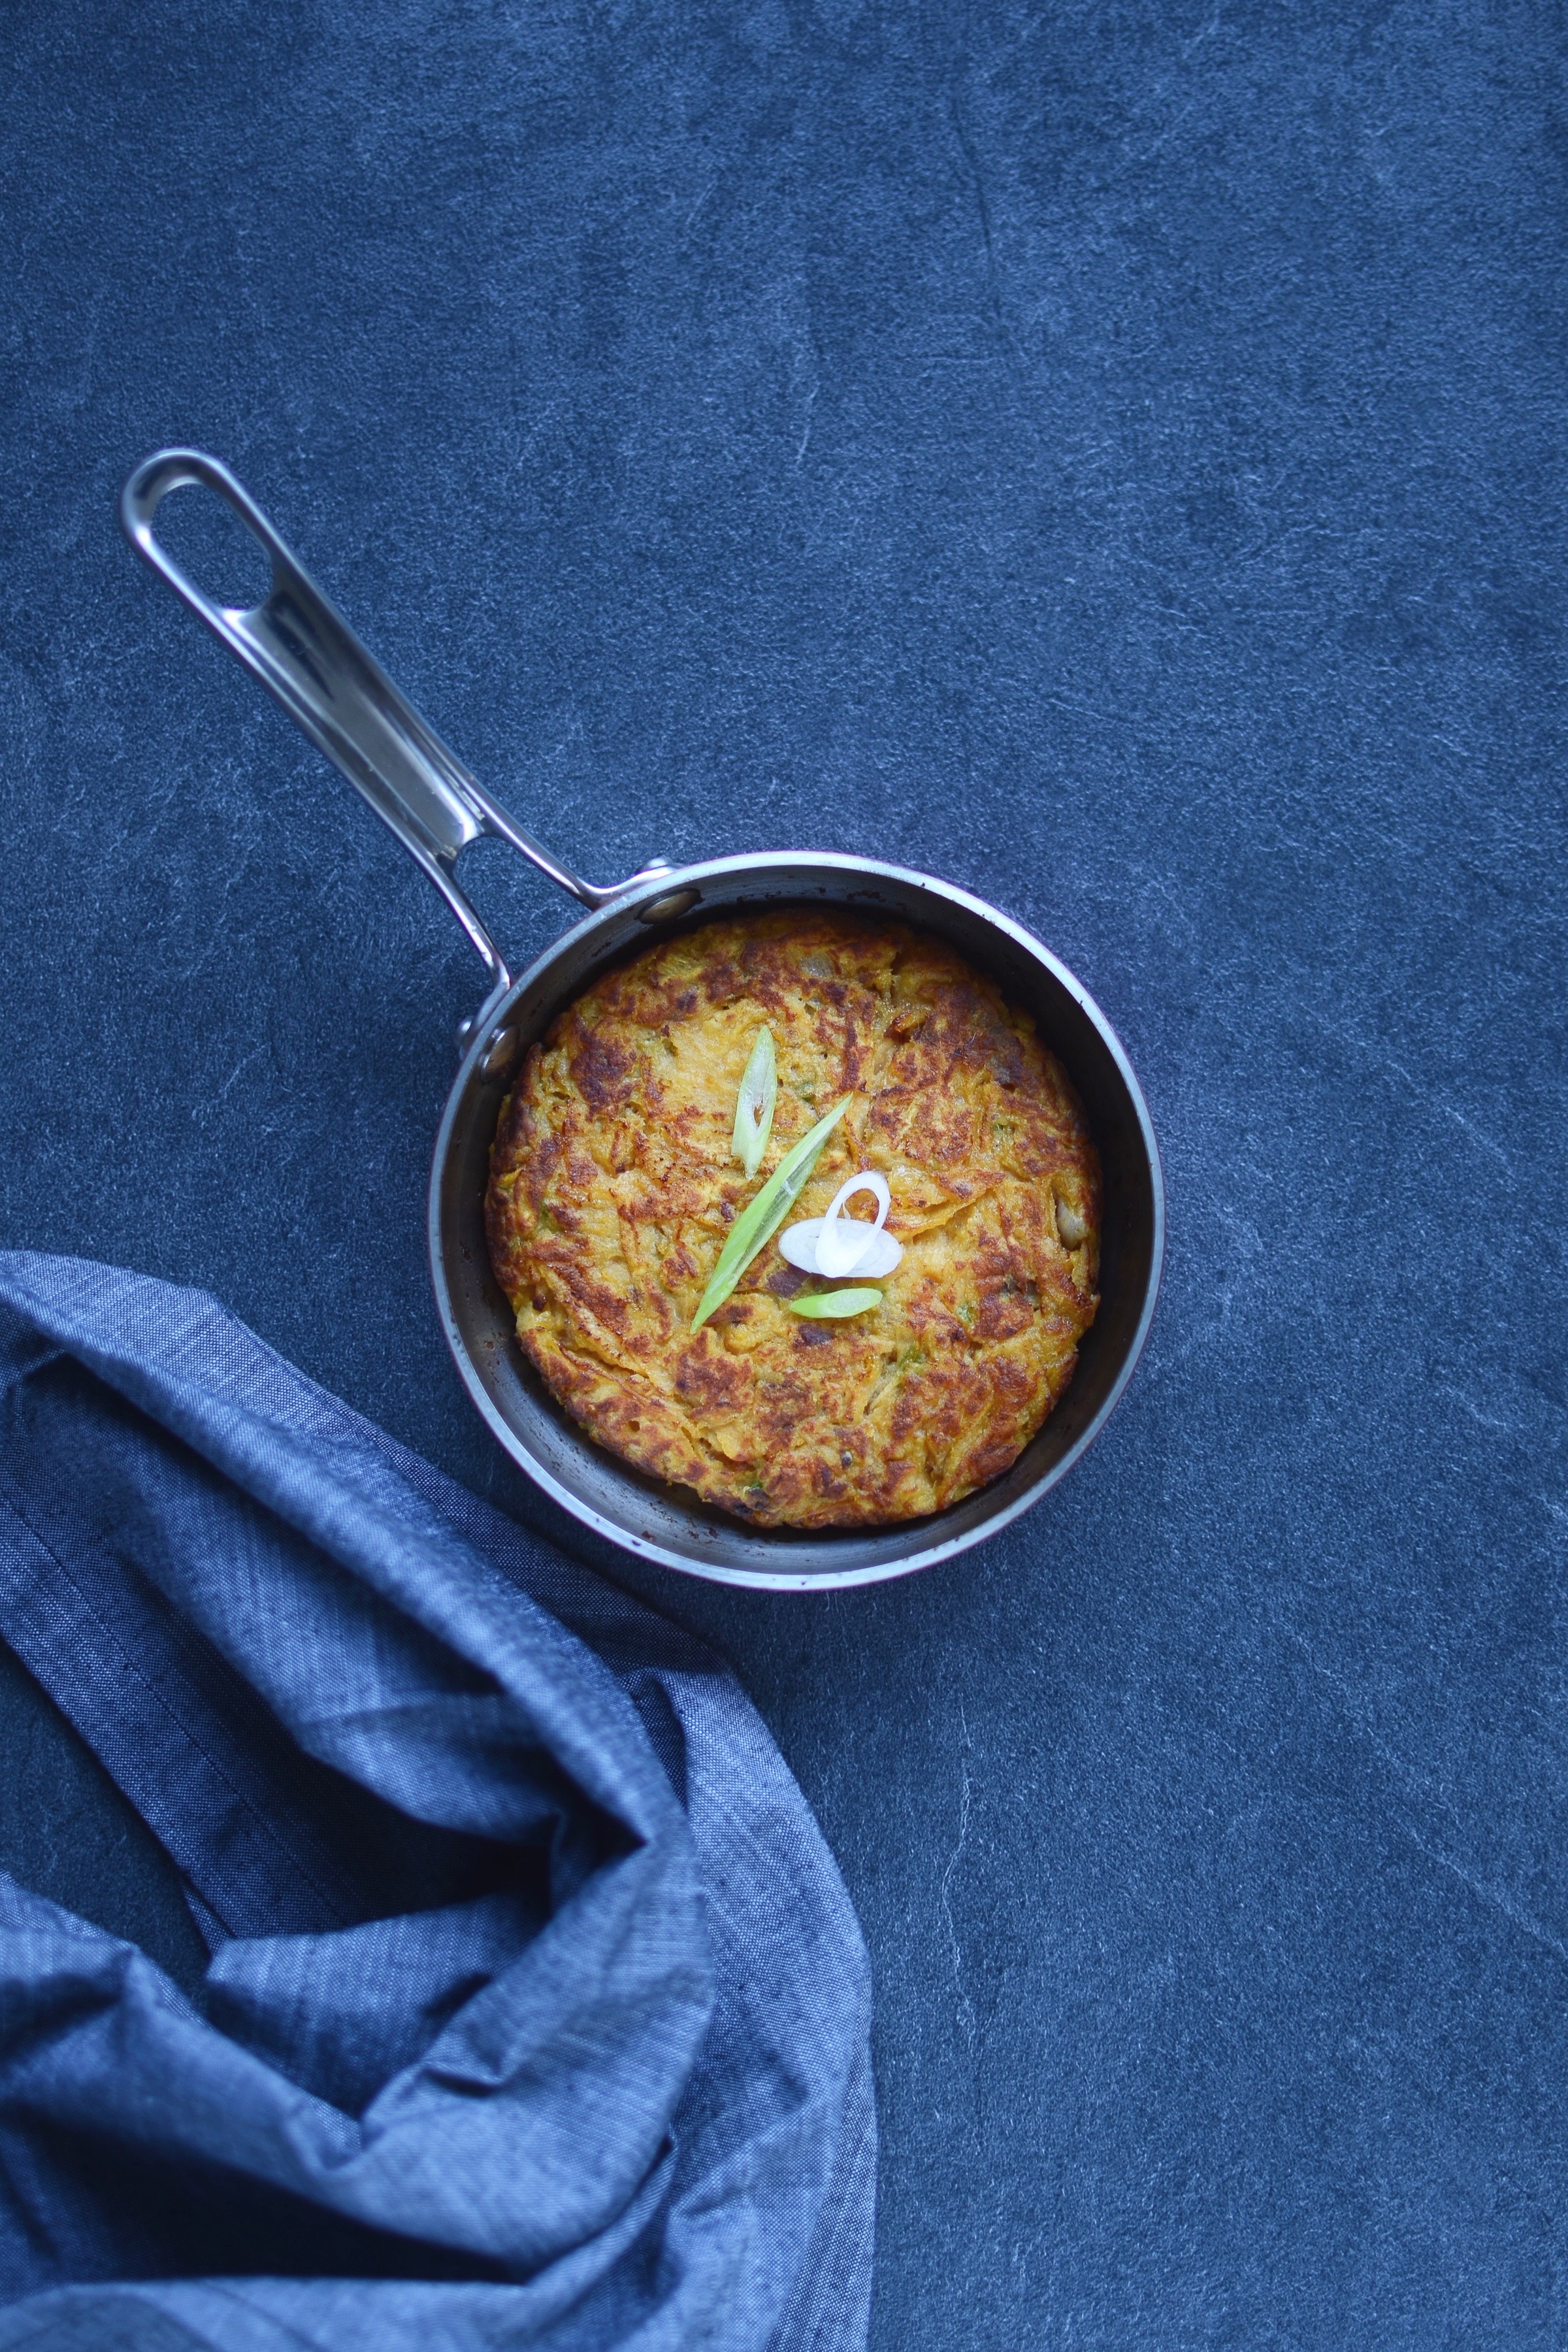
Sweet potato rösti with Caesar kale
My biggest gripe with classifying something as an of-the-moment superfood, is that it inevitably leads to that food going “out of fashion” at some stage. It is such a shame, as many so-called superfoods really are fantastic, nutrient-dense foods that have a lot to offer. It was kale this and kale that for quite some time, but this wonderful veg seems to have fallen out of favour. Don’t be a fashion victim! Add this brunch dish, that I developed for the M&S Super Brunch Campaign, to your Boxing Day brunch, and rediscover an old favourite.
The Caesar-style dressing is delicious with the astringent greens and complemented by the sweet potato pancakes. I used the tiny copper pan from the new M&S chef range to make perfectly shaped individual portions.


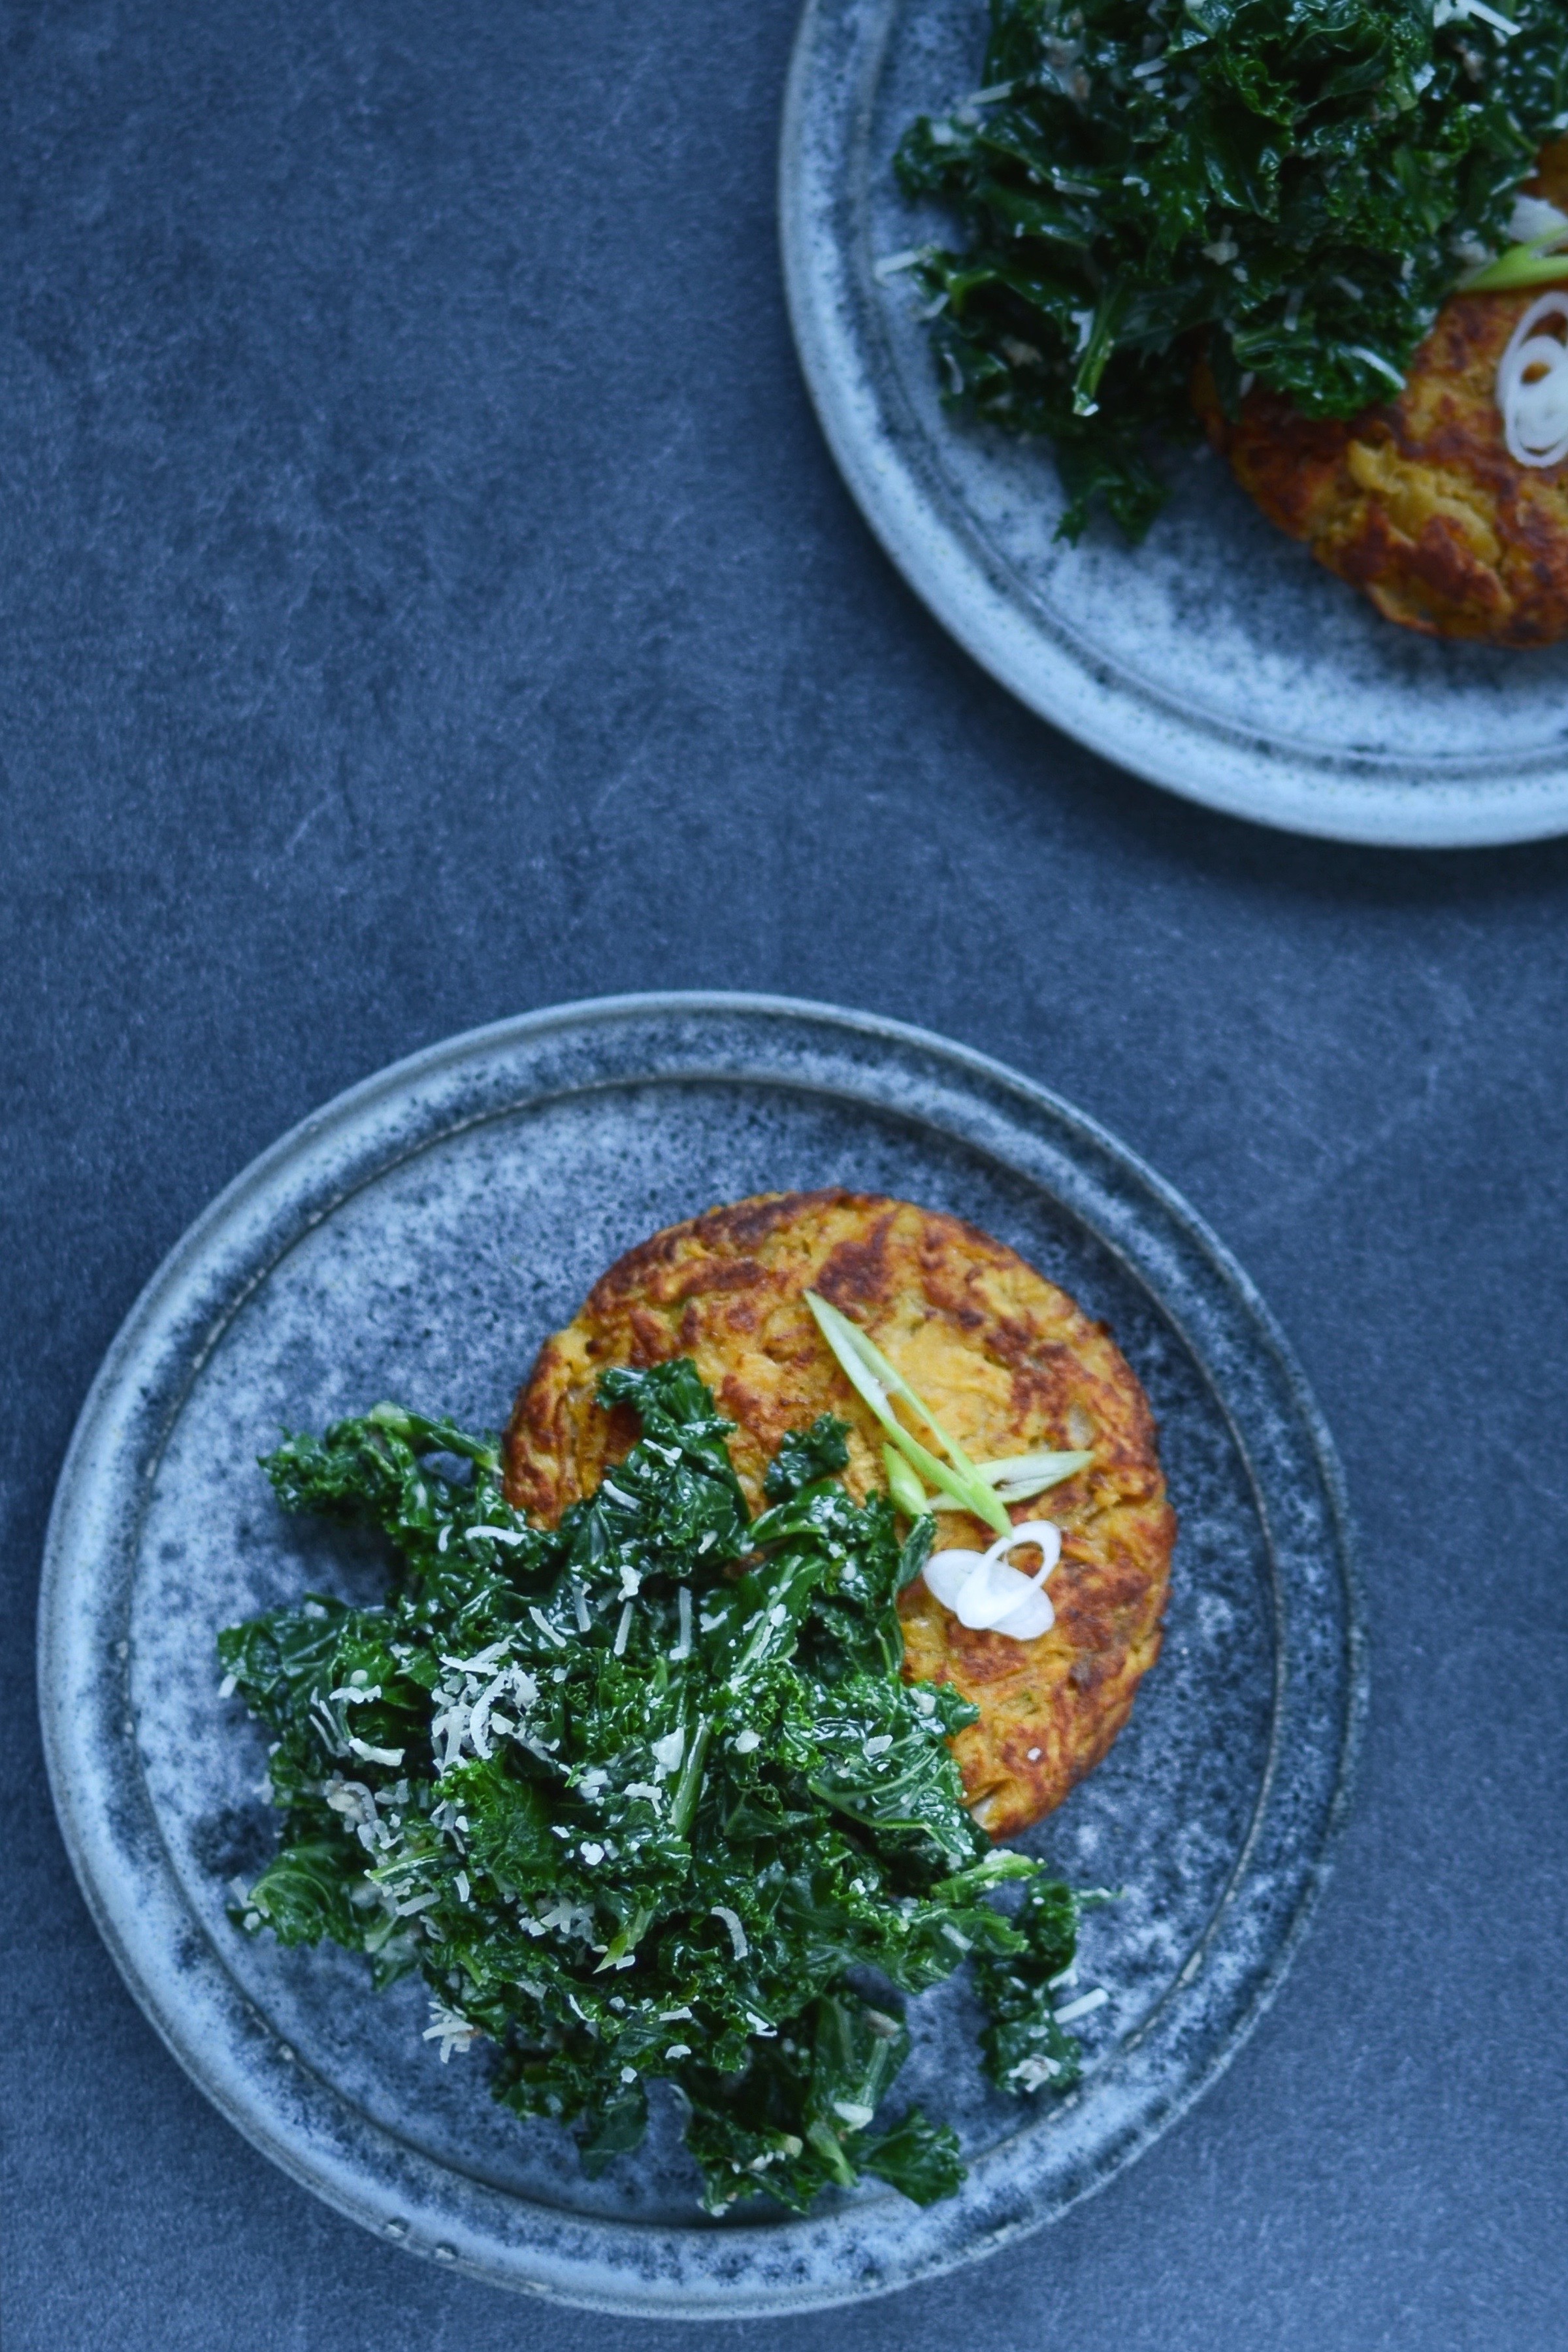
This is a fantastic meal, be it for breakfast, brunch or a light supper. Like most things in life, it tastes even better with an egg on top.
Serves 4 – 6
Ingredients for the rösti
4 medium (about 800g) sweet potatoes, peeled
2 spring onions, finely sliced
2 medium eggs, lightly whisked
40g (about 1/4 cup) wholemeal spelt flour or flour of your choice (I use a gluten-free mix)
butter or ghee for frying
Ingredients for the kale
5 anchovy fillets packed in oil, drained and chopped
1 small garlic clove, peeled and chopped
small pinch of coarse salt
60ml (1/4 cup) mayonnaise, preferably home-made
15ml (1 tablespoon) freshly squeezed lemon juice
15g (1/4 cup loosely packed) finely grated Parmesan
Freshly ground black pepper
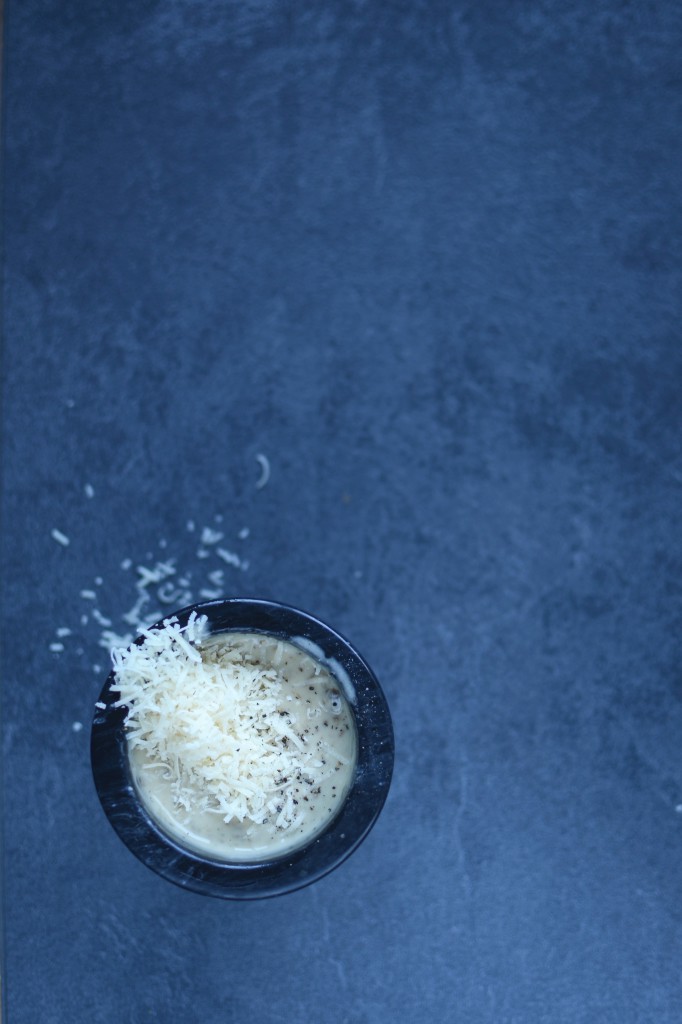
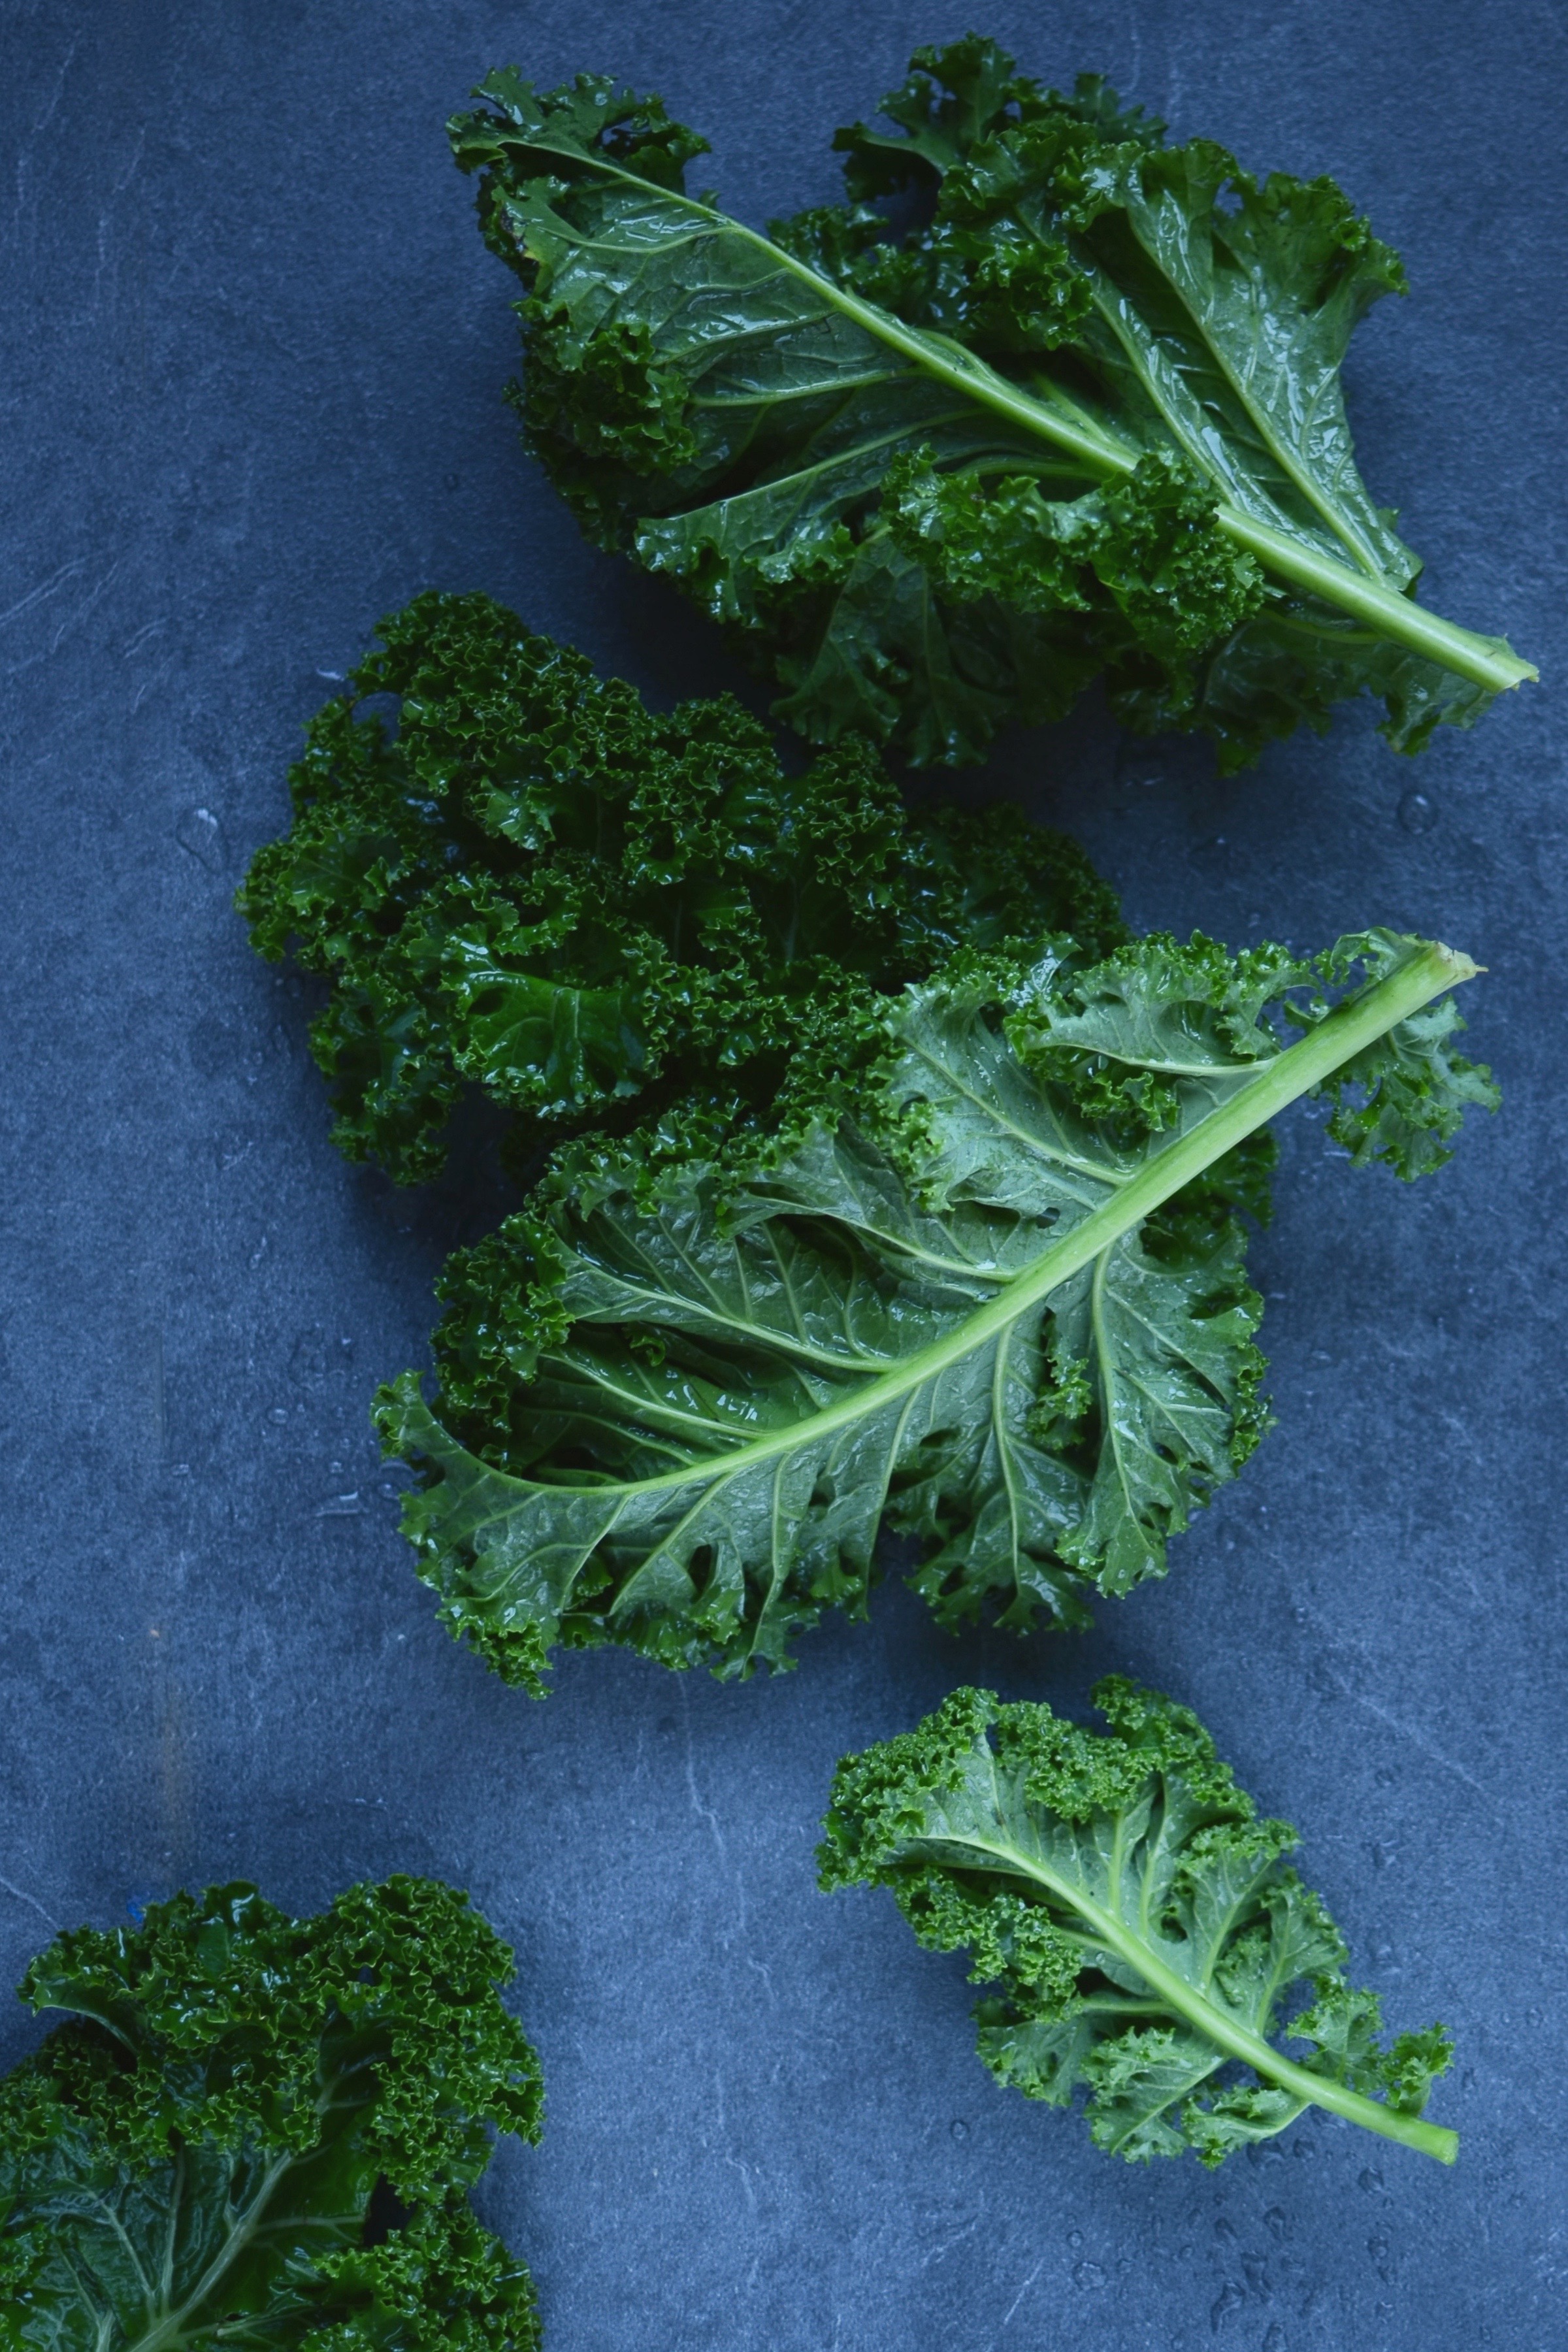
300g kale, thick stalks discarded and torn or chopped into bite-sized pieces
Method
- For the kale: make the dressing, by placing the anchovies, garlic and salt in a mortar and pounding them together until you have a paste.
- Stir in the mayonnaise, lemon juice, Parmesan and pepper, and set aside.
- For the rösti: boil two of the sweet potatoes in a little water until they are just tender around the outside (do not let them get too soft!). Remove from the pot and allow to cool.
- In the meantime, coarsely grate the other two sweet potatoes and mix with the spring onions, eggs and flour.
- Finally, coarsely grate the slightly softened sweet potatoes and carefully combine with the rest of the ingredients.
- Heat a little butter or ghee (or coconut oil) in a frying pan until hot (but not smoking), then add enough batter to make a patty shape. Press down on the batter to ensure it is compact and will hold together.
- Fry for roughly 5 minutes on each side, or until golden and crispy. Carefully remove with a spatula and keep warm while frying the rest.
- Whilst your final rösti is frying, gently wilt the kale in a little water over a medium heat. As soon as it is tender, drain, return to the pan and stir through the dressing.
- Serve the dressed kale on top of the rösti with or without eggs.
*This blog post was written in collaboration with M&S. All content and photos my own.
Turmeric poached pears with macadamia nut cream
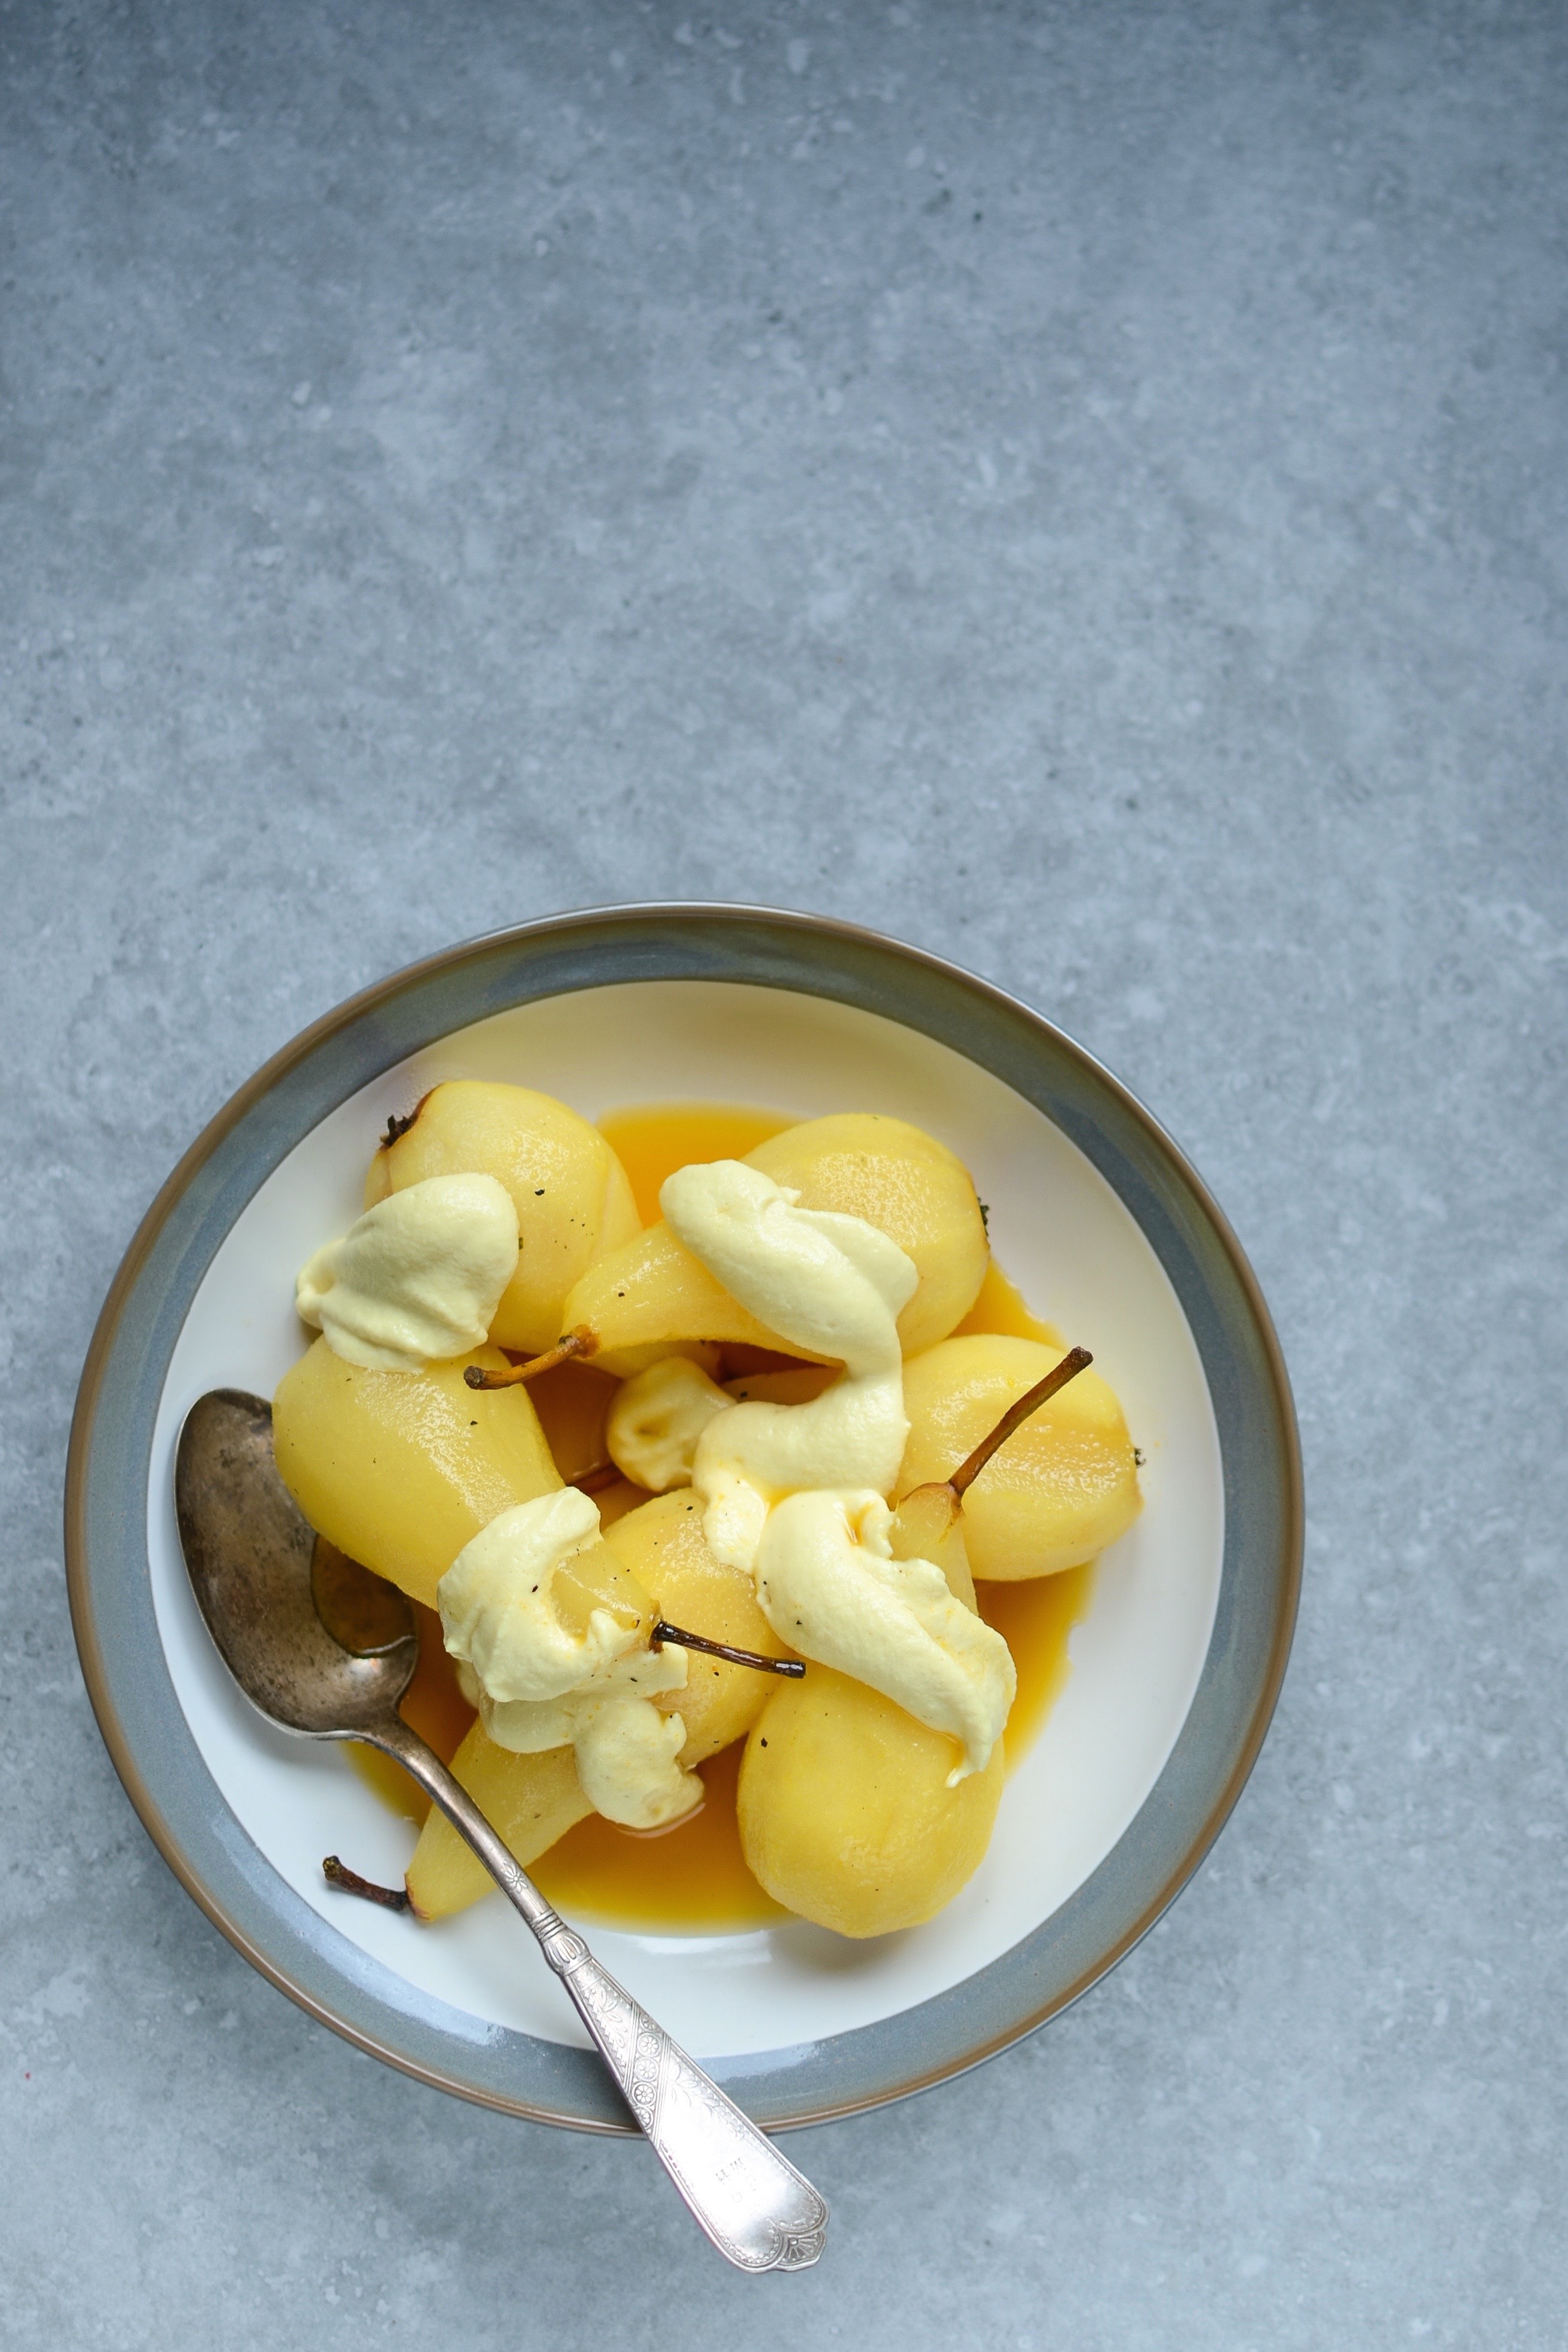
I love brunches so much, that I centre most of my social engagements around them (click here and here for some easy recipe ideas). Not too early, with an array of delectable foods to choose from, most often vegetable-heavy, and no rush to leave, it is by far my favourite kind of meal. I especially like being creative and pushing boundaries when it comes to menu ideas, so I really enjoyed collaborating with M&S on their Super Brunch campaign using their new Chef range cookware. The products are well-designed, solid and beautiful to look at, and being part of a brunch initiative has me smiling from ear to ear. These pears would make a great addition to any brunch spread, but would also be a spectacular dessert, perhaps with a few candied macadamia nuts scattered over the top.
A lot has been written about curcumin, an active compound in turmeric believed to have many health benefits since they are powerful antioxidant, anti-inflammatory, antiseptic, anti-fungal and anti-bacterial agents. But interestingly enough, turmeric is not that easy for our bodies to assimilate, as most of it is metabolised by the liver before being absorbed. Studies have now shown that eaten with even just a tiny amount of black pepper, absorption of the curcumin is a lot higher, because the chemical compound “piperine” in the pepper inhibits this metabolisation. Bioavailability of curcumin is also higher when eaten with a fat, as it can then be directly absorbed into the bloodstream through the lymphatic system thereby in part bypassing the liver.
Turmeric poached pears with macadamia nut cream
Serves 6
Ingredients for the pears
6 – 7 ripe but firm pears
5cm (2”) piece of fresh turmeric, scrubbed cleaned (or peeled if not organic) and thinly sliced
thumb-sized piece of ginger, scrubbed cleaned (or peeled if not organic) and thinly sliced
a few gratings of coarse freshly ground black pepper
500 – 600ml dry white wine
40ml (2 1/2 tablespoons) maple syrup
Ingredients for the macadamia nut cream
140g (1 cup) macadamia nuts, soaked in filtered water for 2 – 4 hours
80ml (1/3 cup) reduced poaching liquid
unrefined salt
Method
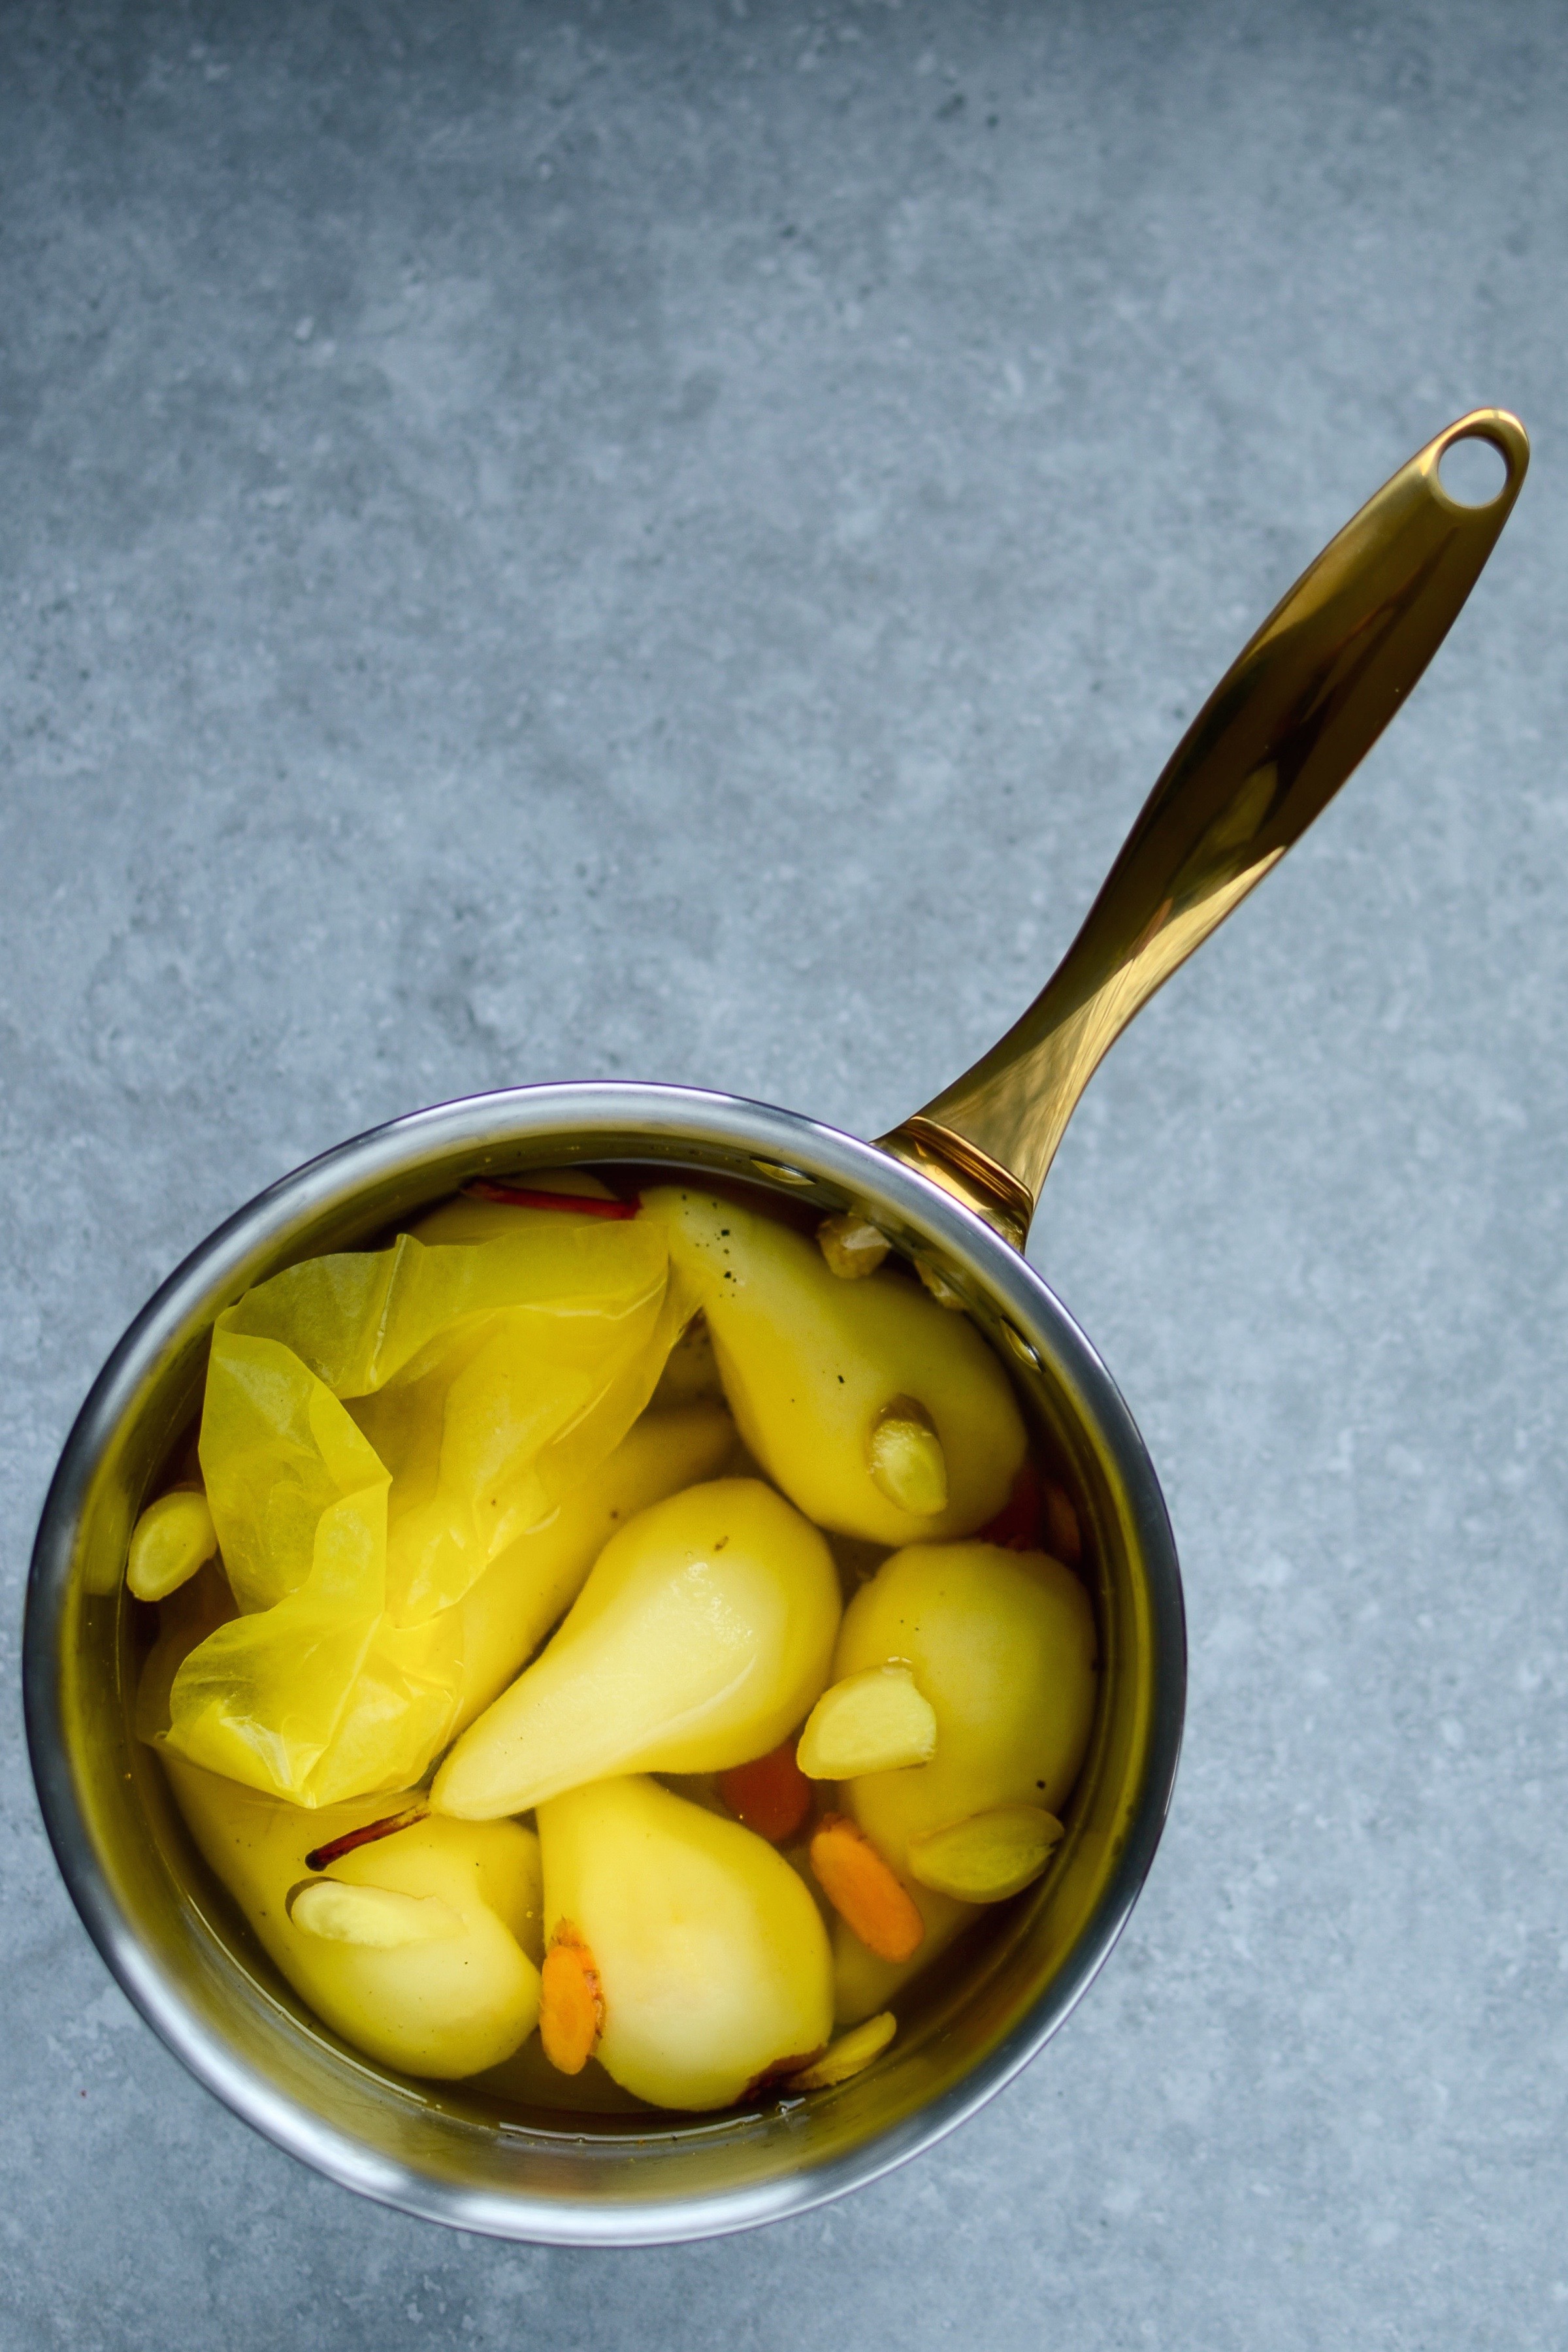
- Peel the pears, taking care to leave the stalk in tact. Place the pears, turmeric, ginger, black pepper and white wine into a medium, deep saucepan like this one I was recently sent by M&S, and set over medium heat.
- Cut a circle out of greaseproof parchment paper just large enough to fit into the saucepan and lay over the pears in the wine (this is called a cartouche and prevents the liquid from evaporating too quickly whilst the fruit is poaching).
- As soon as you see tiny bubbles form under your cartouche, turn the heat down very low and allow the pears to poach for 15 minutes. Test with a sharp paring knife – the pears should be tender, but not too soft.
- Remove the pears carefully with a slotted spoon and set aside.
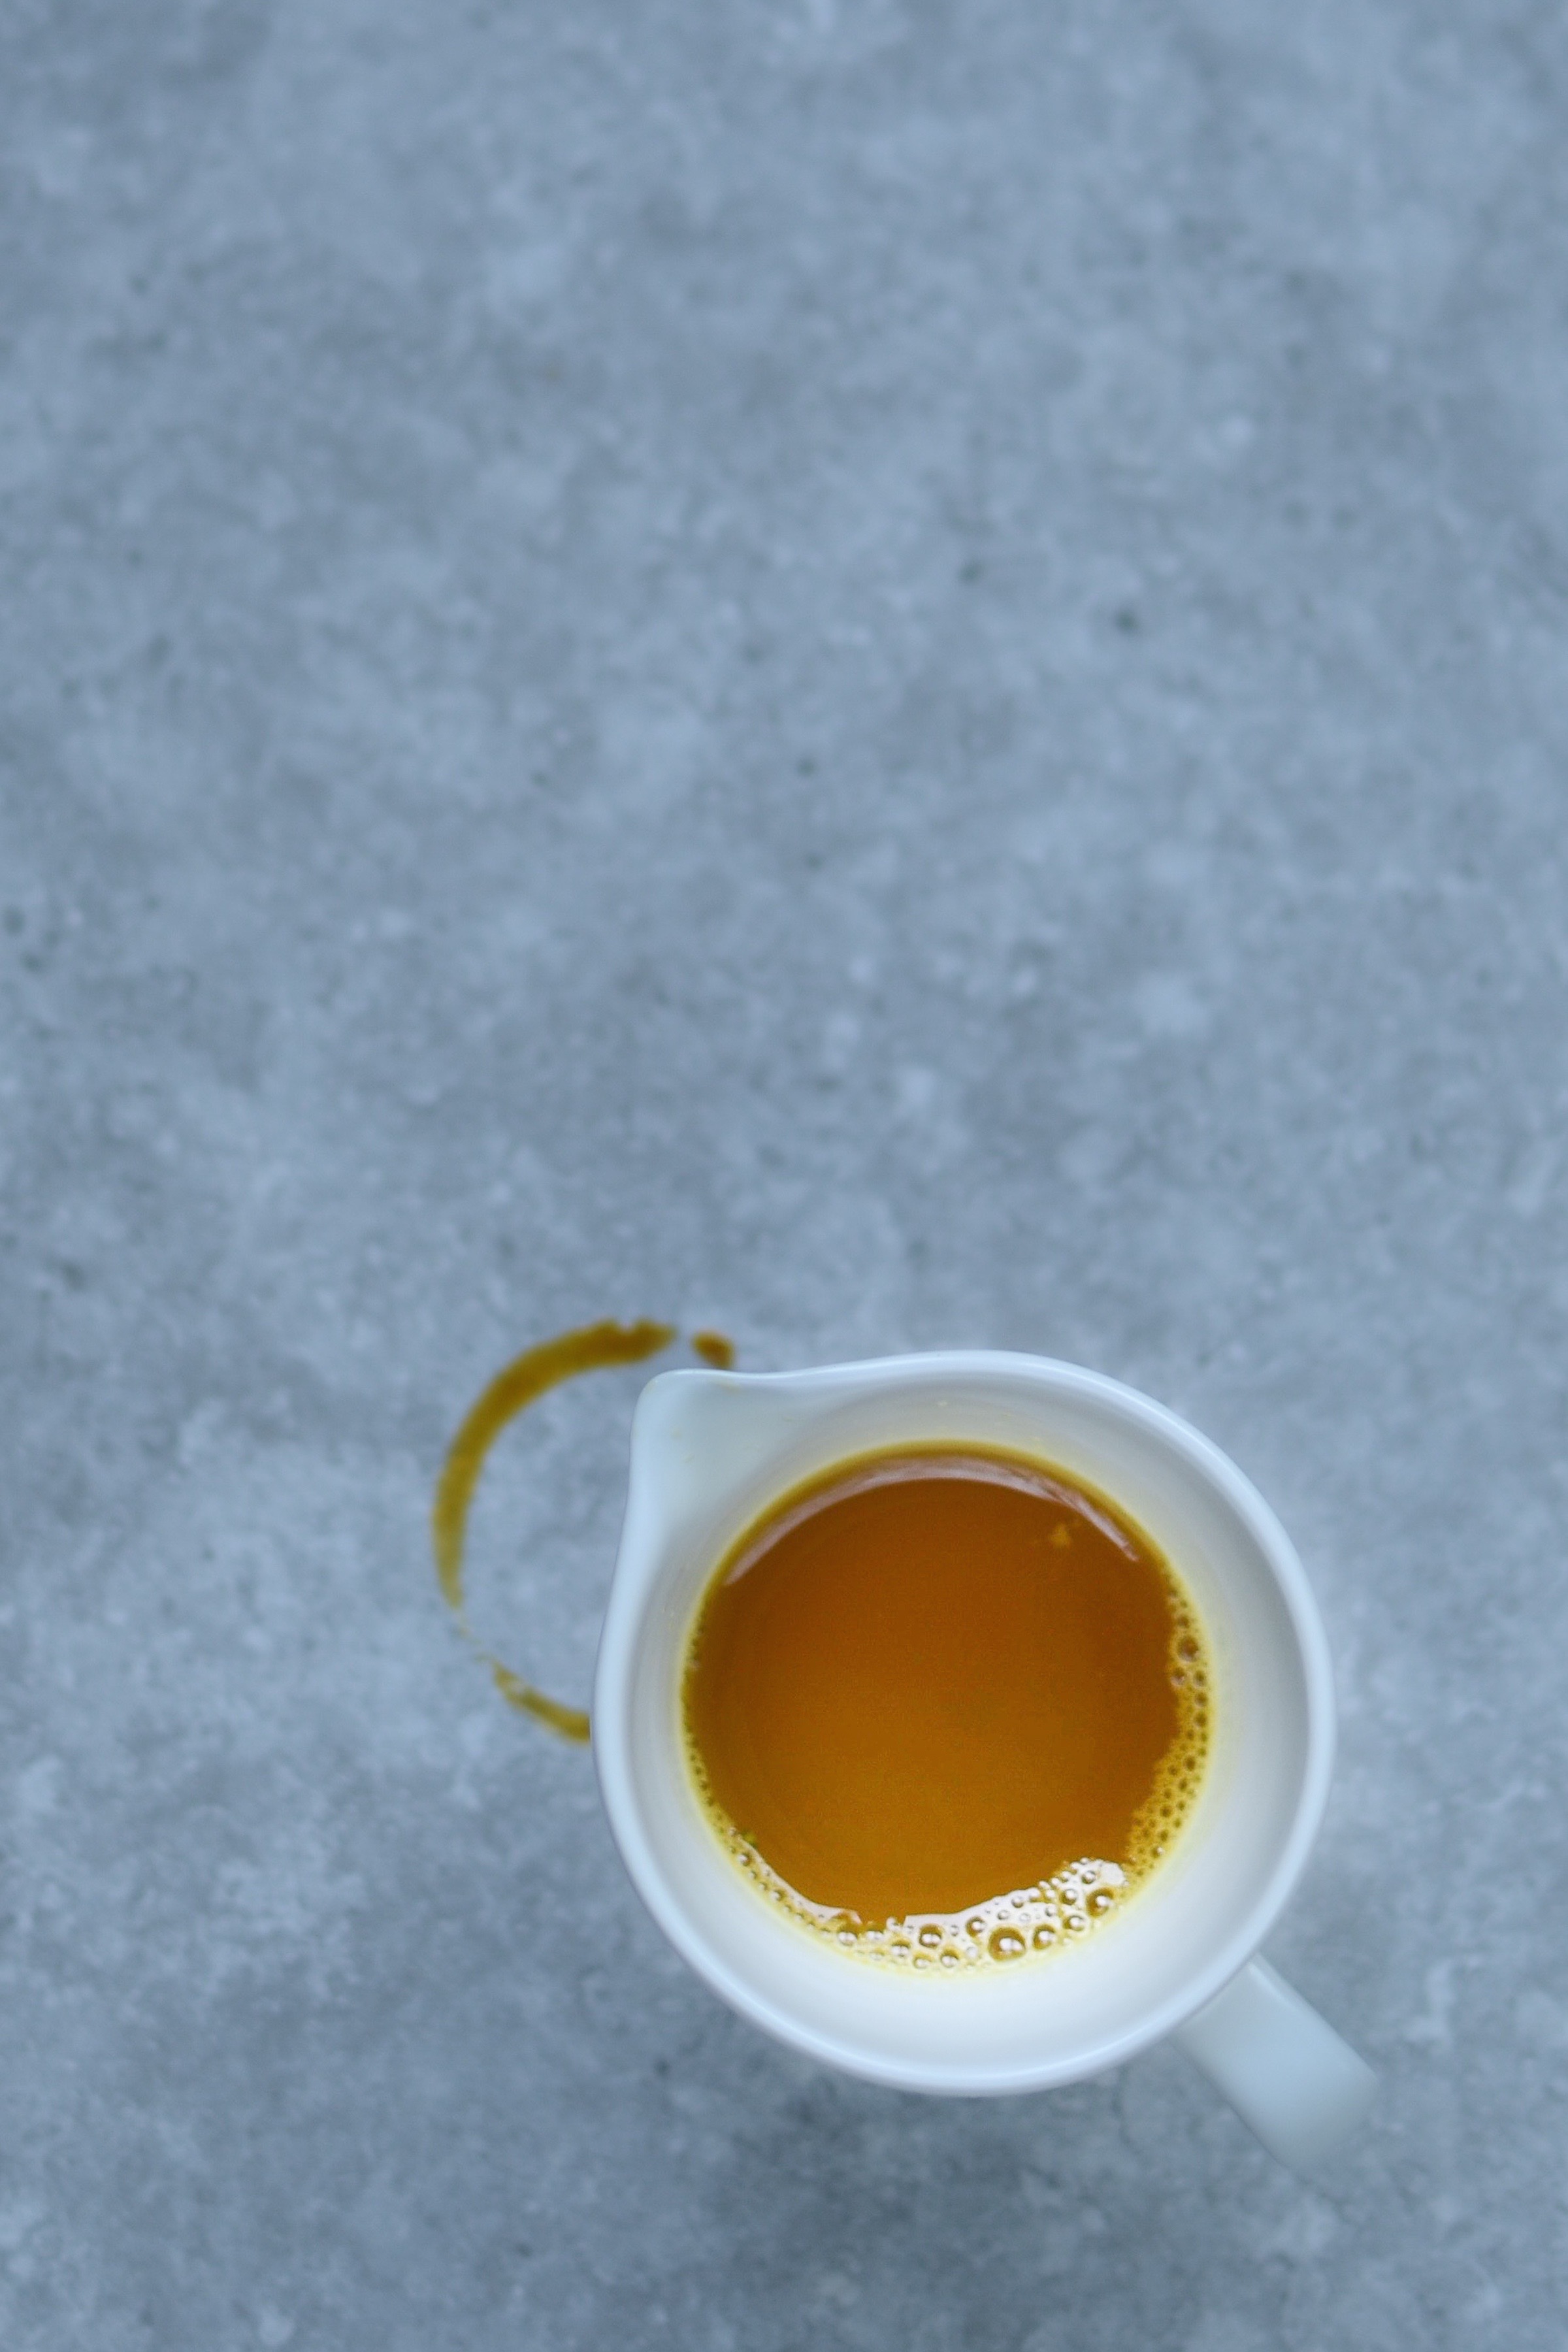
- Turn the heat up high and boil the wine with the flavourings until it has reduced by about two thirds to three quarters. You will need about 160ml (2/3 cup) of reduced liquid.
- Now add the maple syrup, whisk and set aside to cool slightly.
- To make the macadamia nut cream, rinse the soaked nuts and place in a blender with roughly half (about 80ml) of the reduced poaching liquid and a small pinch of salt. Blend until the cream is very smooth – if you do not own a high speed blender, you might have to keep going a bit longer.
- Serve the pears with the cream and remaining poaching liquid.
*This blog post was written in collaboration with M&S. All content and photos my own.